On October 10, 2024, Amazon announced the discontinuation of the Amazon Lookout for Vision service, with a scheduled shut down date of October 31, 2025 (see Exploring alternatives and seamlessly migrating data from Amazon Lookout for Vision blog post). As part of our transition guidance for customers, we recommend the use of Amazon SageMaker AI tools to build applications for customers who are interested in AI/ML computer vision models for automated quality inspection use cases. To support that effort, AWS has made a pre-trained computer vision defect detection model available on AWS Marketplace that can be fine-tuned using Amazon SageMaker AI for a customer’s specific use case. If run in the cloud, this model only requires paying for infrastructure costs for training or inference. This approach provides the tools to accelerate solution development while facilitating complete flexibility to build a solution that integrates with any existing hardware and software infrastructure.
In this blog post, you will learn how to migrate your computer vision workloads from Amazon Lookout for Vision to Amazon SageMaker AI by following our step-by-step guidance.
AWS is sharing the main underlying models used for the service to end users in the AWS Marketplace. You can use the two main types of models, binary classification and semantic segmentation, when you train in your own AWS accounts for deployment on AWS or at the edge.
This model helps customers continue to use AWS defect detection technology at their own pace with greater flexibility. For example, you can train your models with larger instance types for faster training times. With access to set hyperparameters, you can also adjust model behavior that was not previously available on the AWS console. For example, you can set the multi-head model for semantic segmentation to disable the binary classifier head. This can make the model mode more tolerant of changing background and lighting conditions. You can also personalize the maximum training time, which was set to a non-changeable 24-hour limit on Amazon Lookout for Vision (L4V).
The GitHub repository for Amazon Lookout for Vision has been updated with a Jupyter Notebook to help you train datasets with these two model types and package them up. From there you can deploy the models by using a SageMaker endpoint, or edge devices.
To label the images beyond the sample data, you can use Amazon SageMaker Ground Truth to enable crowdsourcing or allow private teams to label the data, or use a partner solution such as Edge Impulse, Roboflow, or SuperbAI to do so. When you have the manifest file of the labeled data, the marketplace models can be used for training. You will lose a thumbnail-based dataset management tool like the Amazon Lookout for Vision console, so consider one of the previously mentioned partner solutions to help manage datasets. You can also export your existing data from the Lookout For Vision service using this guide.
Prerequisites
Before you begin, make sure you have the following components and permissions in place:
- Amazon SageMaker Studio or Amazon SageMaker Unified Studio for integrated development environment (IDE)
- AWS Identity and Access Management (IAM) role with these permissions to follow the principle of least privilege
- Amazon S3
- s3:GetObject
- s3:PutObject
- s3:DeleteObject
- s3:ListBucket
- SageMaker
- sagemaker:CreateTrainingJob
- sagemaker:CreateModel
- sagemaker:CreateEndpoint
- sagemaker:CreateEndpointConfig
- sagemaker:CreateTransformJob
- sagemaker:DescribeTrainingJob
- sagemaker:DescribeModel
- sagemaker:DescribeEndpoint
- sagemaker:DescribeEndpointConfig
- sagemaker:DescribeTransformJob
- sagemaker:InvokeEndpoint
- sagemaker:DeleteEndpoint
- sagemaker:DeleteEndpointConfig
- sagemaker:DeleteModel
- Amazon S3
- Model subscription:
- An AWS account with a subscription to Computer Vision Defect Detection Model or
- An IAM role with these three permissions permission to make AWS Marketplace subscriptions in the AWS account you use:
- aws-marketplace:ViewSubscriptions
- aws-marketplace:Unsubscribe
- aws-marketplace:Subscribe
- Labeled data (you can use the cookie data sample in Github) or label your own data with SageMaker Ground Truth or an AWS Partner tool
- Basic knowledge of creating a SageMaker notebook instance and running Jupyter notebook
Architecture overview
The following diagram illustrates the end-to-end flow, from image acquisition to inferencing at the edge. This blog focus on steps 2 and 3.

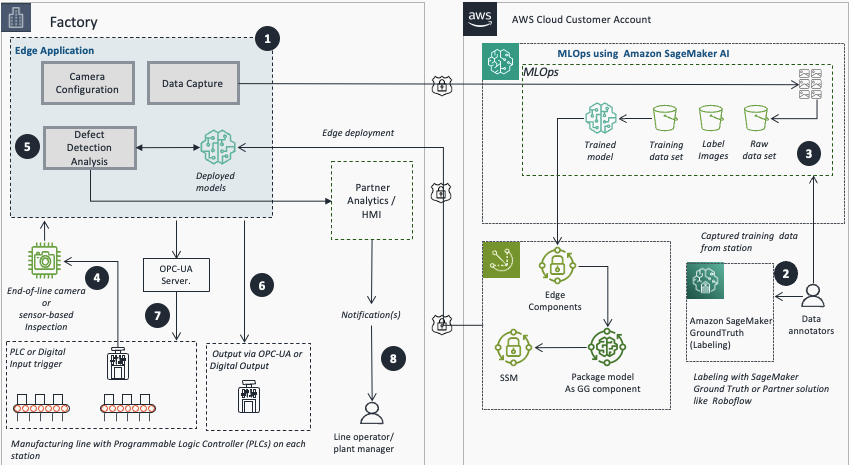
- Use an edge application to configure cameras or sensors and capture training images.
- Use SageMaker GroundTruth or AWS Partner platforms to export and label images.
- Use Amazon SageMaker AI for model training.
- Use REST, PLC, or digital input for image acquisition and processing.
- Run real-time inference using the trained and deployed model.
- Publish inference results to analytics and monitoring for alerts and analytics.
- Perform automated action on the machine of concern or notify plant personnel of anomalies from inspection station component using OPC-UA or digital output.
- Line operators and plant managers receive notifications for action.
Set up the labeling process
This section covers the steps to set up the labeling process using Amazon SageMaker Ground Truth, including creating a private labeling team and configuring the labeling job.
- Configure Amazon SageMaker Ground Truth private team:
- Select Amazon SageMaker AI, Ground Truth, Labeling workforces.
- Select Private, then Create Private Team.
- Enter a team name.
- Leave other values as their defaults.
- Select Create a new Amazon Cognito user group.
- Select Create private Team.
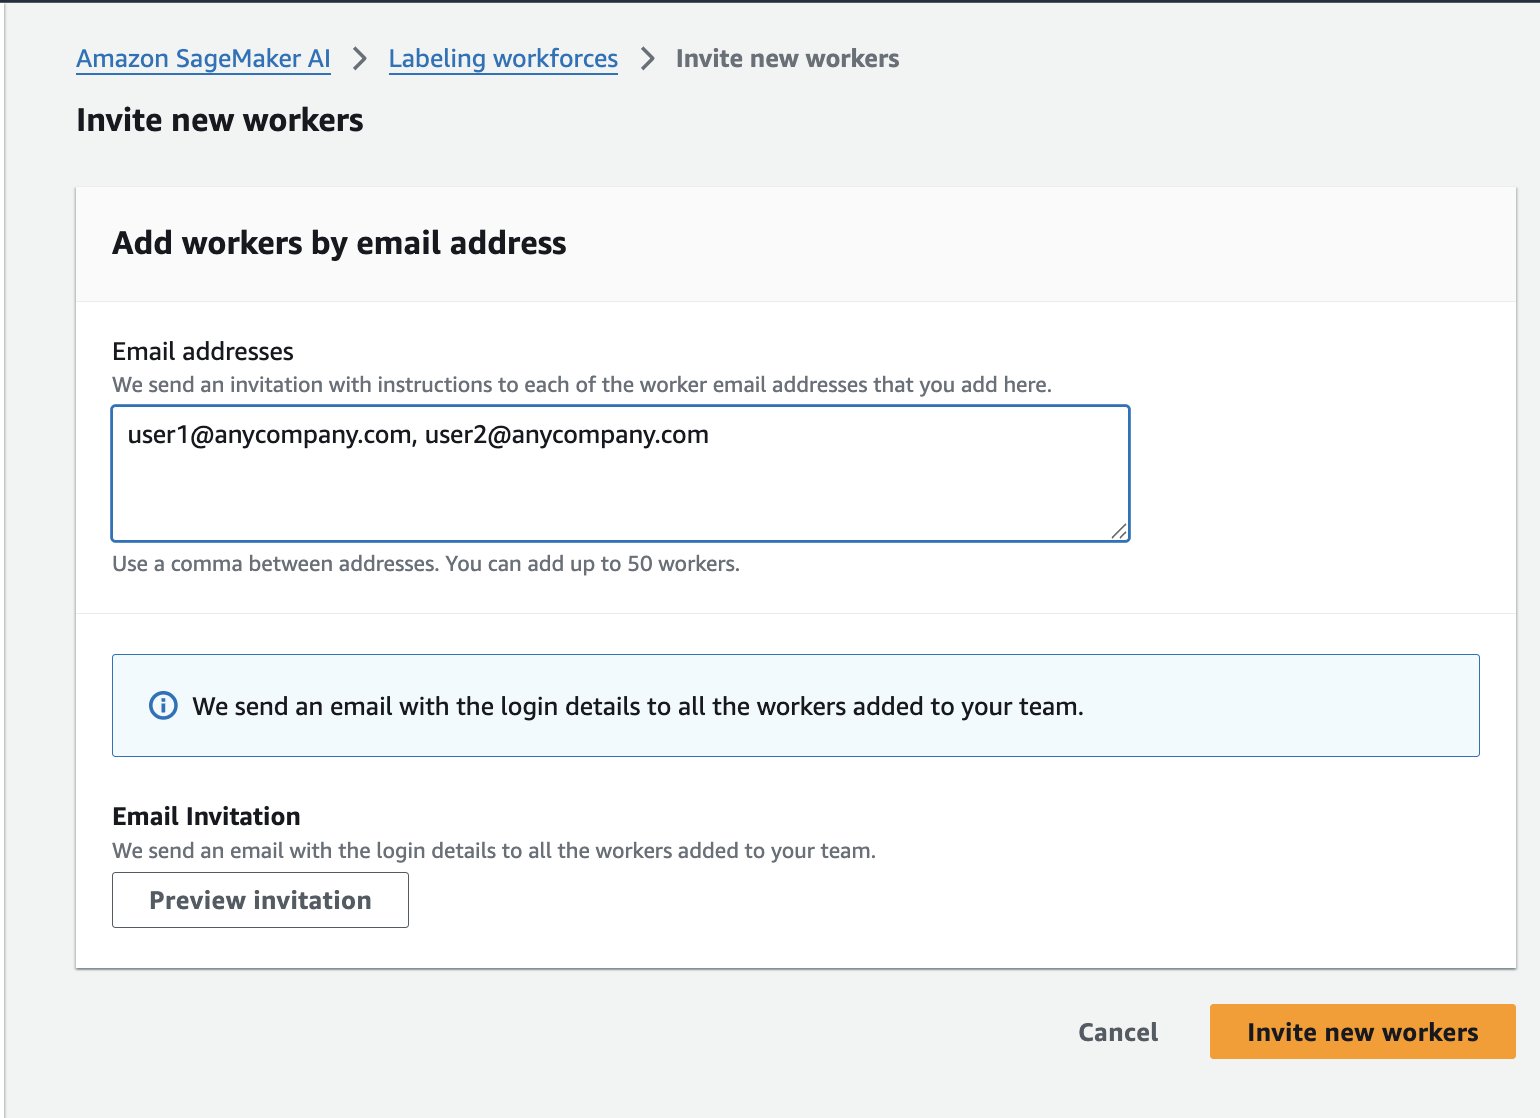
- On the Workers tab, select Invite New Workers.
- Enter your team members’ email addresses to send sign-up invitations.
Label the dataset
After successfully completing the workforce setup for labelling, the next step is to label the dataset. This section explains how to prepare the dataset by uploading the images to an Amazon Simple Storage Service (Amazon S3) bucket, then create and run the SageMaker Ground Truth labeling job to label the images as normal or anomaly.
- Upload the image datasets to an Amazon S3 bucket that SageMaker Ground Truth can access. If you don’t have a dataset, you can use either the cookie-dataset or aliens-dataset.
- Copy all of the images from “normal” and “anomaly” folders into a single directory for SMGT to access or you will get an error message on the next step.
- To use AWS CloudShell, run the following script:
- Alternatively, if you have the AWS CLI installed, you can copy them with the following commands (See setting up AWS CLI for how to do this):
Note: To prevent filename clash from the two folders, a suffix anomaly was added. The uploaded files should be in your <BUCKET_NAME>/aliens-dataset-all bucket for the Ground Truth job.
- In the AWS Console, navigate to Amazon SageMaker AI, Ground Truth, Labeling Jobs, Create labeling job.

- There are several options here to fill in; the most important fields to fill or select are:
- Input data setup: Select Automated data setup
- S3 location for input datasets: <Full path where your dataset exists>
- S3 location data output datasets: <Same location as input dataset>
- Data type: Select Image
- IAM Role – Select Create new role if you do not have one set up to allow Ground Truth to interact with SageMaker services.
- Choose Complete data setup. An Input data connection successful message displays. If you get an error, check your IAM role to make sure S3 access is enabled, and the directory has image files in it, as it will not recurse through sub-directories.

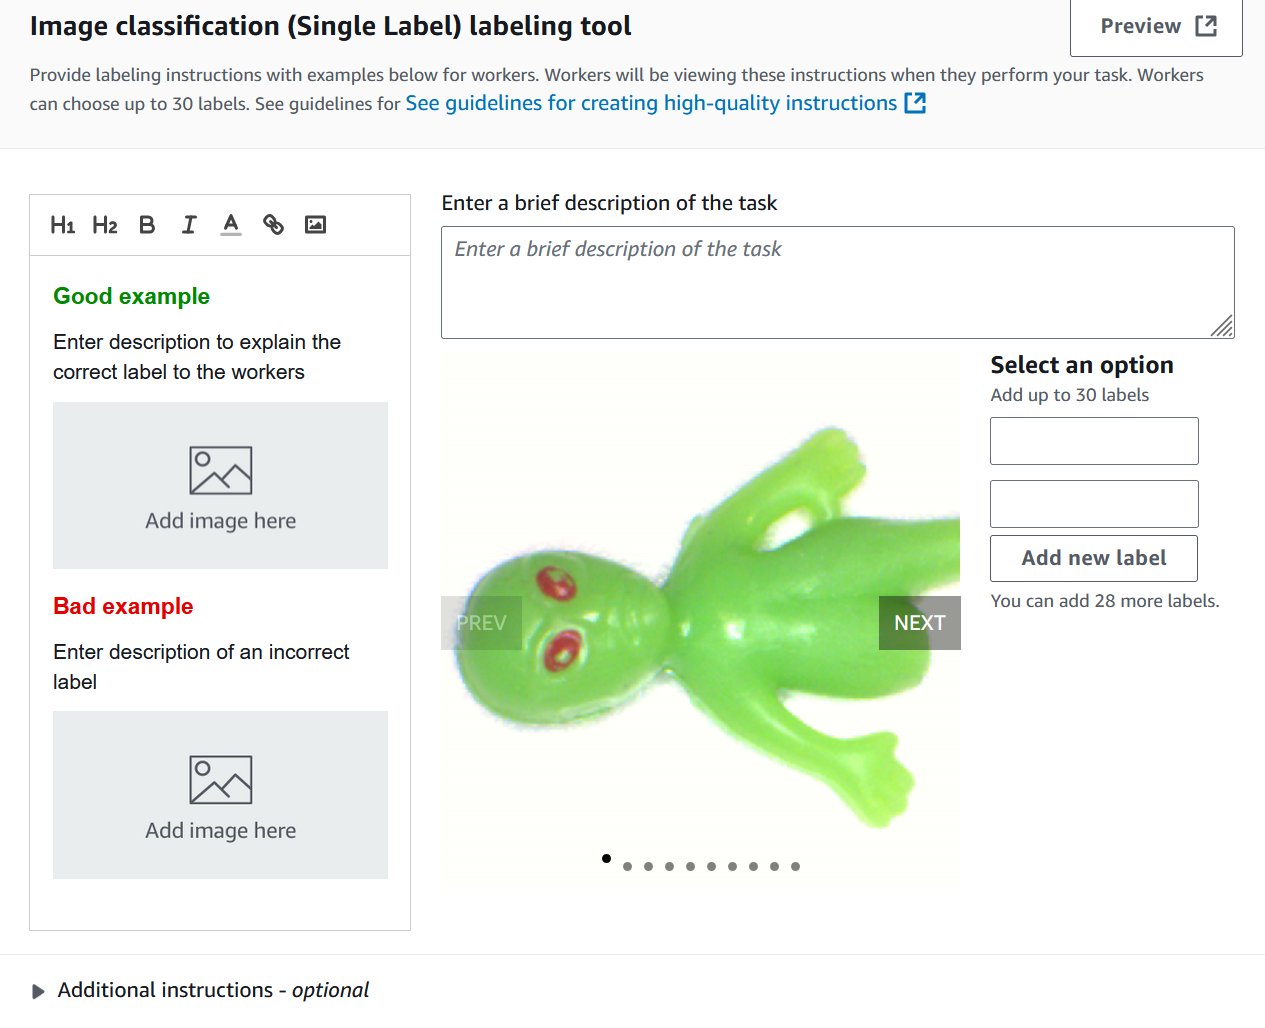
- Select the task type. These models support Image Classification (Single Label), which is binary classification (think good or bad), or Semantic segmentation. You cannot use a bounding box type with these models. You can change your selection later.
- Choose Next.
- For Worker types, select Private. You can read more about Amazon Mechanical Turks or labeling subscriptions in the Developer Guide.
- Under Private teams, select the private team you created in the previous steps.
- For Task timeout and Task expiration time, leave the default values.
- Leave Enable automated data labeling unselected. You can read more about automated data labeling here; however, it is not compatible with semantic segmentation.
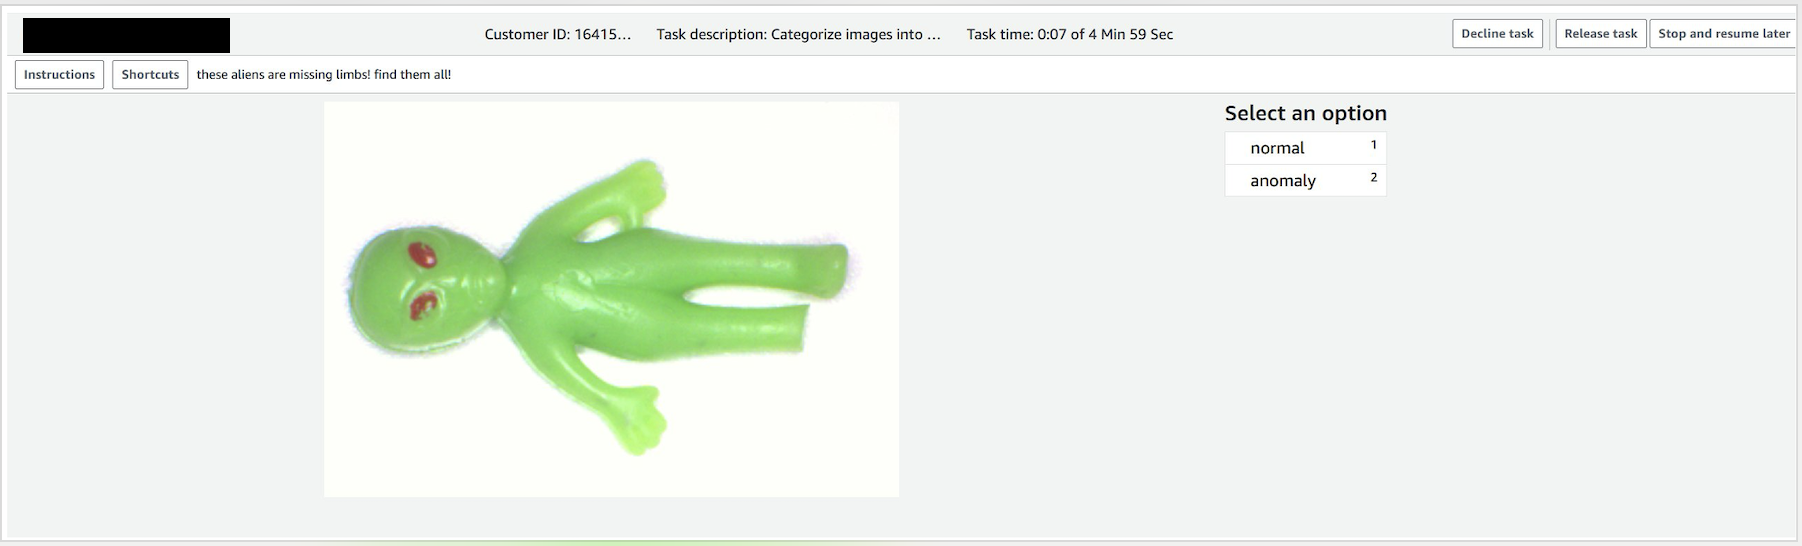
- On the Image classification screen, add two new labels: normal and anomaly. You can fill in the rest as needed. Choose Preview to see a preview of what it will look like to the end user.
- Choose Create.
- Select Ground Truth, and then select the Private tab.
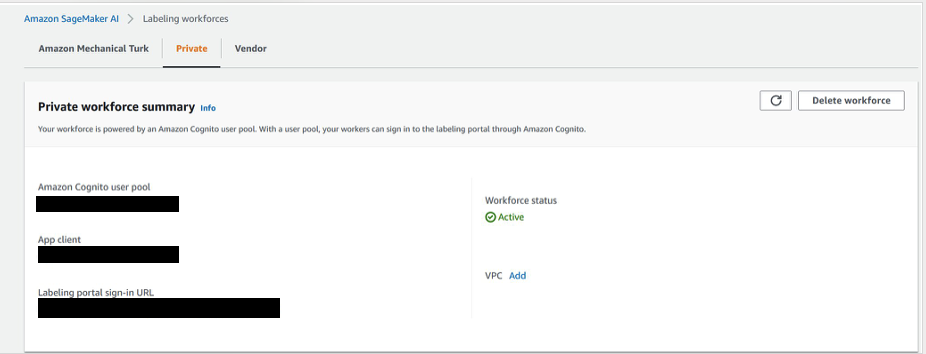
- Open the labeling portal sign-in URL in a new tab in your browser and then sign in to see your assigned tasks.
- Select an assigned task and choose Start working to label the data.
- Select normal or anomaly.
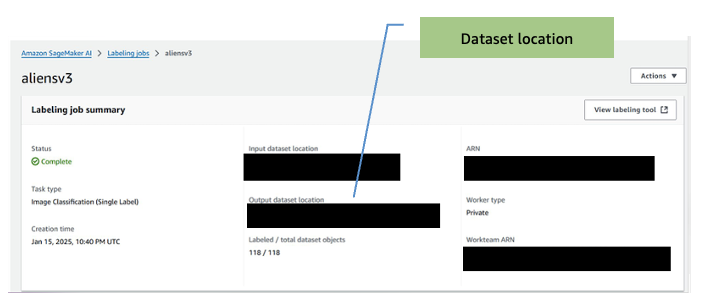
- When the job is complete, make note of the output dataset location. You will need this for the training step.
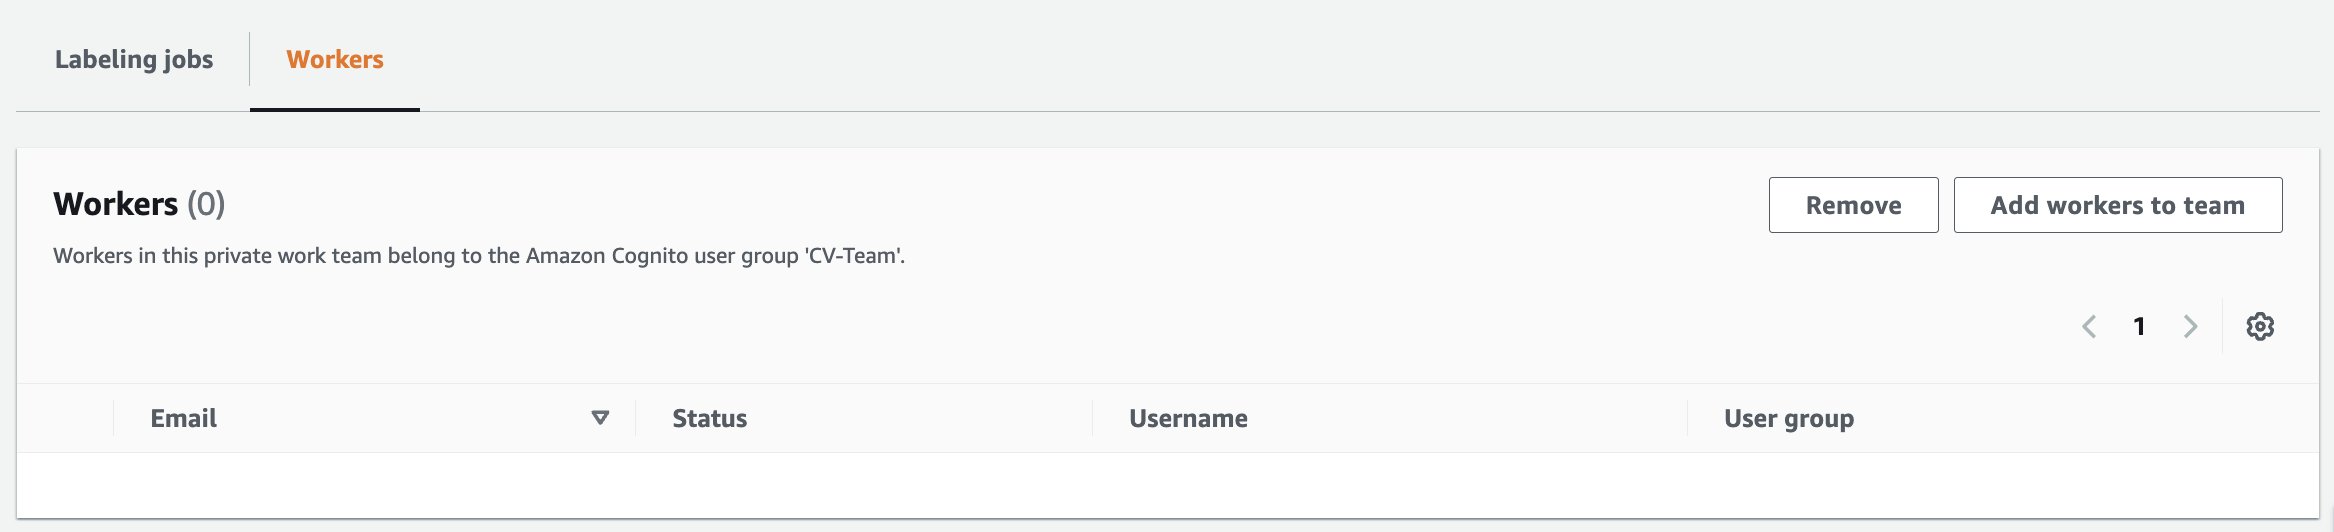
- If you need to add workers to the labelling job:
- On the Amazon SageMaker AI Ground Truth page, select Labeling workforces.
- Select the Private tab.
- Click on the private team that was created earlier (CV-team).
- Select the Workers tab
- Select the desired worker from the list and choose Add workers to team.
-
- You will then be redirected to the Amazon SageMaker AI, labelling workforces page with a confirmation message that worker has been added.

After you complete the labeling task, the output of the task is used to train the Computer Vision Detection model from the AWS Marketplace.
Train the model
This section discusses training the computer vision model using the AWS Marketplace Computer Vision Detection model and the labeled dataset from the previous step.
- Go to the AWS Marketplace to subscribe to the model, https://aws.amazon.com/marketplace/pp/prodview-j72hhmlt6avp6.
- Choose Continue to Subscribe.
- Choose Continue to configuration.
- Select the latest software version, your Region, and make sure Create a training job is selected.
Note: Copy the Product Arn and store in a text editor or notepad for later use.
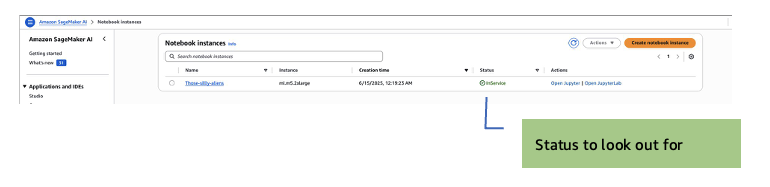
- Go to SageMaker AI, Notebook instances, Create notebook instance.
Note: GPU-enabled notebook instance is not required. Amazon SageMaker Training jobs will spin up the GPU instances needed during training, so most basic instances will be sufficient.
- Select m5.2xl instance, Jupyter lab 4, with volume size of 128 GB. The default is 5 GB, which is too small.
- Select an IAM role to allow the notebook to access resources in your account. You will need access to S3.
- In the Git Repositories – optional section, select Clone a public Git repository to this notebook instance only.
- Enter the Git repository URL. Leave all the other fields as their default, then choose Create notebook instance to start the instance.
- After the instance starts, (the status will display as InService), select Open JupyterLab action for the new notebook instance.
JupyterLab opens:
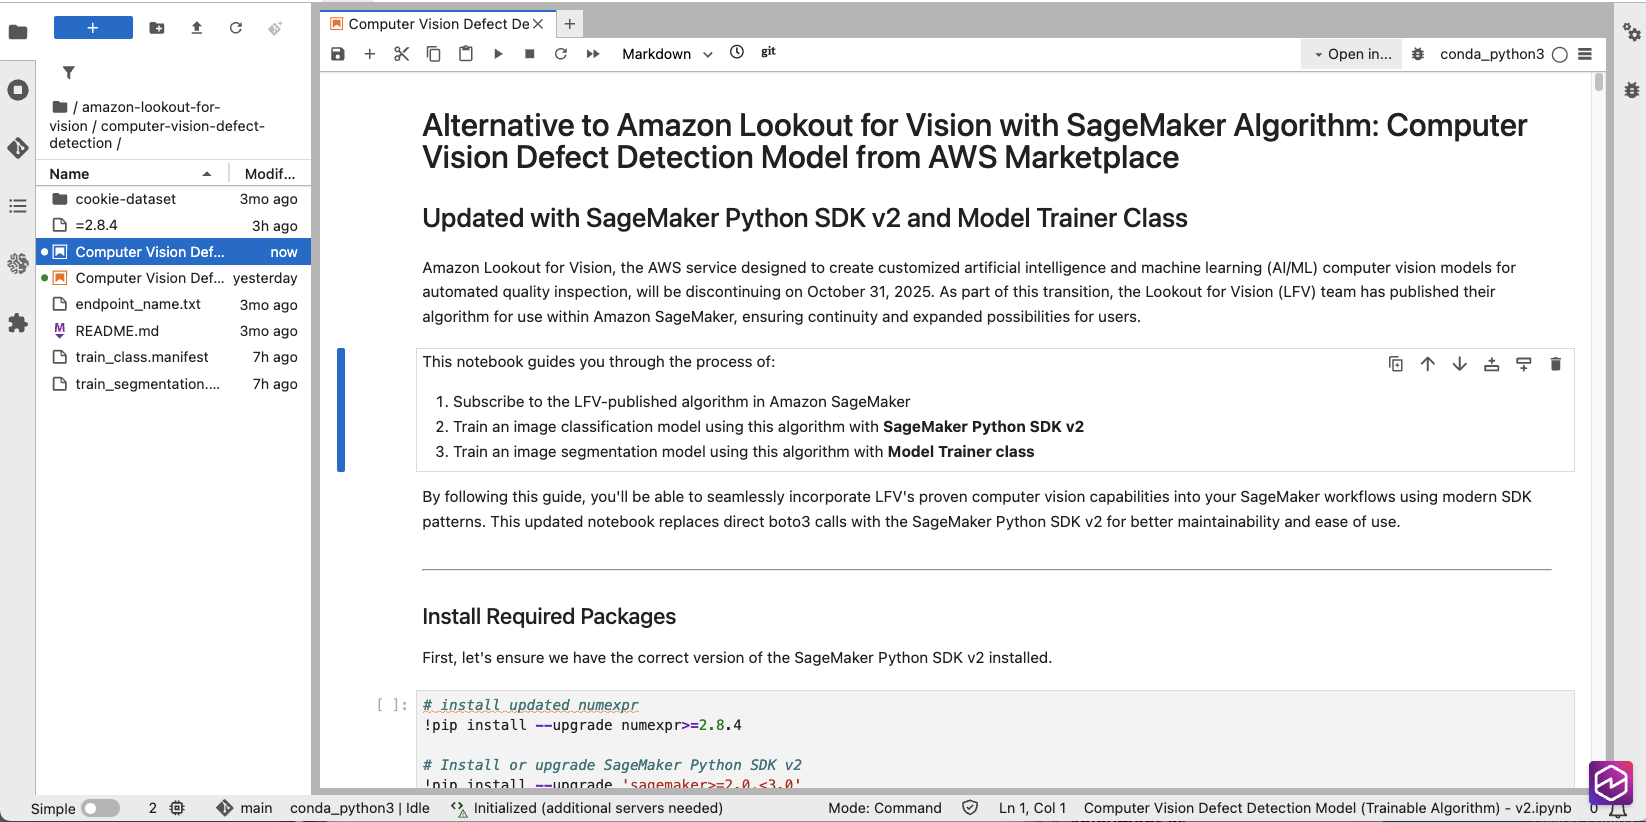
- On the left navigation pane, open the computer-vision-defect-detection folder.
- In the AWS Console, go to Marketplace, Manage subscriptions, and then copy the ARN of your model subscription.

- In the Jupyter notebook, locate the snippet below and update the placeholder value for algorithm_name variable with the Product Arn you copied in the previous step.
The bucket that would be used for this step would be automatically created and named in the format SageMaker-<REGION>-<ACCOUNT_ID>.
- In the AWS Console, navigate to Amazon SageMaker AI, Ground Truth, Labeling jobs and select the job that was completed.
- Identify and take note of the output images folder (Output dataset location)
Note: To start the training job, look at the path for the output manifest in <BUCKET NAME>/aliens-dataset/all/aliensv2/manifests/output/output.manifest—this will be the training manifest for the next step.
- Set the bucket variable to be the images bucket name that you previously set and object key the path to your manifest:
- bucket: where to store the manifest file
- classification_manifest_key: where the output manifest file is stored (for example, aliens-dataset-all/[job-name]/manifests/output/output.manifest)
- Review the model training configuration in the Classification Model with Algorithm Estimator section.
Note: The job uses NVIDIA G4DN instances. They can be sized up to a larger instance to decrease training time, but on a only 118 instances. The image dataset training finishes in less than 10 minutes with a g4dn.2xl. You can experiment with other instance types, however results may vary because the models were extensively tested on the G4DN instances.
- Validate the values of TestInputDataAttributeNames and TrainingInputDataAttributeNames in the Hyperparameters section, as well as AttributeNames in the
TrainingInput section. The labels on all three must match the structure of your manifest file. Here is a sample manifest:
Note: Two of the three values include the labelling job name.
- Run all the cells or blocks listed in the Classification Model with Algorithm Estimator section to start the training job.
- If you want to train a segmentation model as well, follow the steps in the Segmentation Model with Algorithm Estimator section.
Note: After the training is completed, you are ready to test it! There are few inference options available for this:
- Real-time inference using Amazon SageMaker endpoints
- Amazon SageMaker AI Batch Transform inference.
- Edge deployment
Deploy the model
Amazon SageMaker AI endpoints and Amazon SageMaker AI Batch Transform inference are both used for inference but serve different purposes.
Amazon SageMaker AI endpoints
Amazon SageMaker AI endpoints are used for real-time inference, providing low-latency predictions suitable for applications requiring immediate responses. Endpoints remain active while they’re deployed, making them better suited for continuous and steady traffic, but potentially more costly due to ongoing resource usage.
- In the Jupyter notebook, navigate to the (Optional) Running real-time inference using Amazon SageMaker endpoints section.
- Run the following cell blocks to set up and invoke the endpoint:
- Validate the inference, then delete the endpoint by running the following block:
Note: If you start an endpoint, keep in mind you will be billed while it is running until you turn it off.
Amazon SageMaker AI Batch Transform
Batch Transform is designed for offline inference and making predictions on large datasets stored in S3, and is ideal for bulk processing where low latency is not critical. After the job is complete, the resources are released, making it cost-effective for sporadic workloads.
- Navigate to the (Optional) Run Batch Transform Inference using SageMaker SDK v2 section.
- Define the s3_input_data and s3_output_path parameters.
- Run all the cells and blocks in the (Optional) Run Batch Transform Inference using SageMaker SDK v2 section to complete the batch inference.
- Validate the batch transform job after completion by navigating to the s3_output_path folder. The following is a sample inference output file:
Clean up
To avoid incurring unnecessary charges, delete the following resources when you no longer need them:
- Delete SageMaker endpoints.
- Navigate to the Amazon SageMaker Console.
- Select Endpoints.
- Select the endpoint you created.
- Choose Delete.
- Delete SageMaker Notebook instances.
- Navigate to the Amazon SageMaker Console.
- Select Notebook instances.
- Select the notebook instance you created.
- Choose Stop if the instance is running.
- Once stopped, choose Delete.
- Delete S3 objects and buckets.
- Navigate to the Amazon S3 Console.
- Delete all objects in the buckets you created for this tutorial.
- Delete the empty buckets.
- Delete the Ground Truth labeling team.
- Navigate to Ground Truth.
- Select Labeling workforces.
- Select the Private tab.
- Select the private team you created.
- Choose Delete team.
Conclusion
In this blog post, we’ve demonstrated how to transition from Amazon Lookout for Vision to using the underlying Computer Vision Detection models available through the AWS Marketplace, showing the step-by-step process of setting up labeling, training the model, and running inference through batch transformation. The transition provides customers with greater flexibility in terms of training options, hyperparameter adjustments, and deployment choices while continuing to use AWS defect detection technology at their own pace. Also be sure to check out our edge-based open source integrated Defect Detection Application on GitHub if you would like to combine what you have learned here.
About the authors
 Ryan Vanderwerf is a is a senior partner solutions architect at Amazon Web Services specializing in smart manufacturing, vision, and machine learning. Ryan previously provided Java virtual machine-focused consulting and project development as a software engineer at OCI on the Grails and Micronaut team. He was chief architect/director of products at ReachForce, with a focus on software and system architecture for AWS Cloud SaaS solutions for marketing data management. Ryan has built several SaaS solutions in several domains such as financial, media, telecom, and e-learning companies since 1996
 Lu Min is a Software Development Engineer for AWS Edge ML services, focused on developing machine learning solutions that operate at the edge for AWS customers. With expertise in optimizing ML models for resource-constrained environments, Lu helps customers implement efficient inference capabilities on edge devices and cloud communication, as well as manage model lifecycle using AWS SageMaker.
 Tim Westman is the Product Manager and Go-to-Market Lead for Edge Machine Learning, AWS. Tim leads the Product Management and Business Development for the Edge Machine Learning business at Amazon Web Services. In this role, he works with customers to help build computer vision solutions at the edge to solve complex operational challenges. Tim has more than 30 years of experience in sales, business development and product management roles for leading hardware and software companies, with the last 8 years specializing in AI and computer vision for IoT applications.
 Kunle Adeleke is an enterprise solutions architect, providing guidance to large AWS commercial customers in diverse industries craft their technology strategy. Kunle has led enterprise architecture teams and software development teams in both government and commercial sectors. His deep expertise spans software development, solution architecture, enterprise architecture, security, and data & AI/ML.