Amazon SageMaker provides a seamless experience for building, training, and deploying machine learning (ML) models at scale. Although SageMaker offers a wide range of built-in algorithms and pre-trained models through Amazon SageMaker JumpStart, there are scenarios where you might need to bring your own custom model or use specific software dependencies not available in SageMaker managed container images. Examples for this could include use cases like geospatial analysis, bioinformatics research, or quantum machine learning. In such cases, SageMaker allows you to extend its functionality by creating custom container images and defining custom model definitions. This approach enables you to package your model artifacts, dependencies, and inference code into a container image, which you can deploy as a SageMaker endpoint for real-time inference. This post walks you through the end-to-end process of deploying a single custom model on SageMaker using NASA’s Prithvi model. The Prithvi model is a first-of-its-kind temporal Vision transformer pre-trained by the IBM and NASA team on contiguous US Harmonised Landsat Sentinel 2 (HLS) data. It can be finetuned for image segmentation using the mmsegmentation library for use cases like burn scars detection, flood mapping, and multi-temporal crop classification. Due to its unique architecture and fine-tuning dependency on the MMCV library, it is an effective example of how to deploy complex custom models to SageMaker. We demonstrate how to use the flexibility of SageMaker to deploy your own custom model, tailored to your specific use case and requirements. Whether you’re working with unique model architectures, specialized libraries, or specific software versions, this approach empowers you to harness the scalability and management capabilities of SageMaker while maintaining control over your model’s environment and dependencies.
Solution overview
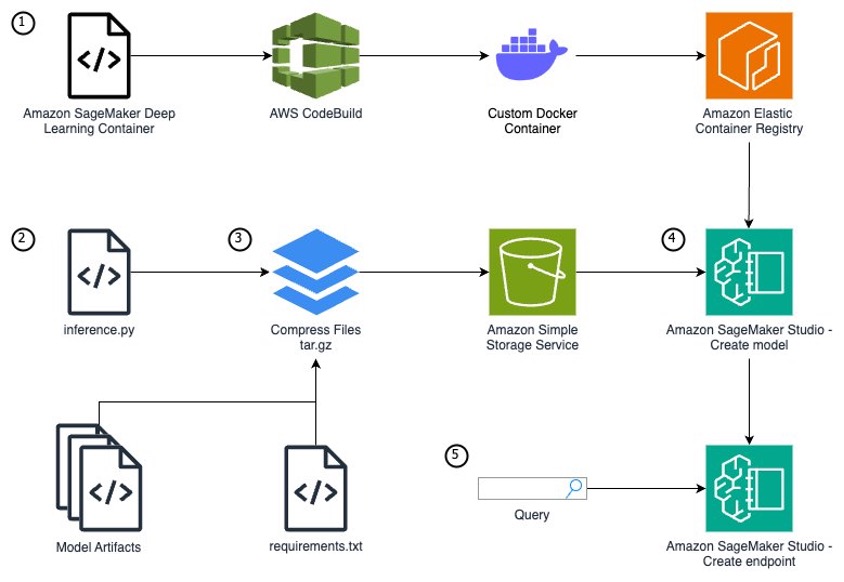
To run a custom model that needs unique packages as a SageMaker endpoint, you need to follow these steps:
- If your model requires additional packages or package versions unavailable from the SageMaker managed container images, you will need to extend one of the container images. By extending a SageMaker managed container vs. creating one from scratch, you can focus on your specific use case and model development instead of the container infrastructure.
- Write a Python model definition using the SageMaker
inference.pyfile format. - Define your model artifacts and inference file within a specific file structure, archive your model files as a tar.gz file, and upload your files to Amazon Simple Storage Service (Amazon S3).
- With your model code and an extended SageMaker container, use Amazon SageMaker Studio to create a model, endpoint configuration, and endpoint.
- Query the inference endpoint to confirm your model is running correctly.
The following diagram illustrates the solution architecture and workflow:
Prerequisites
You need the following prerequisites before you can proceed. For this post, we use the us-east-1 AWS Region:
- Have access to a POSIX based (Mac/Linux) system or SageMaker notebooks. This post doesn’t cover setting up SageMaker access and assumes a notebook accessible to the internet. However, this is not a security best practice and should not be done in production. To learn how to create a SageMaker notebook within a virtual private cloud (VPC), see Connect to SageMaker AI Within your VPC.
- Make sure you have AWS Identity and Access Management (IAM) permissions for SageMaker access; S3 bucket create, read, and PutObject access; AWS CodeBuild access; Amazon Elastic Container Registry (Amazon ECR) repository access; and the ability to create IAM roles.
- Download the Prithvi model artifacts and flood data fine-tuning:
Extend a SageMaker container image for your model
Although AWS provides pre-built container images optimized for deep learning on the AWS Deep Learning Containers (DLCs) GitHub for PyTorch and TensorFlow use cases, there are scenarios where models require additional libraries not included in these containers. The installation of these dependencies can take minutes or hours, so it’s more efficient to pre-build these dependencies into a custom container image. For this example, we deploy the Prithvi model, which is dependent on the MMCV library for advanced computer vision techniques. This library is not available within any of the SageMaker DLCs, so you will have to create an extended container to add it. Both MMCV and Prithvi are third-party models which have not undergone AWS security reviews, so please review these models yourself or use at your own risk. This post uses CodeBuild and a Docker Dockerfile to build the extended container.
Complete the following steps:
- CodeBuild requires a source location containing the source code. Create an S3 bucket to serve as this source location using the following commands:
- Create an ECR repository to store the custom container image produced by the CodeBuild project. Record the repository URI as an environment variable.
- Create a Dockerfile for the custom container. You use an AWS Deep Learning SageMaker framework container as the base image because it includes required dependencies such as SageMaker libraries, PyTorch, and CUDA.
This Docker container installs the Prithvi model and MMCV v1.6.2. These models are third-party models not produced by AWS and therefore may have security vulnerabilities. Use at your own risk.
- Create a
buildspecfile to define the build process for the CodeBuild project. Thisbuildspecfile will instruct CodeBuild to install thenvidia-container-toolkitto make sure the Docker container has GPU access, run the Dockerfile build, and push the built container image to your ECR repository. - Zip and upload the Dockerfile and
buildspec.ymlfiles to the S3 bucket. This zip file will serve as the source code for the CodeBuild project.- To install zip on a SageMaker notebook, run the following command:
- With zip installed, run the following command:
- Create a CodeBuild service role so CodeBuild can access the required AWS services for the build.
- First, create a file defining the role’s trust policy:
- Create a file defining the service role’s permissions. This role has a few wildcard permissions (/* or *). These can give more permissions than needed and break the rule of least privilege. For more information about defining least privilege for production use cases, see Grant least privilege.
- Create the CodeBuild service role:
- Capture the name of the role Amazon Resource Name (ARN) from the CLI command response and record as an environment variable:
- Attach the permission policies to the service role:
- Define the configurations for the CodeBuild build project using the build project JSON specification:
- Create the CodeBuild project using the
codebuild-project.jsonspecification defined in the previous step: - Run a build for the CodeBuild project:
The build will take approximately 30 minutes to complete and cost approximately $1.50 to run. The CodeBuild compute instance type gpu1.small costs $0.05 per minute.
After you run the preceding command, you can press Ctrl+C to exit and run future commands. The build will already be running on AWS and will not be canceled by closing the command.
- Monitor the status of the build using the following command and wait until you observe
buildStatus=SUCCEEDEDbefore proceeding to the next step:
After your CodeBuild project has completed, make sure that you do not close your terminal. The environment variables here will be used again.
Build your inference.py file
To run a custom model for inference on AWS, you need to build out an inference.py file that initializes your model, defines the input and output structure, and produces your inference results. In this file, you must define four functions:
model_fn– Initializes your model-
input_fn– Defines how your data should be input and how to convert to a usable format predict_fn– Takes the input data and receives the predictionoutput_fn– Converts the prediction into an API call format
We use the following completed inference.py file for the SageMaker endpoint in this post. Download this inference.py to continue because it includes the helper functions to process the TIFF files needed for this model’s input. The following code is contained within the inference.py and is only shown to provide an explanation of what is being done in the file.
model_fn
The model_fn function builds your model, which is called and used within the predict_fn function. This function loads the model weights into a torch model checkpoint, opens the model config, defines global variables, instantiates the model, loads the model checkpoint into the model, and returns the model.
input_fn
This function defines the expected input for the model and how to load the input for use in predict_fn. The endpoint expects a string URL path linked to a TIFF file you can find online from the Prithvi demo on Hugging Face. This function also defines the content type of the request sent in the body (such as application/json, image/tiff).
predict_fn:
In predict_fn, you create the prediction from the given input. In this case, creating the prediction image uses two helper functions specific to this endpoint (preprocess_image and enhance_raster_for_visualization). You can find both functions here. The preprocess_image function normalizes the image, then the function uses torch.no_grad to disable gradient calculations for the model. This is useful during inference to decrease inference time and reduce memory usage. Next, the function collects the prediction from the instantiated model. The mask ratio determines the number of pixels on the image zeroed out during inference. The two unpatchify functions convert the smaller patchified results produced by the model back to the original image space. The function normalized.clone() clones the normalized images and replaces the masked Regions from rec_img with the Regions from the pred_img. Finally, the function reshapes the image back into TIFF format, removes the normalization, and returns the image in raster format, which is valuable for visualization. The result of this is an image that can be converted to bytes for the user and then visualized on the user’s screen.
output_fn
output_fn returns the TIFF image received from predict_fn as an array of bytes.
Test your inference.py file
Now that you have downloaded the complete inference.py file, there are two options to test your model before compressing the files and uploading them to Amazon S3:
- Test the
inference.pyfunctions on your custom container within an Amazon Elastic Compute Cloud (Amazon EC2) instance - Test your endpoint on a local mode SageMaker endpoint (requires a GPU or GPU-based workspace for this model)
Model file structure, tar.gz compressing, and S3 upload
Before you start this step, download the Prithvi model artifacts and the Prithvi flood fine-tuning of the model. The first link will provide all of the model data from the base Prithvi model, and the flood fine-tuning of the model builds upon the model to perform flood plain detection on satellite images. Install git-lfs using brew on Mac or using https://git-lfs.com/ on Windows to install the GitHub repo’s large files.
To create a SageMaker model on the SageMaker console, you must store your model data within Amazon S3 because your SageMaker endpoint will pull your model artifacts directly from Amazon S3 using a tar.gz format. Within your tar.gz file, the data must have a specific file format defined by SageMaker. The following is the file structure for the Prithvi foundation model (our requirements are installed on the container, so requirements.txt has been left intentionally blank):
This folder structure remains true for other models as well. The /code folder must hold the inference.py file and any files used within inference.py. These additional files are generally model artifacts (configs, weights, and so on). In our case, this will be the whole Prithvi base model folder as well as the weights and configs for the fine-tuned version we will use. Because we have already installed these packages within our container, this is not used; however, there still must be a requirements.txt file, otherwise your endpoint will fail to build. All other files belong in the root folder.
With the preceding file structure in place, open your terminal and route into the model folder.
- Run the following command in your terminal:
The command will create a compressed version of your model files called
model.tar.gzfrom the files in your current directory. You can now upload this file into an S3 bucket. - If using SageMaker, run the following command:
- Now create a new S3 bucket. The following CLI commands create an S3 bucket and upload your
model.tar.gzfile:
The file you uploaded will be used in the next step to define the model to be created in the endpoint.
Create SageMaker model, SageMaker endpoint configuration, and SageMaker endpoint
You now create a SageMaker inference endpoint using the CLI. There are three steps to creating a SageMaker endpoint: create a model, create an endpoint configuration, and create an endpoint.
In this post, you will create a public SageMaker endpoint because this will simplify running and testing the endpoint. For details about how to limit access to SageMaker endpoints, refer to Deploy models with SageMaker Studio.
Complete the following steps:
- Get the ECR repository’s ARN:
- Create a role for the SageMaker service to assume. Create a file defining the role’s trust policy.
- Create a file defining the service role’s permissions:
- Create the SageMaker service role:
- Attach the permission policies to the service role:
The model definition will include the role you created, the ECR container image, and the Amazon S3 location of the
model.tar.gzfile that you created previously. - Create a JSON file that defines the model and run the create-model command:
A SageMaker endpoint configuration specifies the infrastructure that the model will be hosted on. The model will be hosted on a ml.g4dn.xlarge instance for GPU-based acceleration.
- Create the endpoint configuration JSON file and create the SageMaker endpoint configuration:
- Create the SageMaker endpoint by referencing the endpoint configuration created in the previous step:
The ml.g4dn.xlarge inference endpoint will cost $0.736 per hour while running. It will take several minutes for the endpoint to finish deploying.
- Check the status using the following command, waiting for it to return InService:
When the endpoint’s status is InService, proceed to the next section.
Test your custom SageMaker inference endpoint
To test your SageMaker endpoint, you will query your endpoint with an image and display it. The following command sends a URL that references a TIFF image to the SageMaker endpoint, the model sends back a byte array, and the command reforms the byte array into an image. Open up a notebook locally or on Sagemaker Studio JupyterLab. The below code will need to be run outside of the command line to view the image
This Python code creates a predictor object for your endpoint and sets the predictor’s serializer to NumPy for the conversion on the endpoint. It queries the predictor object using a payload of a URL pointing to a TIFF image. You use a helper function to display the image and enhance the raster. You will be able to find that helper function here. After you add the helper function, display the image:
You should observe an image that has been taken from a satellite.
Clean up
To clean up the resources from this post and avoid incurring costs, follow these steps:
- Delete the SageMaker endpoint, endpoint configuration, and model.
- Delete the ECR image and repository.
- Delete the
model.tar.gzfile in the S3 bucket that was created. - Delete the
customsagemakercontainer-modelandcustomsagemakercontainer-codebuildsourceS3 buckets.
Conclusion
In this post, we extended a SageMaker container to include custom dependencies, wrote a Python script to run a custom ML model, and deployed that model on the SageMaker container within a SageMaker endpoint for real-time inference. This solution produces a running GPU-enabled endpoint for inference queries. You can use this same process to create custom model SageMaker endpoints by extending other SageMaker containers and writing an inference.py file for new custom models. Furthermore, with adjustments, you could create a multi-model SageMaker endpoint for custom models or run a batch processing endpoint for scenarios where you run large batches of queries at once. These solutions enable you to go beyond the most popular models used today and customize models to fit your own unique use case.
About the Authors
 Aidan is a solutions architect supporting US federal government health customers. He assists customers by developing technical architectures and providing best practices on Amazon Web Services (AWS) cloud with a focus on AI/ML services. In his free time, Aidan enjoys traveling, lifting, and cooking
 Nate is a solutions architect supporting US federal government sciences customers. He assists customers in developing technical architectures on Amazon Web Services (AWS), with a focus on data analytics and high performance computing. In his free time, he enjoys skiing and golfing.
 Charlotte is a solutions architect on the aerospace & satellite team at Amazon Web Services (AWS), where she helps customers achieve their mission objectives through innovative cloud solutions. Charlotte specializes in machine learning with a focus on Generative AI. In her free time, she enjoys traveling, painting, and running.