As ML teams grow, embedding Amazon SageMaker AI MLflow Apps into a custom portal requires a scalable approach to access management. Distributing presigned URLs doesn’t scale for teams with dozens of data scientists, and granting individual AWS Management Console access adds operational overhead for administrators managing access controls. Teams who rely on SSO-integrated internal portals need their MLflow experiment tracking accessible alongside other internal applications through a single bookmarkable URL. With a custom portal, you reduce onboarding time for new team members, simplify access management, and give data scientists a consistent experience across your internal tools.
With this solution, you give your machine learning (ML) teams a persistent, bookmarkable URL to the full MLflow web UI without presigned URLs or AWS Management Console access. You can embed the MLflow experiment tracking UI directly into your organization’s SSO-integrated internal portal or custom dashboard, so users authenticate once and access experiment tracking alongside other internal tools. Your continuous integration and continuous delivery (CI/CD) pipelines and automation scripts can interact with MLflow REST APIs programmatically through the same proxy endpoint, with SigV4 authentication handled behind the scenes.
In this post, you learn how to build a custom portal with embedded SageMaker AI MLflow Apps UI. You walk through the architecture pattern behind a React front end paired with a Flask reverse proxy that handles AWS Signature Version 4 (SigV4) authentication, deploy the entire stack through the AWS Cloud Development Kit (AWS CDK), validate the deployment, and review security considerations and cleanup procedures.
Solution overview
You deploy a custom React web application with the SageMaker AI MLflow Apps UI embedded using iframe, backed by a Flask reverse proxy running on Amazon Elastic Compute Cloud (Amazon EC2). The architecture consists of four components that work together to give your team authenticated access to MLflow.
Application Load Balancer
The Application Load Balancer (ALB) serves as the single entry point for your users. It handles HTTPS termination by routing traffic to the appropriate backend targets and integrates with your organization’s existing DNS and certificate infrastructure. It provides a stable, public-facing URL for the portal that can integrate with existing SSO infrastructure. It distributes traffic for both the React dashboard and MLflow API requests, and supports custom domain names and SSL termination.
Note: This implementation uses ALB with HTTP. For production environments, you should add HTTPS with an SSL/TLS certificate via AWS Certificate Manager (ACM).
React front end portal
The React front end gives your team a branded entry point to the MLflow experience. It provides a custom portal that embeds the MLflow tracking UI in an iframe and serves as an integration point for organizational branding and additional tools. It delivers static files through the Flask proxy from the /app path.
Flask reverse proxy service
The Flask reverse proxy sits between the front end and the MLflow backend, handling authentication so your users never manage AWS credentials directly. A Python-based Flask application handles:
- Intercepting incoming requests, including UI paths and REST API calls.
- Signing each request with AWS SigV4 using temporary credentials obtained by assuming a dedicated AWS Identity and Access Management (IAM) role.
- Forwarding signed requests to the Amazon SageMaker AI MLflow Apps endpoint.
- Rewriting absolute MLflow URLs in HTML responses to relative paths and stripping
X-Frame-Optionsheaders so the UI renders correctly inside an iframe.
Amazon SageMaker AI MLflow apps
Amazon SageMaker AI fully manages MLflow apps for you, so there are no servers to provision or patch. Amazon SageMaker AI MLflow Apps provides experiment tracking with runs, metrics, parameters, and artifacts, along with a model registry for model versioning and lifecycle management. It is a fully managed backend with no infrastructure to maintain.
This architecture supports secure communication while maintaining compatibility with existing enterprise portals. The proxy service acts as a bridge, transforming standard HTTPS requests into authenticated AWS API calls.
Architecture and request workflow
The following diagram shows how the different components work together to give your team secure, browser-based access to Amazon SageMaker AI MLflow Apps.
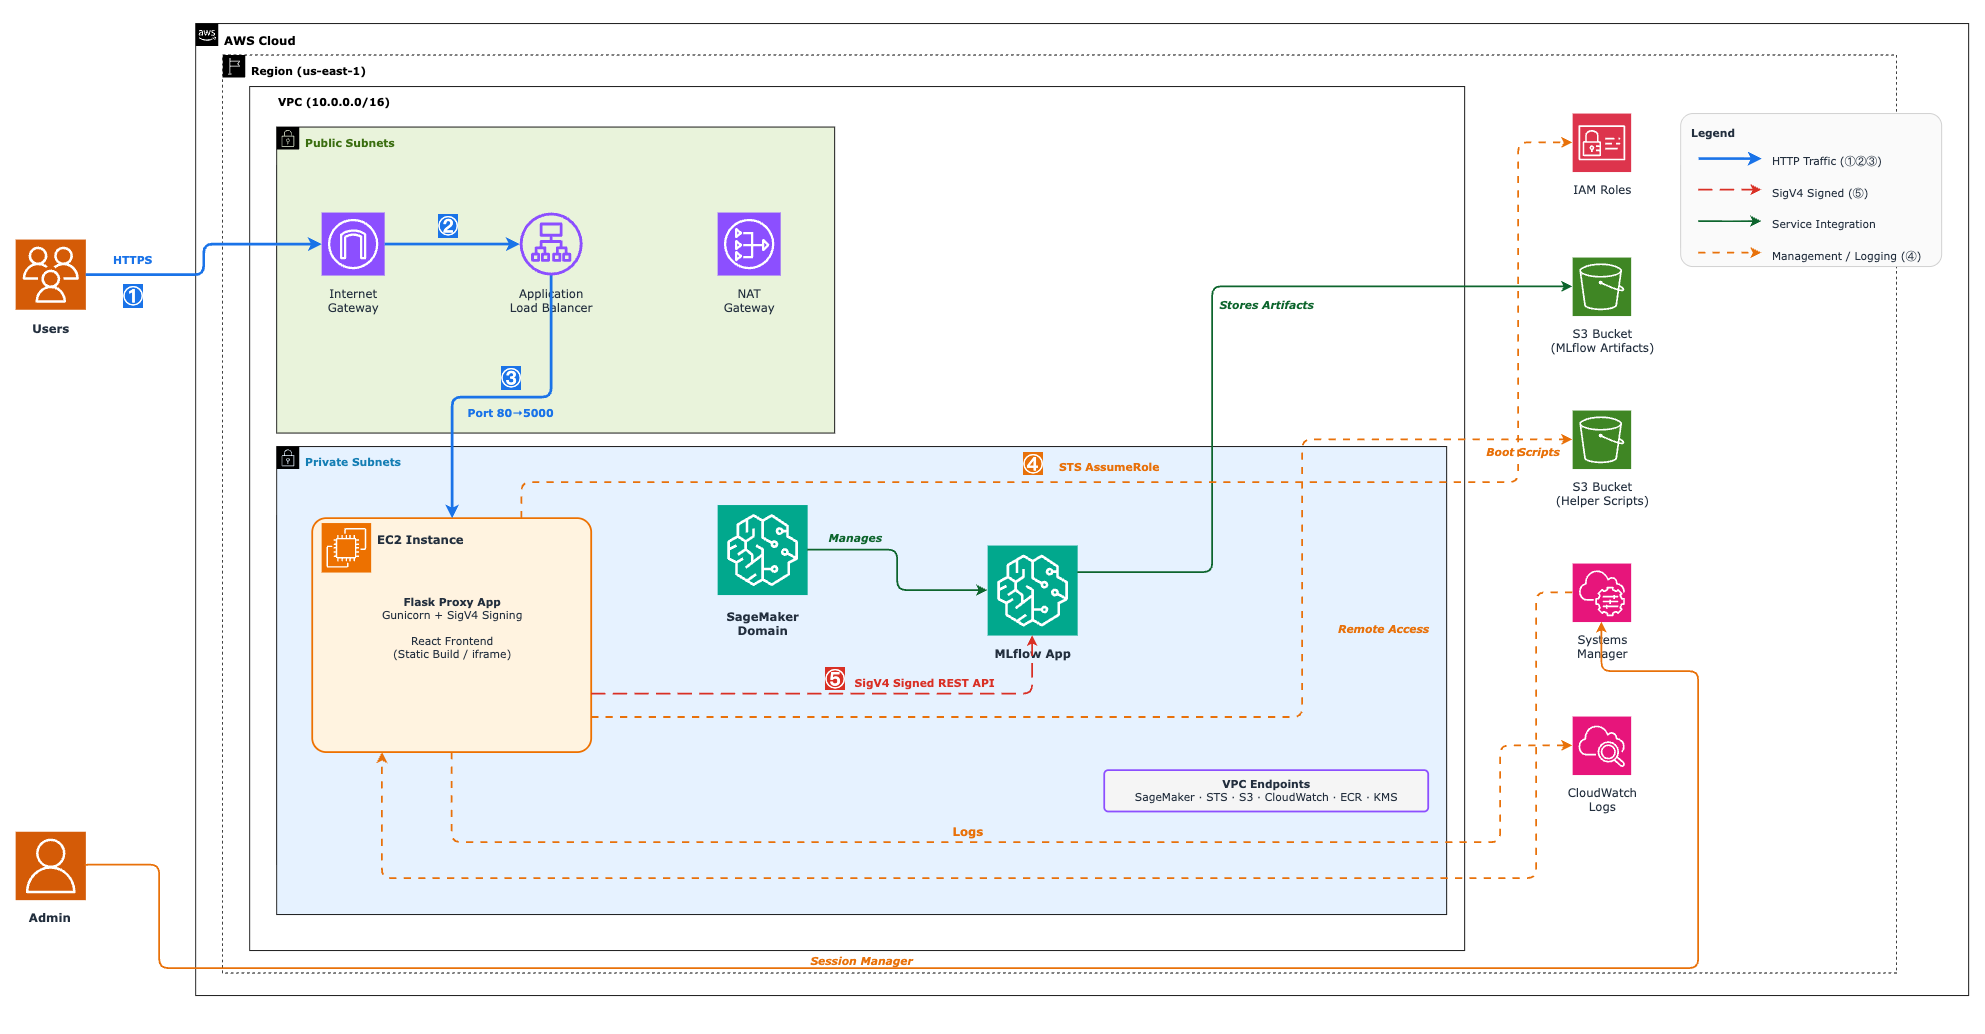
Here’s what happens when a user navigates to the portal:
- The user opens the ALB URL in their browser, either directly or through a link in your organization’s internal portal. The ALB routes the request to the Amazon EC2 instance running the Flask proxy.
- The Flask proxy serves the React dashboard (from the
/apppath). The React app renders the page and loads the MLflow UI inside an iframe pointing to/mlflow-ui/. - From this point on, every request the iframe makes goes through the Flask proxy, whether it’s loading the MLflow UI pages or calling API endpoints like
/api/2.0/mlflow/experiments/search. The proxy signs each request with AWS SigV4 using temporary credentials (obtained by assuming a dedicated IAM role) and forwards it to the serverless MLflow App endpoint. - When the MLflow App responds, the proxy does two things before passing the response back to the browser. It rewrites absolute MLflow URLs to relative paths so that navigation works correctly through the proxy. It also strips
X-Frame-Optionsheaders so that the browser allows the content to render inside the iframe.
Your users see the full MLflow tracking UI, including experiments, runs, metrics, and model registry, right in their browser, with AWS authentication handled behind the scenes.
Walkthrough
The following section walks you through how to deploy the solution. ### Prerequisites
To follow along with this walkthrough, make sure you have the following prerequisites:
- An AWS account.
- AWS Command Line Interface (AWS CLI) v2.34.5 or later (required for
create-mlflow-app,list-mlflow-apps, anddescribe-mlflow-appcommands). - Python 3.13 or later installed locally (used by the deployment script to parse JSON outputs).
- AWS CDK v2 (
aws-cdk-lib2.243.0 or later) installed and bootstrapped in the target account and Region. For instructions, see Getting started with the AWS CDK. - Node.js 18.x or later installed locally for CDK deployment.
- Python 3.13 installed on the Amazon EC2 instance (automated by the setup script).
- Sufficient IAM permissions to create VPCs, Amazon EC2 instances, ALBs, Amazon SageMaker AI domains, MLflow Apps, and IAM roles.
- An Ubuntu 24.04 LTS AMI available in the target AWS Region (automatically resolved using SSM Parameter Store).
- Required knowledge:
- Basic understanding of AWS services and IAM permissions.
- Familiarity with Python and Flask applications.
- Understanding of MLflow concepts and operations.
- Cost considerations:
- This solution creates AWS resources that may incur costs.
- Key cost-driving resources include:
- Amazon EC2 instances.
- Application Load Balancer.
- Amazon SageMaker AI resources.
- Amazon Simple Storage Service (Amazon S3) storage.
For information about AWS service pricing, see the AWS Pricing Calculator.
Deploy the solution
This section guides you through deploying the solution in your AWS account and validating it. The deployment uses a single deploy.sh script that orchestrates CDK stack deployment and serverless MLflow App creation.
Step 1: Clone the repository and deploy the infrastructure
- Download the solution code and install dependencies:
- Set your AWS account ID and Region as environment variables:
Note: If you previously deployed to a different Region, delete the cached context file.
- Bootstrap your environment for AWS CDK (skip this step if your AWS account and Region is already bootstrapped for AWS CDK).Bootstrap the AWS account and Region for CDK:
- Deploy the required resources on your AWS account.Run the deployment script to deploy the stacks:
Note the ALB DNS name and Amazon EC2 instance ID from the deployment output. You need these in the following steps.
Step 2: Set up the Flask proxy service on Amazon EC2
- Sign in to the Amazon EC2 instance using the instance ID from Step 1. Use AWS Systems Manager Session Manager to access the instance. For detailed instructions, see the Session Manager connection guide.
- Install Python 3.13 and dependencies.Install Python packages:
Note: This script works on Ubuntu-based systems. For other Linux distributions, verify that Python 3.12+, PIP3, and Virtualenv are installed using your system’s package manager.
- Install and start the MLflow proxy service:
- Check Flask MLflow proxy service status:
If the service isn’t running, check logs with the following.
Step 3: Validate the deployment
This section demonstrates how to interact with MLflow REST APIs through the ALB. These examples use the HTTP (unsecured) protocol, and for production environments, HTTPS is recommended. The following examples use the curl tool to make API requests, but you can also use a tool like Postman or equivalent.
- Open the ALB URL that you noted in Step 1 in your browser. You can also retrieve it from the AWS CloudFormation stack output:
- Open the ALB URL in your browser at
http://<ALB-URL>/. You are automatically redirected to/app, where the React dashboard displays the MLflow UI embedded in an iframe, as shown in the following figure.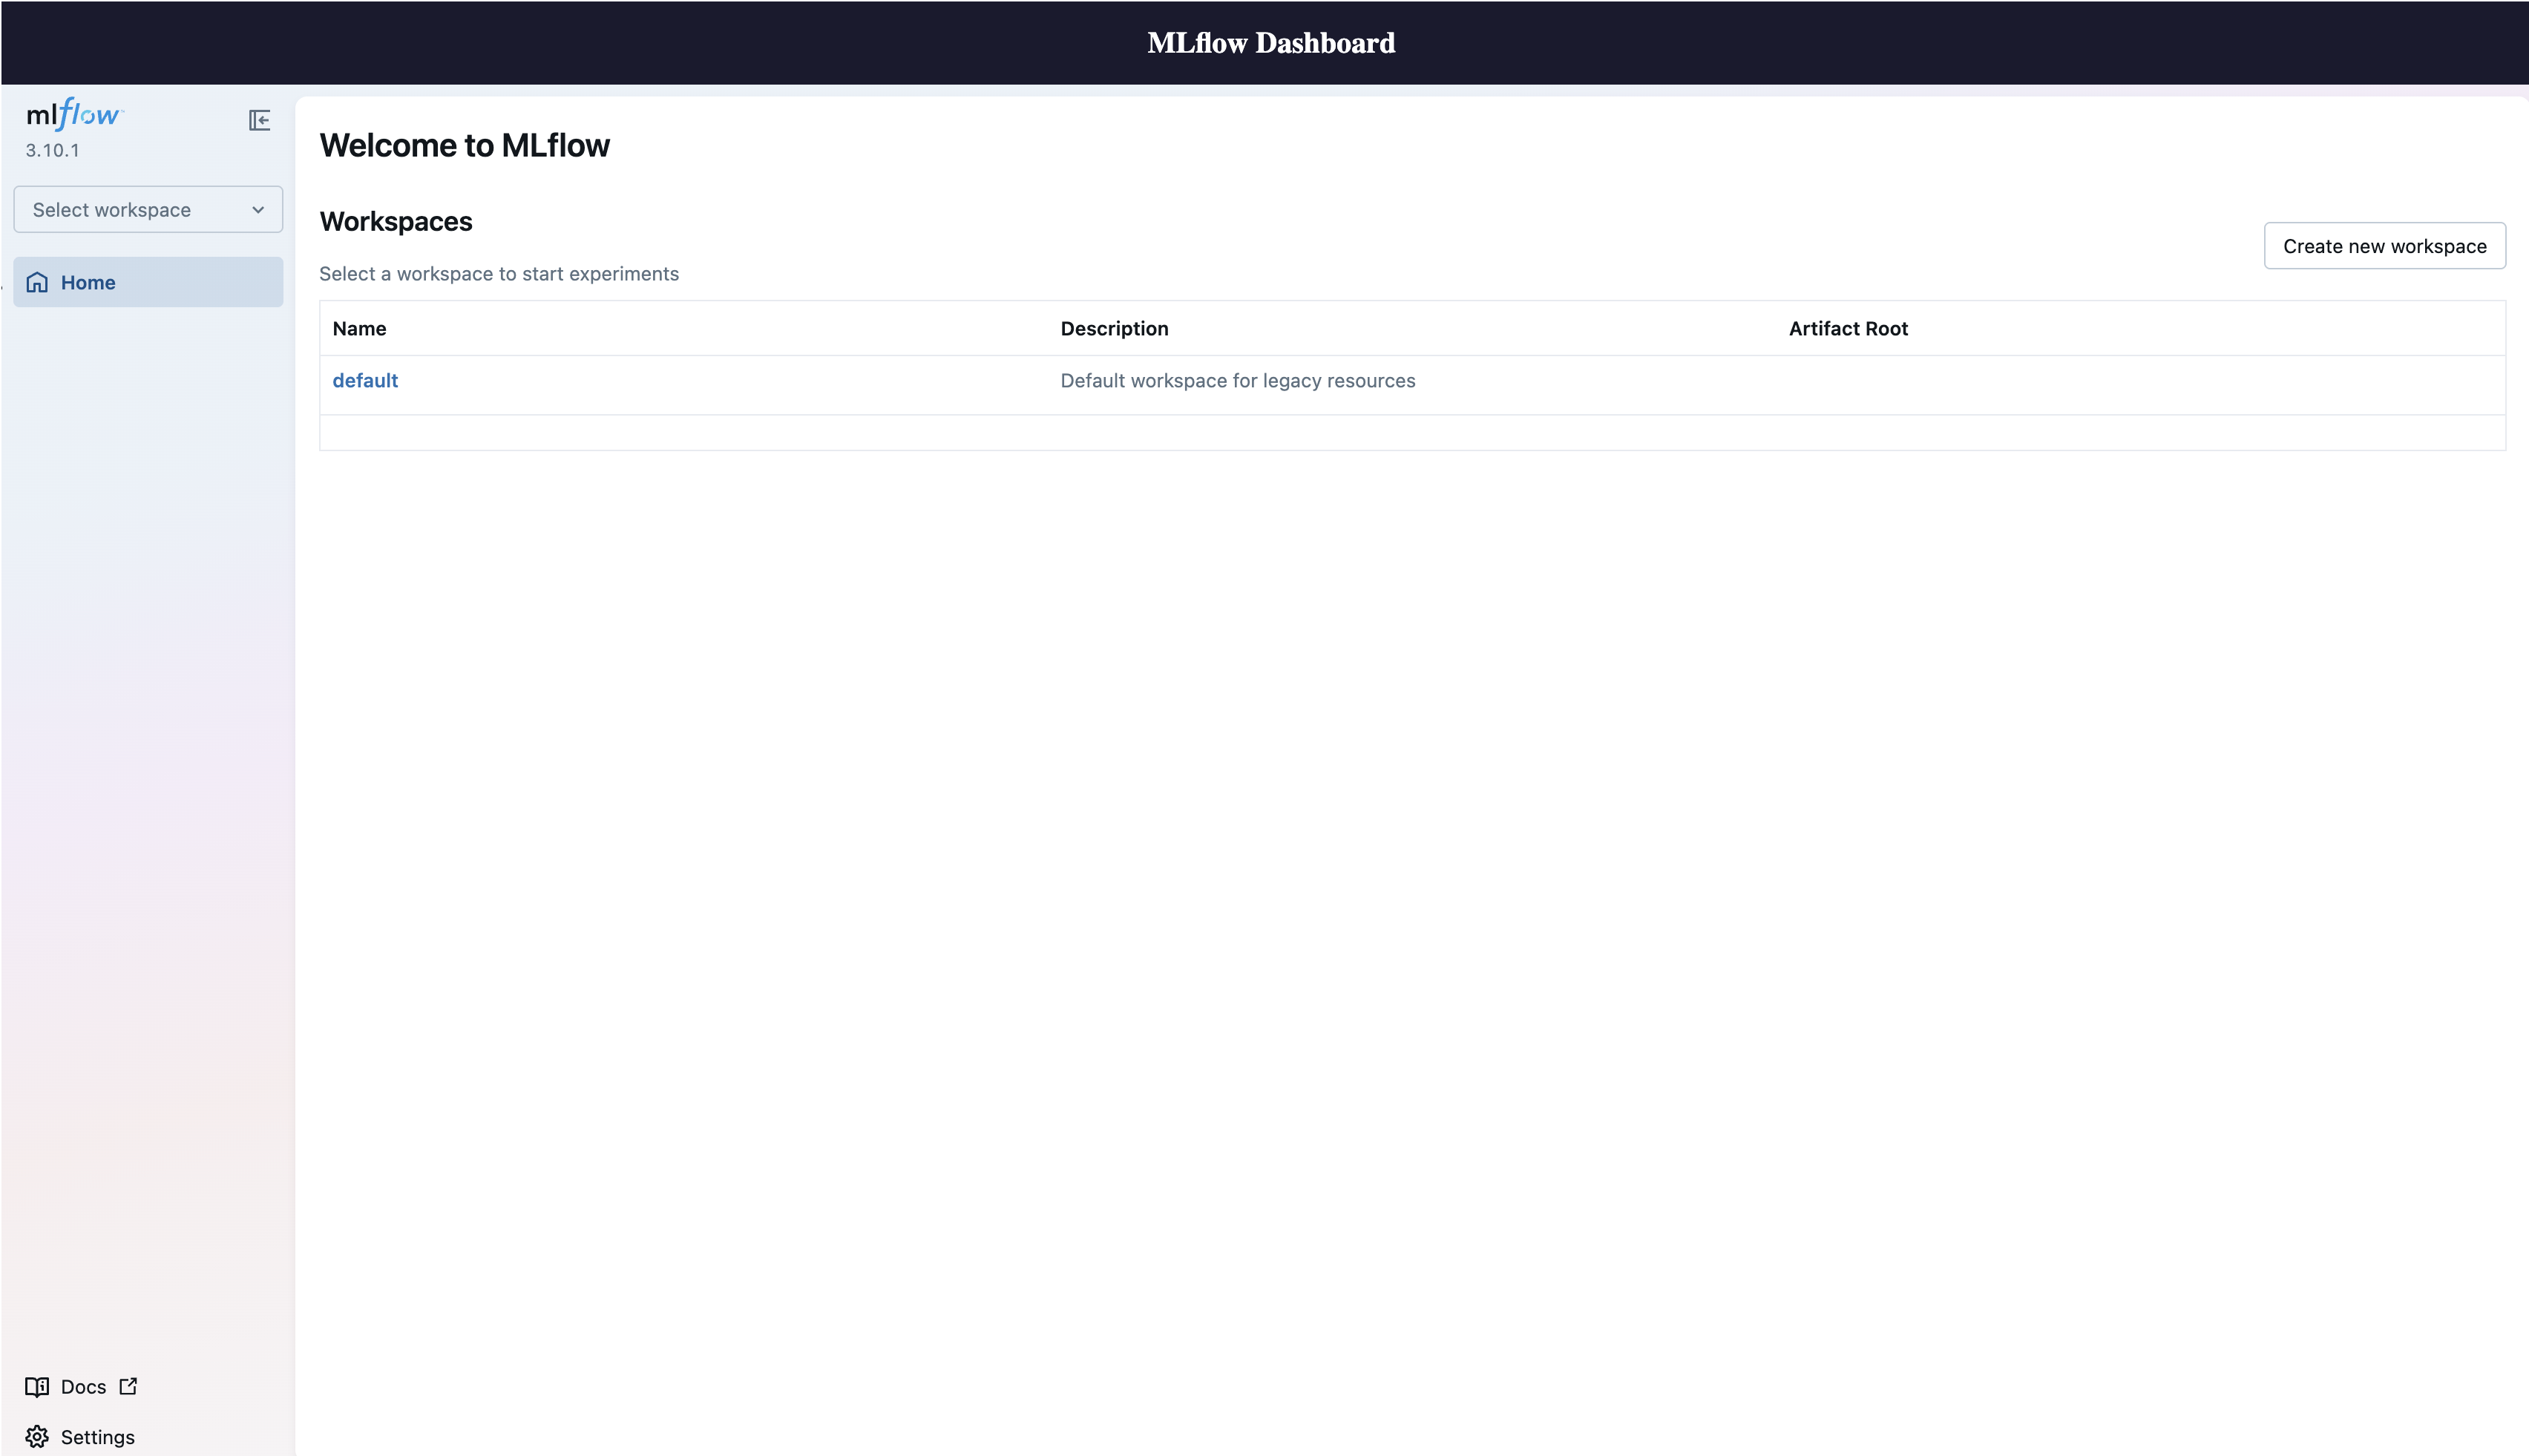
- Verify the health endpoint:
This should return
{"status": "healthy"}. - Test MLflow experiment tracking via the REST API.
- Create an experiment.Use the MLflow REST API through the ALB to create a new experiment. Note the experiment ID from the response.
- Create and log a run.Create a run under the experiment and log metrics and parameters.
- Verify the run in the React dashboard.Refresh the React dashboard in your browser at
http://<ALB-URL>/app. The MLflow UI now displays the experiment, runs, metrics, and parameters you created in the preceding steps, as shown in the following figure.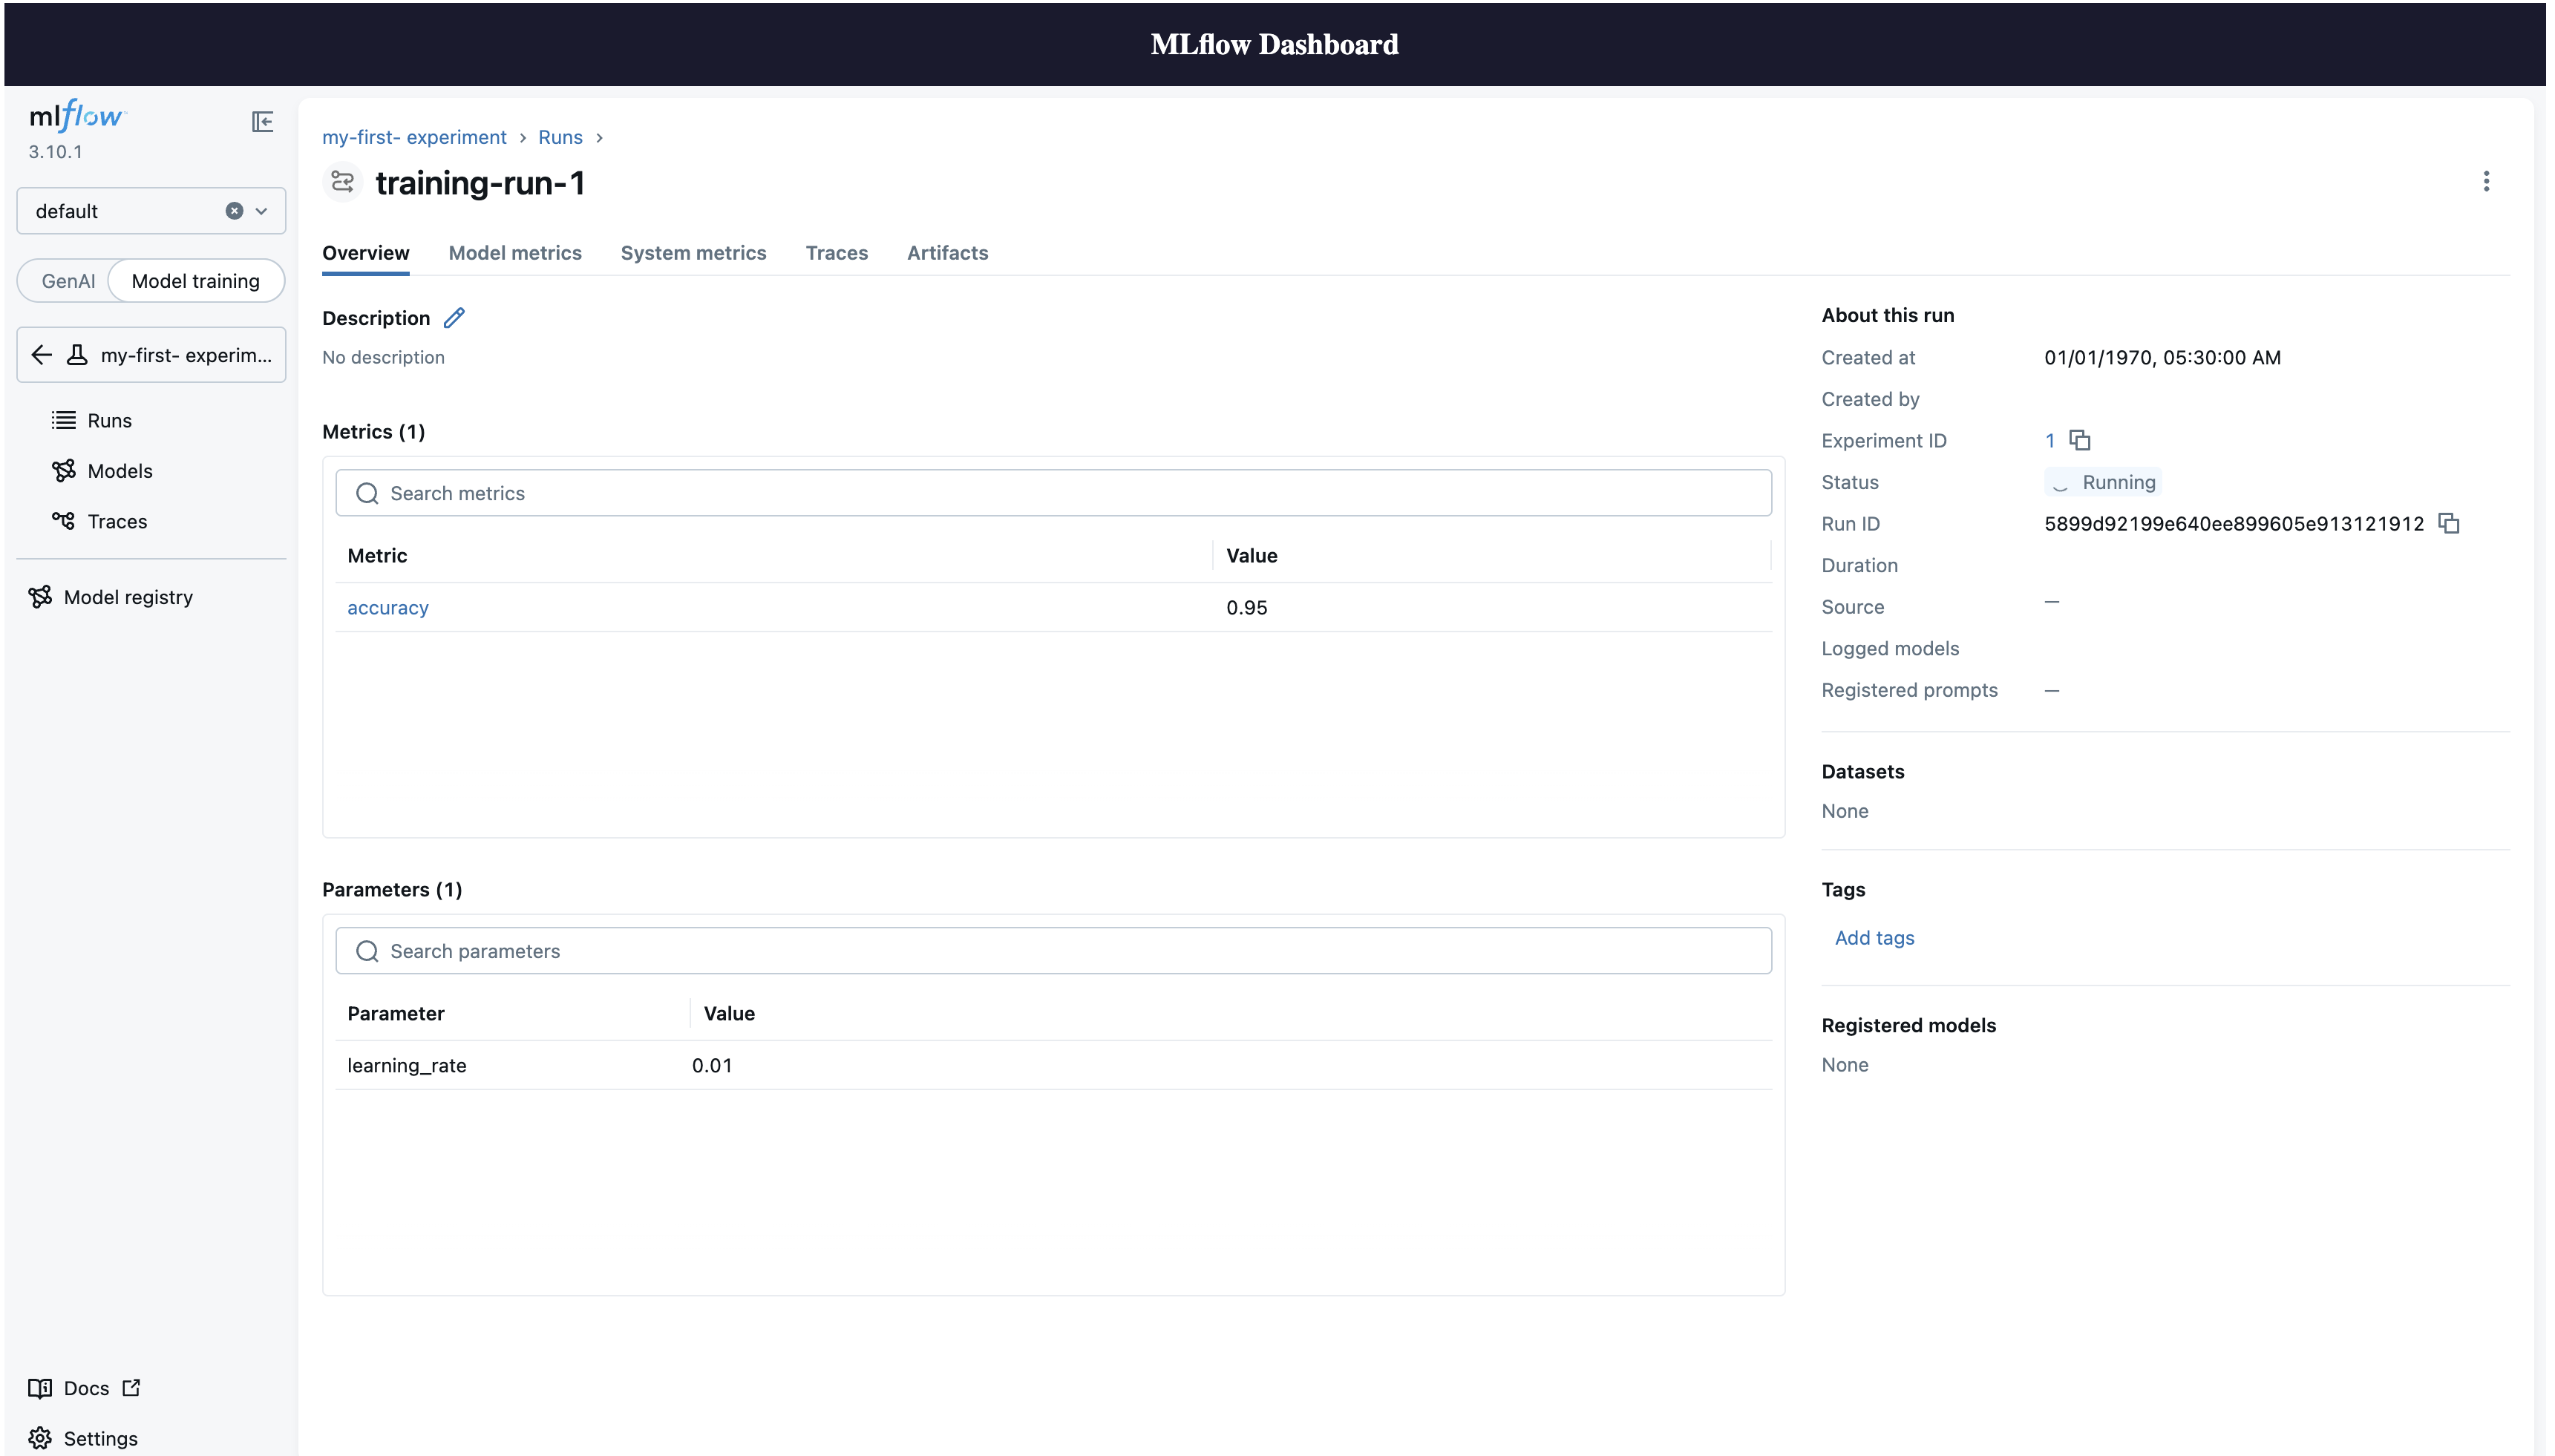
Clean up
To avoid ongoing charges and remove the resources created by this solution, follow these cleanup steps:
- Run the cleanup script from the project root.
This script tears down the deployed resources in reverse dependency order. It starts by destroying the Flask app stack, then deletes the serverless MLflow App through the AWS CLI and waits for the deletion to finish. After that, it removes the MLflow resources, Amazon SageMaker domain, and networking stacks. The networking stack includes an AWS Lambda-backed custom resource. It automatically cleans up Amazon SageMaker AI-created Amazon Elastic File System (Amazon EFS) file systems, orphaned network interfaces, and security groups before deleting the VPC.
- Manual resource cleanup.The MLflow artifacts Amazon S3 bucket has a
RETAINremoval policy and must be manually deleted if no longer needed. For detailed instructions, see Deleting a general purpose bucket in the Amazon S3 User Guide.
CDK stack details
The solution deploys four CDK stacks, each responsible for a distinct layer of the architecture.
Networking stack
This stack creates the VPC and associated networking components, including public and private subnets, route tables, and security groups. It provides the network foundation that all other stacks depend on.
SageMaker AI domain stack
This stack sets up the Amazon SageMaker AI domain, which serves as the organizational container for SageMaker resources. The domain provides the identity and access context needed for the MLflow App.
SageMaker MLflow stack
This stack deploys the serverless MLflow App within the SageMaker AI domain that stores experiments, runs, metrics, and model registry data.
Flask application stack
This stack deploys the Flask reverse proxy service on an Amazon EC2 instance behind an ALB. It handles SigV4 authentication and serves the React front end portal.
Next steps
After deploying the portal, consider extending it with these use cases:
- Add SSO authentication to the portal. Integrate an identity provider such as Amazon Cognito or Okta with the ALB to authenticate users before they reach the proxy. For instructions, see Authenticate users using an Application Load Balancer.
- Secure the proxy with AWS PrivateLink. If your team requires private connectivity without traversing the public internet, see AWS PrivateLink support for Amazon SageMaker with MLflow.
- Learn about the AWS Signature Version 4 signing process.
When deploying this solution in a production environment, consider implementing these additional security measures:
- Configure Amazon CloudWatch monitoring for the Flask-based proxy service to track application health, detect anomalies, and set up alerts for suspicious activities. For more information, see Monitor your instances using CloudWatch and Create a CloudWatch alarm based on anomaly detection.
- Implement rate limiting for the Flask-based proxy service to protect against potential denial-of-service (DoS) attacks and control the number of requests from individual clients. You can use AWS WAF in conjunction with Application Load Balancer to implement rate-based rules.
- Enable HTTPS termination at the Application Load Balancer level to support secure communication between clients and your application. You can use ACM to provision and manage SSL/TLS certificates for your application. For instructions on configuring HTTPS listeners, see the Application Load Balancer HTTPS listeners documentation.
Conclusion
In this post, you learned how to build a React-based dashboard with the Amazon SageMaker AI MLflow Apps UI embedded using iframe, backed by a Flask reverse proxy that handles SigV4 authentication. This solution helps ML infrastructure teams provide persistent, bookmarkable access to the full MLflow experiment tracking experience through a custom portal that integrates with existing organizational infrastructure.
With this approach, your team gets a persistent, bookmarkable URL for MLflow experiment tracking without presigned URLs, along with direct integration into existing SSO-protected internal portals. Users get the full MLflow UI experience, including run comparison, metric visualization, and model registry, while administrators benefit from reduced operational overhead by removing per-user console access. The entire solution is deployed as infrastructure as code with automated provisioning and cleanup. To get started, clone the sample repository and deploy the stack in your AWS account.