Enterprises face significant challenges accessing and utilizing the vast amounts of information scattered across organization’s various systems. What if you could simply ask a question and get instant, accurate answers from your company’s entire knowledge base, while accounting for an individual user’s data access levels?
Amazon Q Business is a game changing AI assistant that’s revolutionizing how enterprises interact with their data. With Amazon Q Business, you can access relevant information through natural language conversations, drawing insights from diverse data sources within your organization, adhering to the permissions granted to your user account.
At its core, Amazon Q Business works by first indexing the content from a variety of data sources using built-in data source connectors. These connectors function as an integration layer, unifying content from diverse systems such as Salesforce, Microsoft Exchange, and SharePoint into a centralized index. This consolidated index powers the natural language processing and response generation capabilities of Amazon Q. When a user asks a question using the built-in web experience, Amazon Q Business retrieves relevant content from the index, taking into account user profiles and permissions. It then uses large language models (LLMs) to provide accurate, personalized, and well-written responses based on the consolidated data.
For a full list of Amazon Q supported data source connectors, refer to Supported connectors.
This approach is useful when you need Amazon Q Business to crawl through OneNote or when certificate-based authentication is not preferred or your organization has a strict policy that requires regular password rotation. For a complete list of authentication mechanisms, refer to SharePoint (Online) connector overview.
We provide a step-by-step guide for the Azure AD configuration and demonstrate how to set up the Amazon Q connector to establish this secure integration.
Solution overview
SharePoint is a web-based solution developed by Microsoft that enables organizations to collaborate, manage documents, and share information efficiently. It offers a wide range of features, including using document libraries, viewing lists, publishing pages, sharing events and links, and allowing users to make comments, making it a great tool for team collaboration and content management.
After integrating SharePoint Online with Amazon Q Business, you can ask questions using natural language about the content stored in the SharePoint sites. For example, if your organization’s human resources team manages an internal SharePoint site and maintains a list of holidays for geographical regions, you can ask, “What are the company holidays for this year?” Amazon Q Business will then list region-specific holidays based on your location (country).
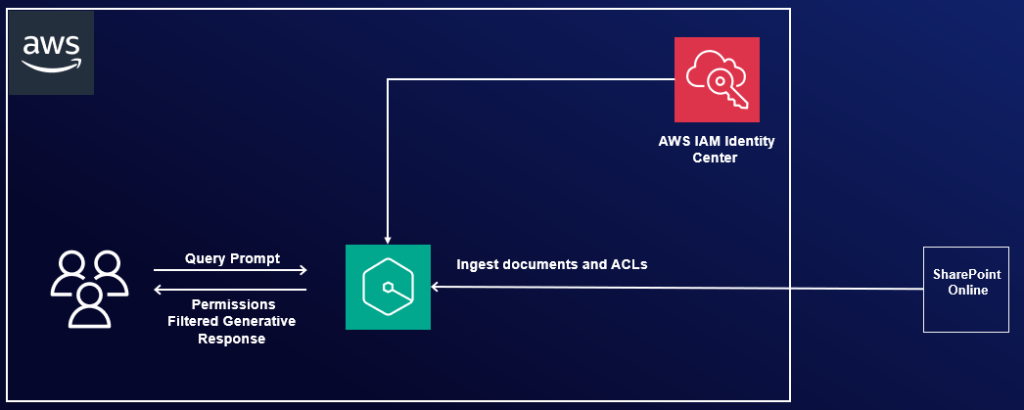
The following diagram illustrates the solution architecture. In the upcoming sections, we show you how to implement this architecture. After you integrate Amazon Q Business using the SharePoint connector, Amazon Q Business will crawl through the SharePoint content and update the index whenever content changes. Each published event, page, link, file, comment, OneNote, and attachment on the SharePoint site is treated as a document. In addition to the documents, it also crawls through access control lists (ACLs) for each document (user and group information) and stores them in the . This allows end-users to see chat responses generated only from the documents they have access to.
You can configure Azure AD using either of the following methods:
- Use the Azure AD console GUI – This is a manual process
- Use the provided PowerShell script – This is an automated process that takes in the inputs and configures the required permissions
We demonstrate both methods in the following sections.
Prerequisites
To follow along, you need the following prerequisites:
- The user performing these steps should be a global administrator on Azure AD/Entra ID.
- You need to configure Microsoft Entra ID and AWS IAM Identity Center. For details, see Configure SAML and SCIM with Microsoft Entra ID and IAM Identity Center.
- You need a Microsoft Windows instance to run PowerShell scripts and commands with PowerShell 7.4.1+. Details of the required PowerShell modules are described in the following steps.
- The user should have administrator permissions on the Windows instance.
- The user running these PowerShell commands should have the right M365 license (for example, M365 E3).
Configure Azure AD using the Azure AD console
To configure Azure AD using the GUI, complete the steps in this section.
Register an Azure AD application
Complete the following steps to register an Azure AD application in the Azure AD tenant that is linked to the SharePoint Online/O365 tenant:
- Open the Office 365 Admin Center using the account of a user member of the Tenant Global Admins group.
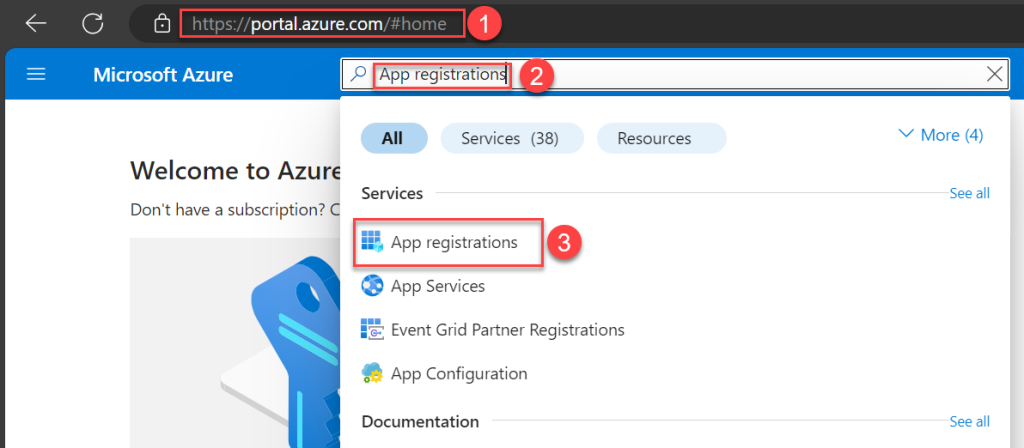
- Navigate to Microsoft Azure Portal.
- Search for and choose App registrations.
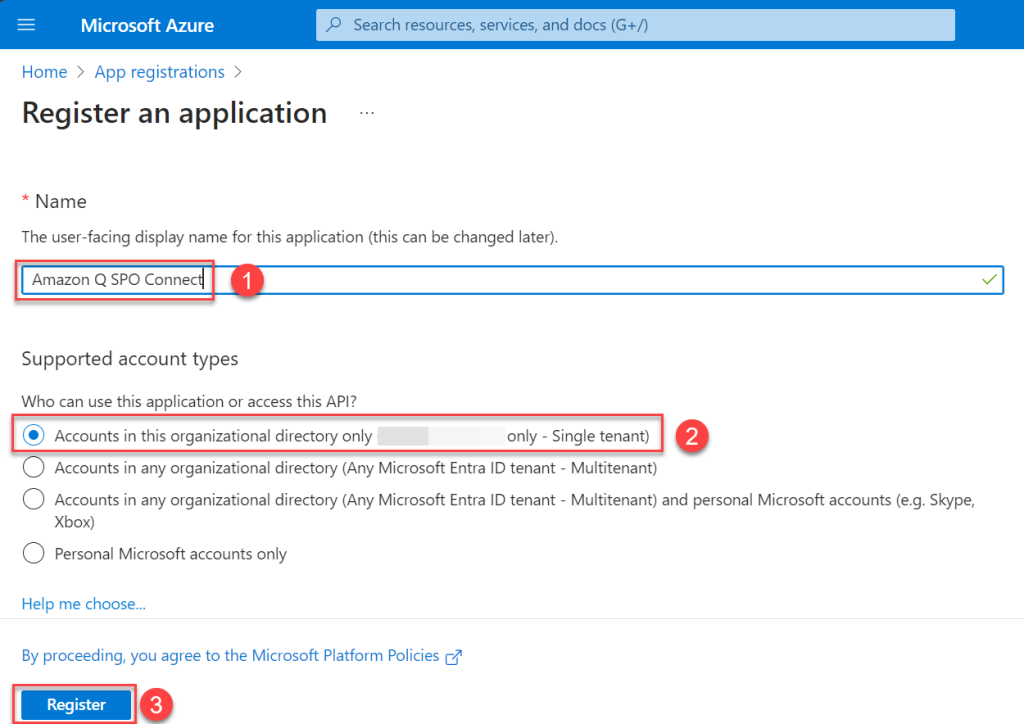
- Choose New registration.

- Enter a name for your application, select who can use this application, then choose Register.
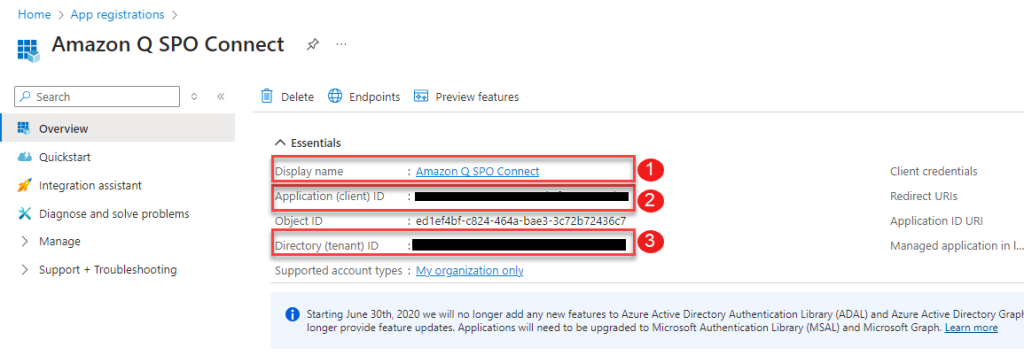
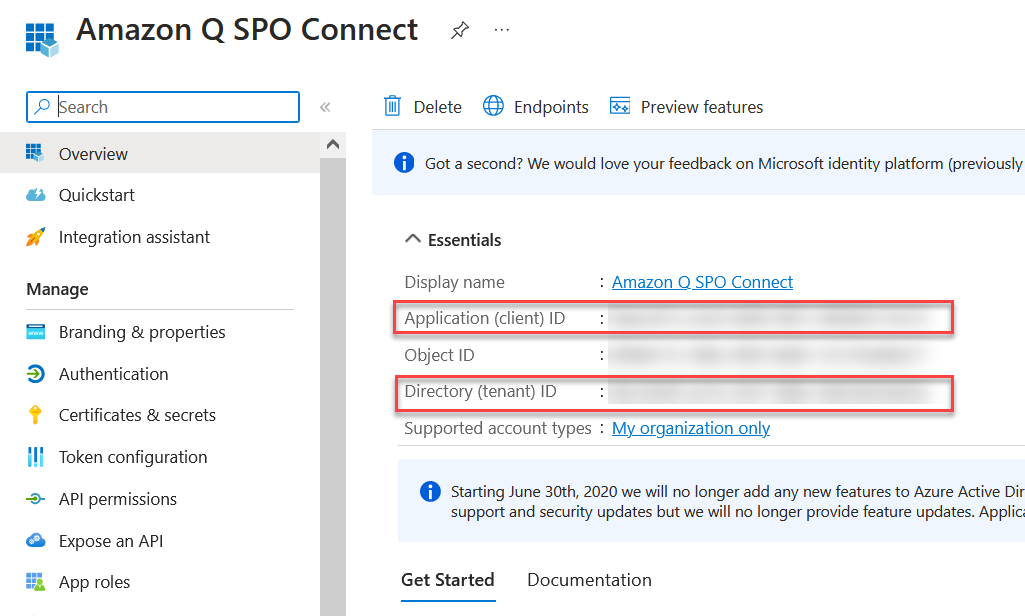
An application will be created. You will see a page like the following screenshot.
- Note the values for Display name, Application (client) ID, and Directory (tenant) ID. These IDs will be different than what is shown in the screenshot.
Now you can configure the newly registered application with Microsoft Graph and SharePoint API permissions.
When configuring permissions, you have two different options:
- Option 1 – Allow access to a specific set of SharePoint sites by granting the Selected permission
- Option 2 – Allow access to all SharePoint sites by granting the FullControl.All permission
For option 1, install the MS Graph PowerShell SDK as a prerequisite.
Option 1: Manually allow access to specific SharePoint sites
If you choose option 1, to grant access to specific sites instead of all sites, you need to complete additional prerequisites.
Make sure you have access to another application in Microsoft Entra ID with Sites.FullControl.All application-level permissions, along with its client ID and client secret. This application won’t be used by the Amazon Q Business connector, but it’s needed to grant Sites.Selected permissions only to the application you just registered. If you don’t have access to an application with Sites.FullControl permissions, you can follow the previous steps to register a new application and grant Sites.FullControl as described in option 2. We refer to this application as SitesFullControlApp.
To configure your permissions using option 1, complete the following steps:
- In the navigation pane, choose API permissions.
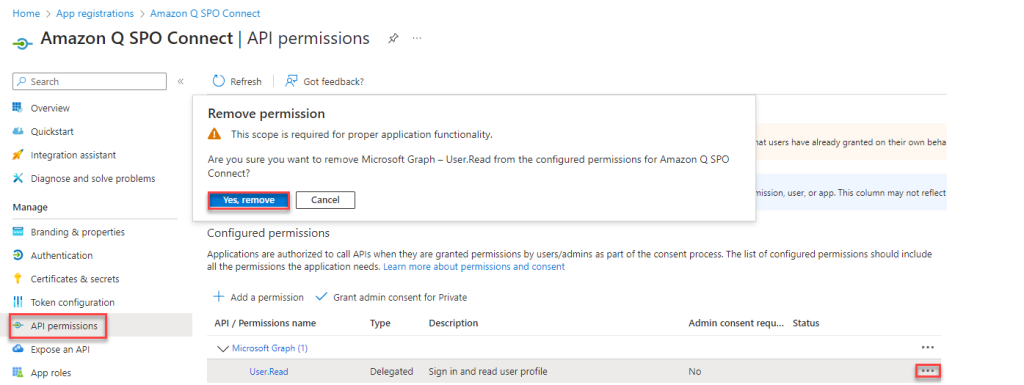
- Choose the options menu (three dots) next to the permissions that were granted by default when you registered the application, and remove those permissions.
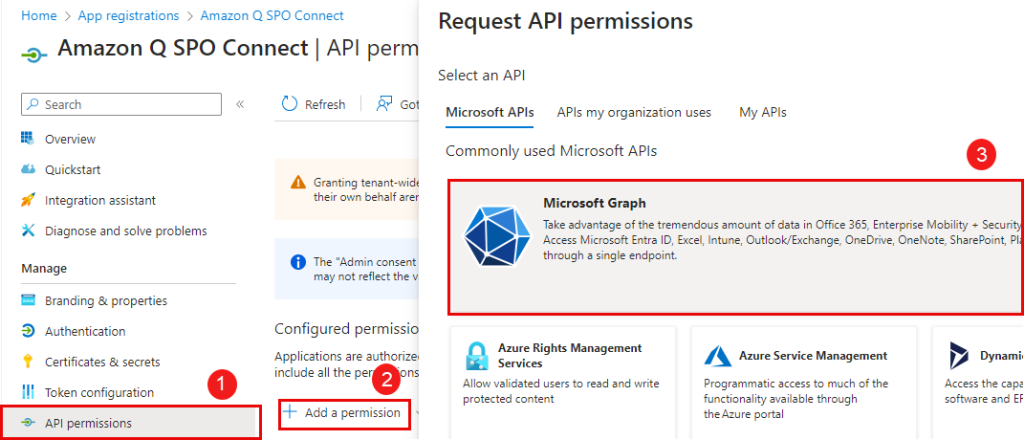
- Choose Add a permission and then choose Microsoft Graph.
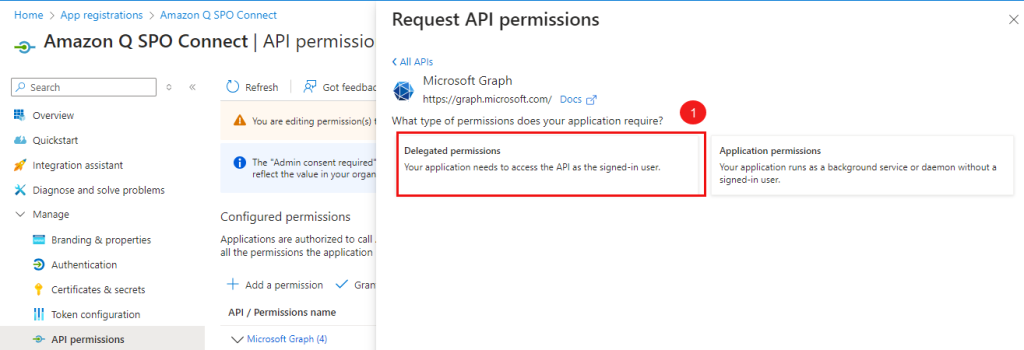
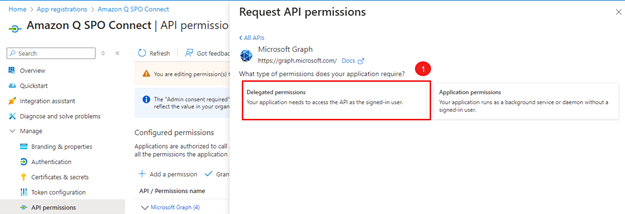
- Choose Delegated permissions.
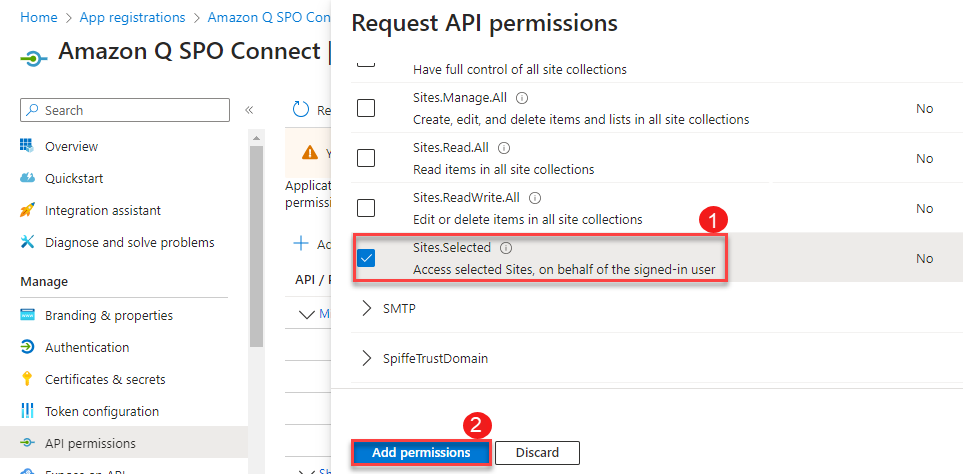
- Select
Sites.Selectedand choose Add permissions.
- Add the following Microsoft Graph API delegated permissions:
GroupMember.Read.AllUser.Read.All
You will see the permissions listed as shown in the following screenshot.
- Some of the following permissions require admin consent in a tenant before it can be used. To grant admin consent, choose Grant admin consent for <organization name> and choose Yes to confirm.
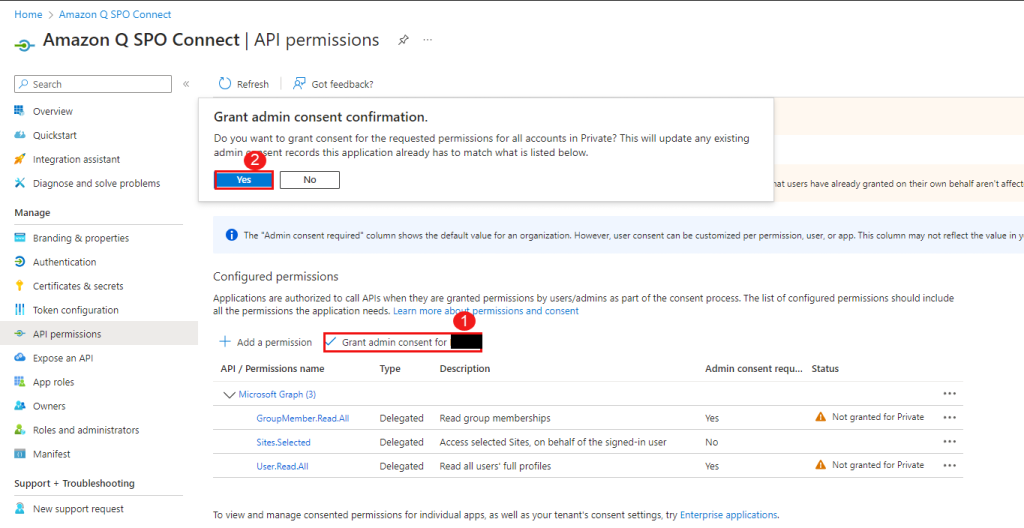
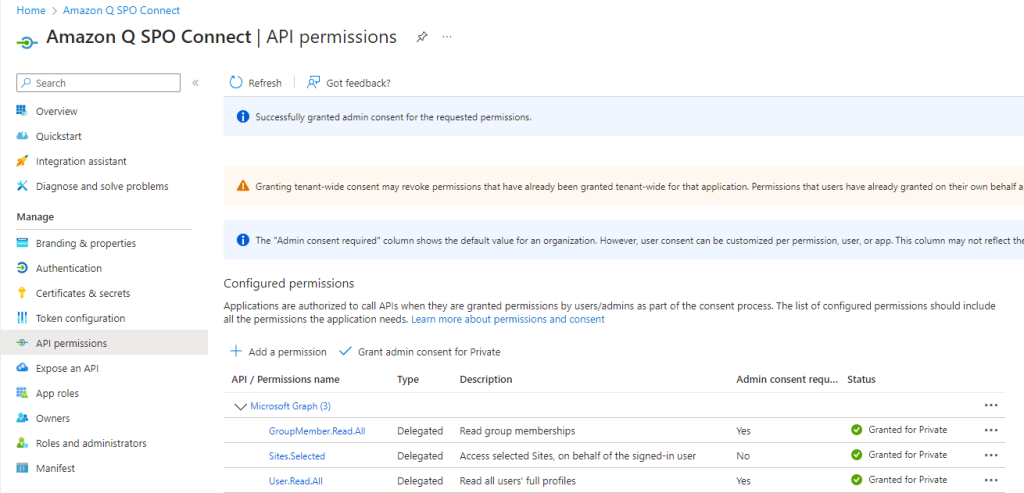
After granting admin consent, your permissions should look like the following screenshot.
- To grant permissions to a specific SharePoint site, you’ll need to obtain the Site ID for that site.
- Visit the URL of the SharePoint site in your web browser. The URL will be in the format
https://yourcompany.sharepoint.com/sites/{SiteName}. - Log in to the site using valid
- Edit the URL in your browser’s address bar by appending
/_api/site/idto the end of{SiteName}. For example, if the original URL washttps://yourcompany.sharepoint.com/sites/HumanResources, modify it tohttps://yourcompany.sharepoint.com/sites/HumanResources/_api/site/id. - Press Enter, and the browser will display the Site ID for that particular SharePoint site collection.
- Visit the URL of the SharePoint site in your web browser. The URL will be in the format

- Run the script after gathering the values listed in the following table.
| Variable | Description |
AppName |
Display name that you captured earlier. |
AppID |
Application (client) ID that you captured earlier. |
SitesFullControlAppID |
Application (client) ID that was granted with Sites.FullControl.All. This is a prerequisite to have access to another application. This application won’t be used by the Amazon Q Business connector, but it’s needed to grant Sites.Selected permissions only to the application you plan to register. |
SitesFullControlAppClientSecret |
Client secret of the SitesFullControlAppID you entered. |
SiteID |
SharePoint Site ID. |
TenantId |
Directory (tenant) ID that you captured earlier. |
param(
  [Parameter(Mandatory = $true,
    HelpMessage = "The friendly name of the app registration")]
  [String]
  $AppName,
  [Parameter(Mandatory = $true,
    HelpMessage = "Application (client) ID that was registered")]
  [String]
  $AppID,
  [Parameter(Mandatory = $true,
    HelpMessage = "Application (client) ID that was granted with Sites.FullControl.All")]
  [String]
  $SitesFullControlAppID,

  [Parameter(Mandatory = $true,
    HelpMessage = "Client Secret of the APP ID that was granted with Sites.FullControl.All")]
  [string]
  $SitesFullControlAppClientSecret,

  [Parameter(Mandatory = $true,
    HelpMessage = "SharePoint Site ID")]
  [String]
  $SiteId,

  [Parameter(Mandatory = $true,
    HelpMessage = "Your Azure Active Directory tenant ID")]
  [String]
  $TenantId,

  [Parameter(Mandatory = $false)]
  [Switch]
  $StayConnected = $false
)

# You will get access token by logging into application that has Sites.Fullcontrol.All permissions and using the token, grant permissions to new application you created with Sites.Selected permission.

$Scope = "https://graph.microsoft.com/.default"
$TokenEndpoint = "https://login.microsoftonline.com/$TenantId/oauth2/v2.0/token"

# Body of the request

$body = @{
  grant_type    = "client_credentials"
  client_id     = $SitesFullControlAppID
  client_secret = $SitesFullControlAppClientSecret
  scope         = $Scope
}

# Get access token
$response = Invoke-RestMethod -Uri $TokenEndpoint -Method POST -Body $body

# URL to grant permission to site
$url = "https://graph.microsoft.com/v1.0/sites/$SiteId/permissions"

# Define the body content as JSON string

$Body = @"
{
  "roles": ["fullcontrol"],
  "grantedToIdentities": [{
    "application": {
      "id": "$AppID",
      "displayName": "$AppName"
    }
  }]
}
"@

# Headers
$headers = @{
  "Authorization" = "Bearer $($response.access_token)"
  "Content-Type"  = "application/json"
}
$response = Invoke-RestMethod -Uri $url -Method Post -Headers $headers -Body $Body

$response
The output from the PowerShell script will look like the following screenshot.

This completes the steps to configure permissions for a specific set of SharePoint site collections.
Option 2: Manually allow access to all SharePoint sites
Complete the following steps to allow full control permissions to all the SharePoint site collections:
- In the navigation pane, choose API permissions.
- Remove the permissions that were granted by default when you registered the application.
- Choose Add a permission and then choose Microsoft Graph.
- Choose Delegated permissions.
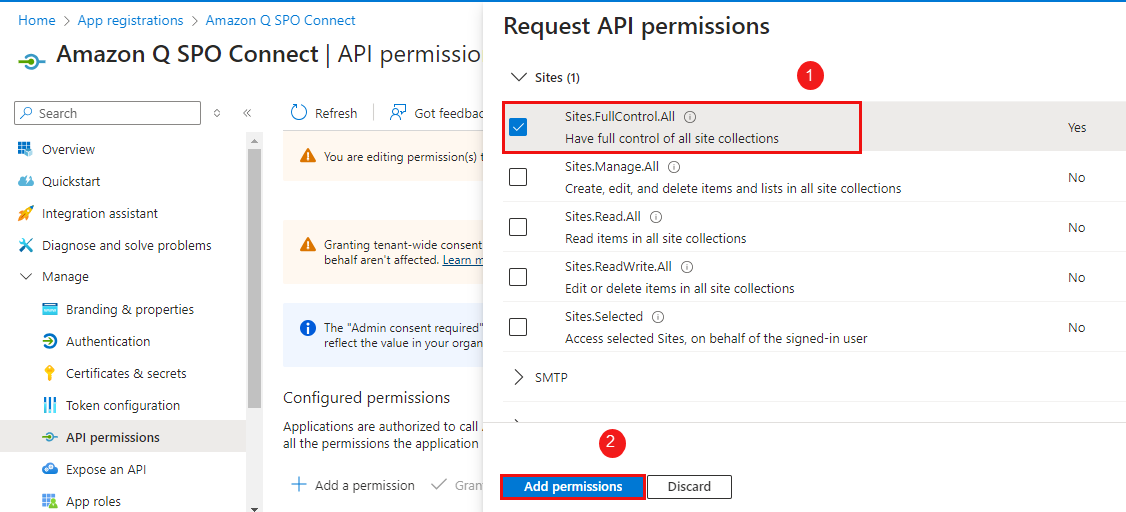
- Select
FullControl.Alland choose Add permissions.
Next, you configure Microsoft Graph application permissions.
- In the navigation pane, choose API permissions.
- Choose Add a permission and then choose Microsoft Graph.
- Choose Application permissions.
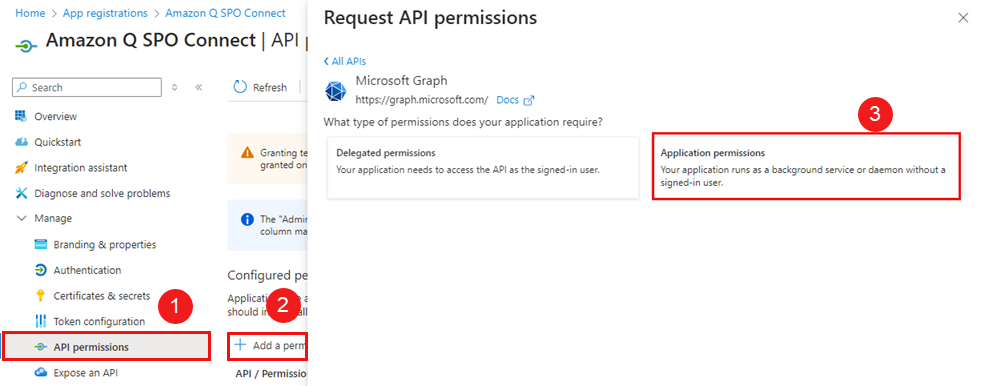
- Add the following application permissions:
-
GroupMember.Read.All -
User.Read.All -
Notes.Read.All -
Sites.Read.All
-
Next, you configure SharePoint delegated permissions.
- In the navigation pane, choose API permissions.
- Choose Add a permission and then choose SharePoint.
- Choose Delegated permissions.
- Expand
AllSites, selectAllSites.Read, and choose Add permission.

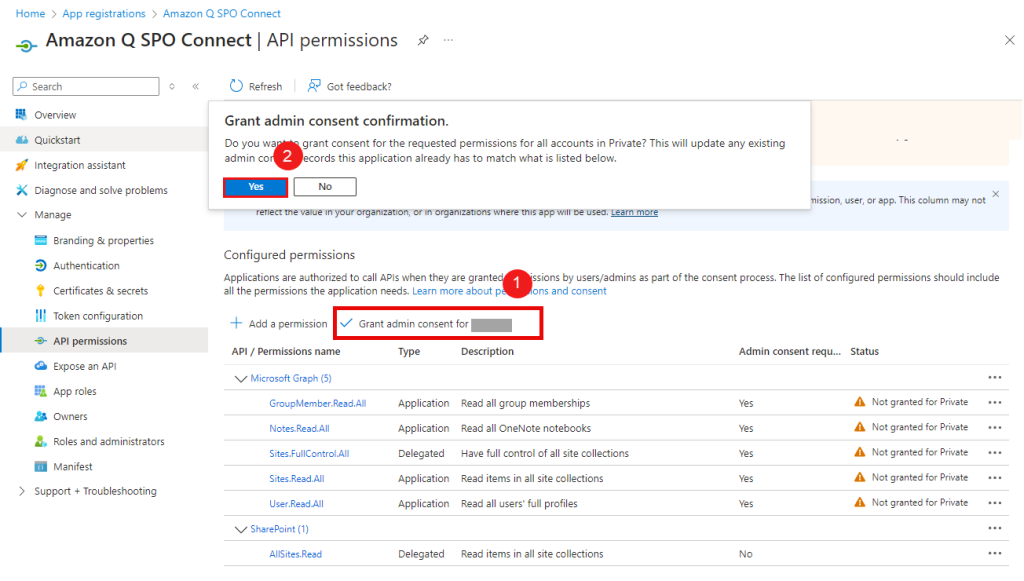
You will find the permissions listed as shown in the following screenshot.
- Some of the following permissions require admin consent in a tenant before it can be used. To grant admin consent, choose Grant admin consent for <organization name> and choose Yes to confirm.
After granting admin consent, your permissions will look like the following screenshot.
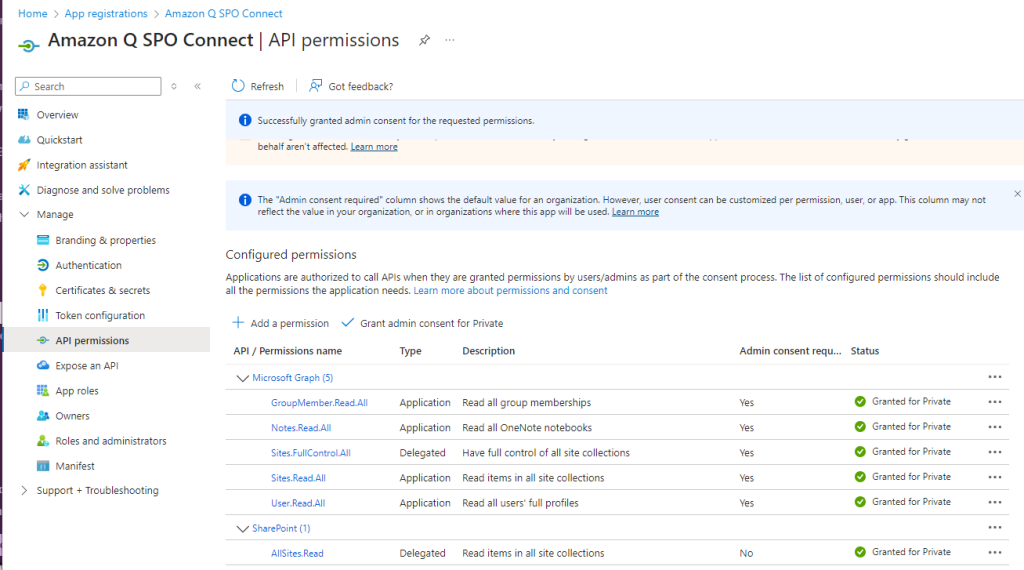
This completes the steps to configure permissions to allow full control permissions to all the SharePoint site collections.
Create a client secret
Complete the following steps to create a client secret:
- In the navigation pane, choose Certificates & secrets.
- On the Client secrets tab, choose New client secret.
- Enter a value for Description and choose an expiration length Expires.
- Choose Add.
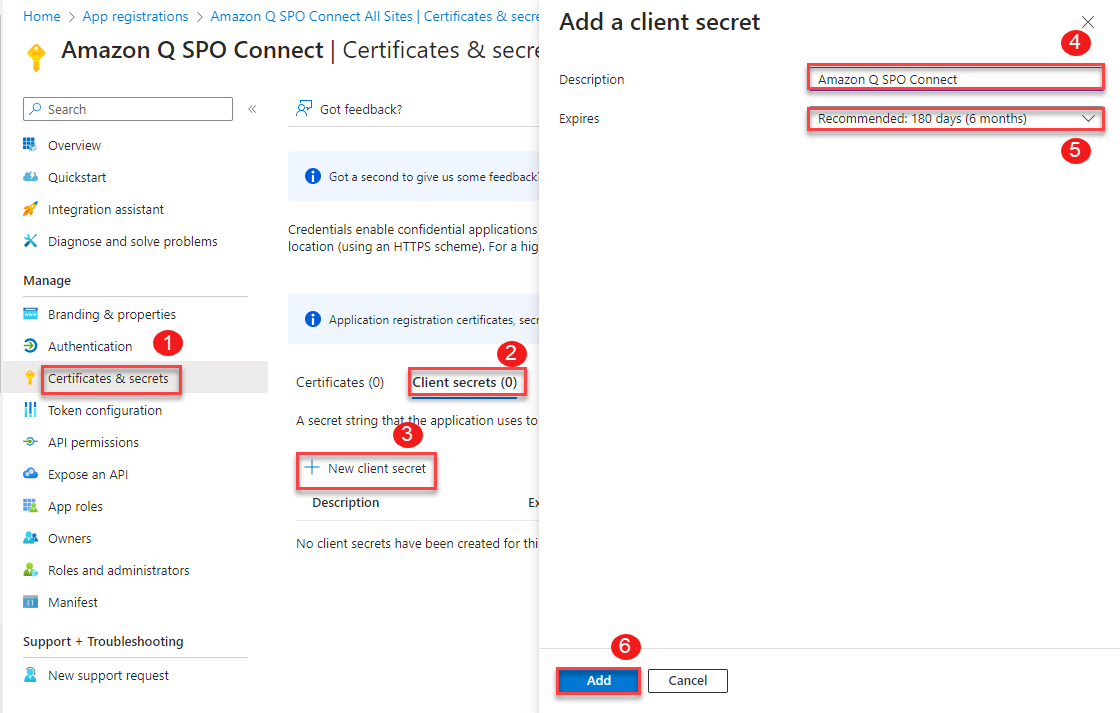
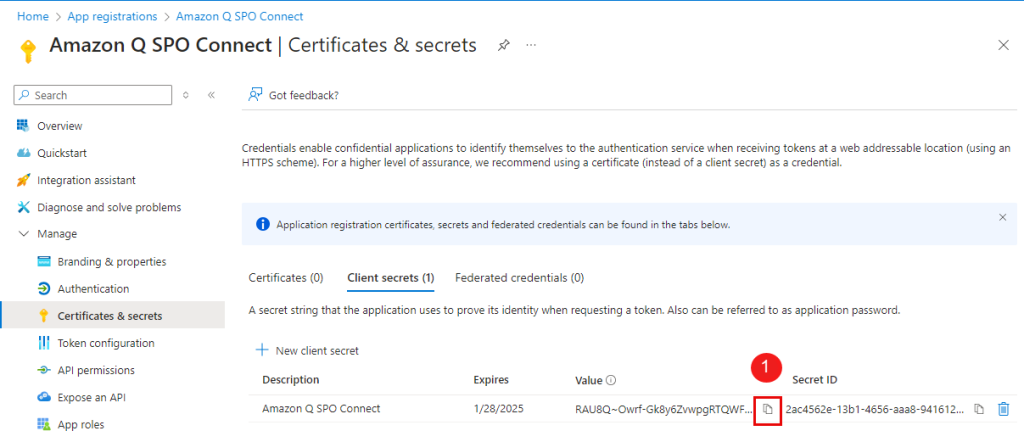
- Save the client secret value.
This value is needed while configuring Amazon Q. Client secret values can’t be viewed except for immediately after creation. Be sure to save the secret.
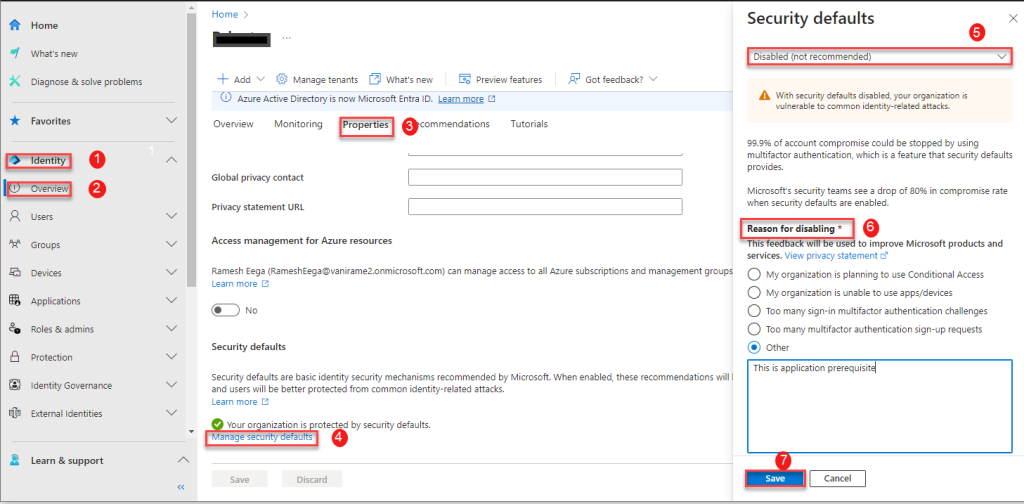
Deactivate multi-factor authentication
To deactivate multi-factor authentication (MFA), sign in to the Microsoft Entra Admin Center as security or global administrator and disable the security defaults.
- In the navigation pane, choose Identity and Overview.
- On the Properties tab, choose Manage security defaults.
- Choose Disabled.
- For Reason for disabling, select Other and enter your reason.
- Choose Save.
Configure Azure AD using the provided PowerShell script
- Option 1: Grant access to specific SharePoint sites. This approach involves granting the Selected permission, which allows access to a specific set of SharePoint sites.
- Option 2: Grant access to all SharePoint sites. This approach involves granting the
FullControl.Allpermission, which allows access to all SharePoint sites in your organization.
When configuring permissions, consider your organization’s SharePoint access requirements. Many SharePoint admins prefer to grant Amazon Q Business access only to specific sites that need to be crawled, in which case Option 1 with the Sites.Selected permission would be suitable.
For either option, the user running the PowerShell script should be an Azure AD tenant admin or have tenant admin permissions. Additionally, .
Run one of the provided PowerShell scripts, then follow the additional instructions. The scripts will perform the following tasks:
- Register a new application in Azure AD/Entra ID
- Configure the required permissions
- Provide admin consent for the configured permissions
Option 1: Use a script to allow access to specific SharePoint sites
There is one additional prerequisite for option 1 (granting Sites.Selected permission): you need access to another application in Microsoft Entra ID that has the Sites.FullControl.All application-level permission. These are required to grant the Sites.Selected permission to the new application you will register. If you don’t have access to an application with the Sites.FullControl.All permission, you can follow the to register a new application and grant it the Sites.FullControl.All permission. This application will be referred to as SitesFullControlApp.
Use the following script to grant permissions to a specific SharePoint site. You need the following information before running the script.
| Variable | Description |
AppName |
Name of the application that you plan to register. |
SitesFullControlAppID |
Application (client) ID that was granted with Sites.FullControl.All. This is a prerequisite to have access to another application. This application won’t be used by the Amazon Q Business connector, but it’s needed to grant Sites.Selected permissions only to the application you plan to register. |
SitesFullControlAppClientSecret |
Client secret of the app ID you entered. |
SiteID |
SharePoint Site ID. |
TenantId |
Your Azure Active Directory tenant ID. |
param(
  [Parameter(Mandatory = $true,
    HelpMessage = "The friendly name of the app registration")]
  [String]
  $AppName,
  [Parameter(Mandatory = $true,
    HelpMessage = "Application (client) ID that was registered")]
  [String]
  $AppID,
  [Parameter(Mandatory = $true,
    HelpMessage = "Application (client) ID that was granted with Sites.FullControl.All")]
  [String]
  $SitesFullControlAppID,

  [Parameter(Mandatory = $true,
    HelpMessage = "Client Secret of the APP ID that was granted with Sites.FullControl.All")]
  [string]
  $SitesFullControlAppClientSecret,

  [Parameter(Mandatory = $true,
    HelpMessage = "SharePoint Site ID")]
  [String]
  $SiteId,

  [Parameter(Mandatory = $true,
    HelpMessage = "Your Azure Active Directory tenant ID")]
  [String]
  $TenantId,

  [Parameter(Mandatory = $false)]
  [Switch]
  $StayConnected = $false
)

# You will get access token by logging into application that has Sites.Fullcontrol.All permissions and using the token, grant permissions to new application you created with Sites.Selected permission.

$Scope = "https://graph.microsoft.com/.default"
$TokenEndpoint = "https://login.microsoftonline.com/$TenantId/oauth2/v2.0/token"

# Body of the request

$body = @{
  grant_type    = "client_credentials"
  client_id     = $SitesFullControlAppID
  client_secret = $SitesFullControlAppClientSecret
  scope         = $Scope
}

# Get access token
$response = Invoke-RestMethod -Uri $TokenEndpoint -Method POST -Body $body

# URL to grant permission to site
$url = "https://graph.microsoft.com/v1.0/sites/$SiteId/permissions"

# Define the body content as JSON string

$Body = @"
{
  "roles": ["fullcontrol"],
  "grantedToIdentities": [{
    "application": {
      "id": "$AppID",
      "displayName": "$AppName"
    }
  }]
}
"@

# Headers
$headers = @{
  "Authorization" = "Bearer $($response.access_token)"
  "Content-Type"  = "application/json"
}
$response = Invoke-RestMethod -Uri $url -Method Post -Headers $headers -Body $Body

$response
The output from the PowerShell script will look like the following screenshot.
Note down the secret value shown in the output and then close the window for security. You will not able to retrieve this value again.
Option 2: Use a script to manually grant access to all SharePoint sites
The following script grants full control permissions to all the SharePoint site collections. You need the following information before running the script.
| Variable | Description |
AppName |
The name of the application that you plan to register. |
param(
  [Parameter(Mandatory=$true,
  HelpMessage="The friendly name of the app registration")]
  [String]
  $AppName,
  [Parameter(Mandatory=$false,
  HelpMessage="Your Azure Active Directory tenant ID")]
  [String]
  $TenantId,
  [Parameter(Mandatory=$false)]
  [Switch]
  $StayConnected = $false
)

# Requires an admin
if ($TenantId)
{
  Connect-MgGraph -Scopes "Application.ReadWrite.All User.Read AppRoleAssignment.ReadWrite.All  DelegatedPermissionGrant.ReadWrite.All" -TenantId $TenantId
}
else
{
  Connect-MgGraph -Scopes "Application.ReadWrite.All User.Read AppRoleAssignment.ReadWrite.All  DelegatedPermissionGrant.ReadWrite.All"
}
$SitePermissionAllSitesRead = "4e0d77b0-96ba-4398-af14-3baa780278f4"
$GraphPermissionsGroupMemberReadAll  = "98830695-27a2-44f7-8c18-0c3ebc9698f6"
$GraphPermissionsNotesReadAll = "3aeca27b-ee3a-4c2b-8ded-80376e2134a4"
$GraphPermissionsSitesReadAll = "332a536c-c7ef-4017-ab91-336970924f0d"
$GraphPermissionsUserReadAll = "df021288-bdef-4463-88db-98f22de89214"
$GraphPermissionsSitesFullControlAll = "5a54b8b3-347c-476d-8f8e-42d5c7424d29"

# Sharepoint permissions
$sharePointResourceId = "00000003-0000-0ff1-ce00-000000000000"
$SitePermission = @(
  @{
  Id= $SitePermissionAllSitesRead  #AllSites.Read (Delegated) – Read items in all site collections
  Type="Scope"
}
)

# Graph permissions
$graphResourceId =  "00000003-0000-0000-c000-000000000000"
$graphPermissions = @(
    @{
        Id =  $GraphPermissionsGroupMemberReadAll  # GroupMember.Read.All (Application)
        Type = "Role"
    },
    @{
        Id = $GraphPermissionsNotesReadAll # Notes.Read.All (Application)
        Type = "Role"
    },
    @{
        Id = $GraphPermissionsSitesReadAll # Sites.Read.All (Application)
        Type = "Role"
    },
    @{
        Id =  $GraphPermissionsUserReadAll # User.Read.All (Application)
        Type = "Role"
    },
     @{
        Id = $GraphPermissionsSitesFullControlAll # Sites.FullControl.All (Delegated)
        Type = "Scope"
    }
)


$requiredResourceAccess = @()

$graphResourceAccess   = @{
ResourceAppId=$graphResourceId
ResourceAccess= $graphPermissions
}

$spResourceAccess = @{
    ResourceAppId = $sharePointResourceId
    ResourceAccess = $SitePermission
  }

$requiredResourceAccess += $spResourceAccess
$requiredResourceAccess += $graphResourceAccess


# Get context for access to tenant ID
$context = Get-MgContext

# Create app registration
$appRegistration = New-MgApplication -DisplayName $AppName -SignInAudience "AzureADMyOrg" `
 -Web @{ RedirectUris="http://localhost"; } `
 -RequiredResourceAccess   $requiredResourceAccess `
 -AdditionalProperties @{}
Write-Host -ForegroundColor Cyan "App registration created with app ID" $appRegistration.AppId

# Add client secret
#$clientSecret = [System.Net.WebUtility]::UrlEncode(([System.Text.Encoding]::UTF8.GetBytes((New-Guid).ToString() + "abcdefghijklmnopqrstuvwxyz0123456789")))
$clientSecretCredential = Add-MgApplicationPassword -ApplicationId $appRegistration.Id -PasswordCredential @{ displayName  = "Client Secret"; EndDateTime = (Get-Date).AddYears(2) }
Write-Host -ForegroundColor Cyan "Client secret created "

$secretValue = $clientSecretCredential.SecretText
Write-Host  -ForegroundColor  Red "Secret Text is [$secretValue]"
Write-Host  -ForegroundColor  Red  "Please Clear the screen after noting down the Secret value."
#$clientSecretCredential |  Format-List

# Create corresponding service principal
$servicePrincipal= New-MgServicePrincipal -AppId $appRegistration.AppId -AdditionalProperties @{} | Out-Null
Write-Host -ForegroundColor Cyan "Service principal created"
Write-Host
Write-Host -ForegroundColor Green "Success"
Write-Host

#Admin consent
$scp = Get-MgServicePrincipal -Filter "DisplayName eq '$($AppName)'"
$app = Get-MgServicePrincipal -Filter "AppId eq '$graphResourceId'"

New-MgServicePrincipalAppRoleAssignment -ServicePrincipalId $scp.id -PrincipalId $scp.Id -ResourceId $app.Id -AppRoleId  $GraphPermissionsGroupMemberReadAll
New-MgServicePrincipalAppRoleAssignment -ServicePrincipalId $scp.id -PrincipalId $scp.Id -ResourceId $app.Id -AppRoleId $GraphPermissionsNotesReadAll
New-MgServicePrincipalAppRoleAssignment -ServicePrincipalId $scp.id -PrincipalId $scp.Id -ResourceId $app.Id -AppRoleId $GraphPermissionsSitesReadAll
New-MgServicePrincipalAppRoleAssignment -ServicePrincipalId $scp.id -PrincipalId $scp.Id -ResourceId $app.Id -AppRoleId $GraphPermissionsUserReadAll
New-MgOAuth2PermissionGrant -ClientId $scp.id  -consentType "AllPrincipals"  -resourceId $app.Id  -Scope "Sites.FullControl.All"


if ($StayConnected -eq $false)
{
  Disconnect-MgGraph
  Write-Host "Disconnected from Microsoft Graph"
}
else
{
  Write-Host
  Write-Host -ForegroundColor Yellow "The connection to Microsoft Graph is still active. To disconnect, use Disconnect-MgGraph"
}
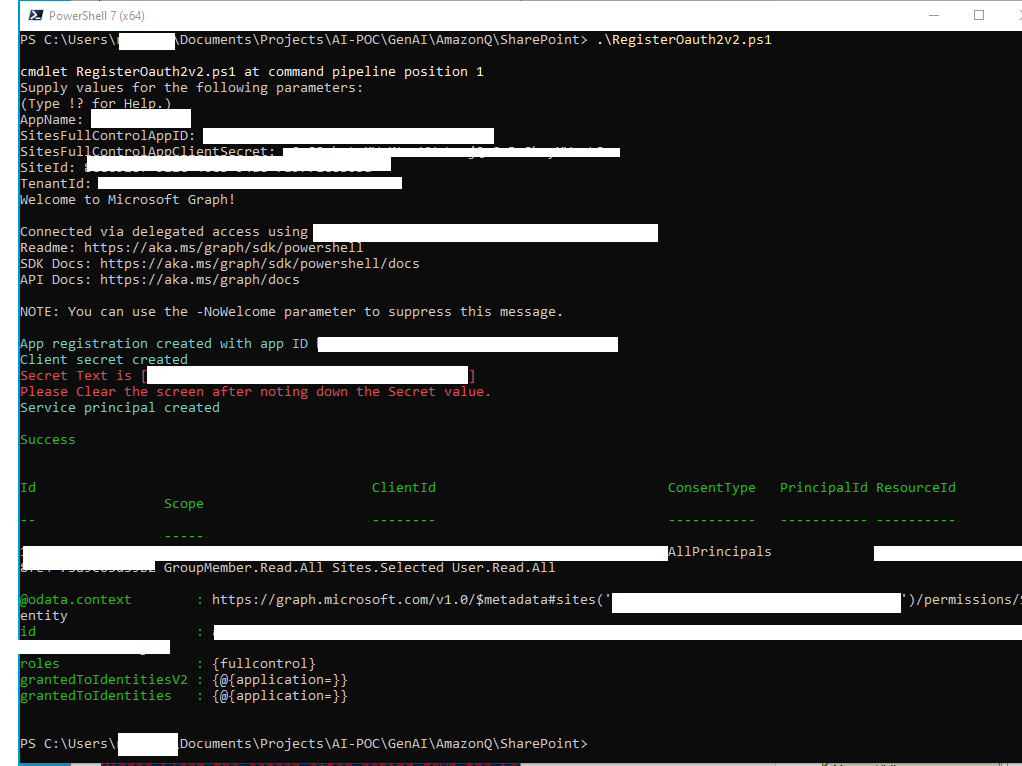
The output from the PowerShell script will look like the following screenshot.

Note down the secret value shown in the output and then close the window for security. You will not able to retrieve this value again.
Configure Amazon Q
Make sure you have set up Amazon Q Business with Entra ID as your identity provider as mentioned in the prerequisites. Also, make sure the email ID is in lowercase letters while creating the user in Entra ID.
Follow the instructions in Connecting Amazon Q Business to SharePoint (Online) using the console.
For Step 9 (Authentication), we choose Oauth 2.0 and configure it as follows:
- For Tenant ID, enter the tenant ID of your SharePoint account.
This is the directory (tenant) ID in your registered Azure application, in the Azure Portal, as shown in the following screenshot (the IDs will be different for your setup).
- For the AWS Secrets Manager secret, create a secret on the Secrets Manager console to store your SharePoint authentication credentials:
- For Secret name, enter a name for your secret.
- For Username, enter user name for your SharePoint account.
- For Password, enter password for your SharePoint account.
- For Client ID, enter the Azure AD client ID generated when you registered SharePoint in Azure AD. This is the application (client) ID created in the Azure Portal when registering the SharePoint application in Azure, as described earlier.
- For Client secret, enter the secret generated earlier.
Frequently asked questions
In this section, we discuss some frequently asked questions.
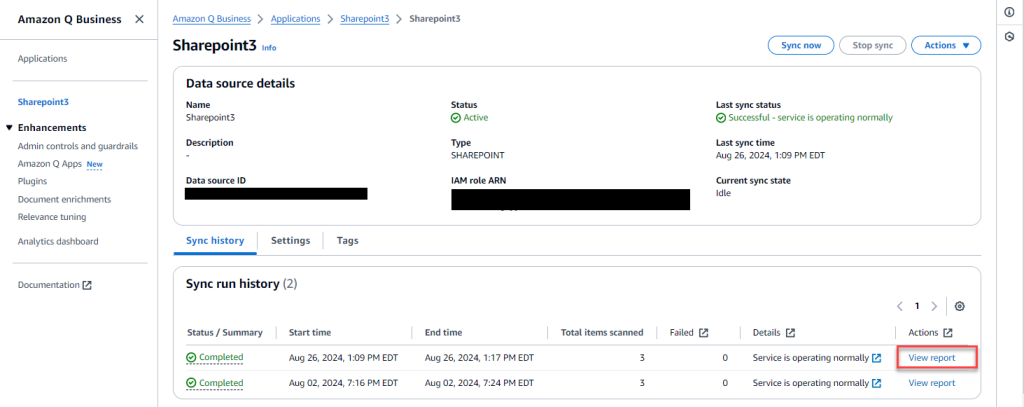
Amazon Q Business isn’t answering questions
There are a few possible scenarios for this issue. If no users are getting a response from a specific document, verify that you have synced your data source with Amazon Q. Choose View report in the Sync run history section. For more information, see Introducing document-level sync reports: Enhanced data sync visibility in Amazon Q Business.
If a specific user is unable to access, verify that their email address in SharePoint matches with the email address of the corresponding identity in IAM Identity Center and entered in lowercase in IAM Identity Center. For more information, refer to Known limitations for the SharePoint (Online) connector.
For troubleshooting purposes, you can use the
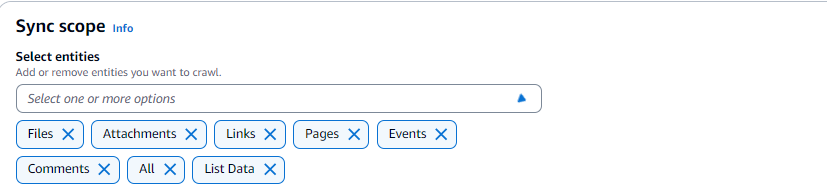
Amazon Q Business isn’t answering any questions that are in the event attachment or comments in the SharePoint site
The connector crawls event attachments only when Events is also chosen as an entity to be crawled. Make sure that you chose the corresponding entities in the sync scope.
Error message that authentication failed
In some cases, you might get the error message, “Sharepoint Connector Error code: SPE-5001 Error message: Authentication failed:” when trying to sync.
To address this, validate that the user name, password, clientId, clientSecret, and authType values are correct in the secret that you created for this connector. Verify that MFA is deactivated.
Amazon Q Business is showing old data after an update
After the content has been updated on SharePoint, you must re-sync the contents for the updated data to be picked up by Amazon Q. Go to the data sources, select the SharePoint data source, and choose Sync now. After the sync is complete, verify that the updated data is reflected by running queries on Amazon Q.
Unable to sign in as a new user through the web experience URL
If you experience issues when signing in, clear your browser cookies and sign in as a new user.
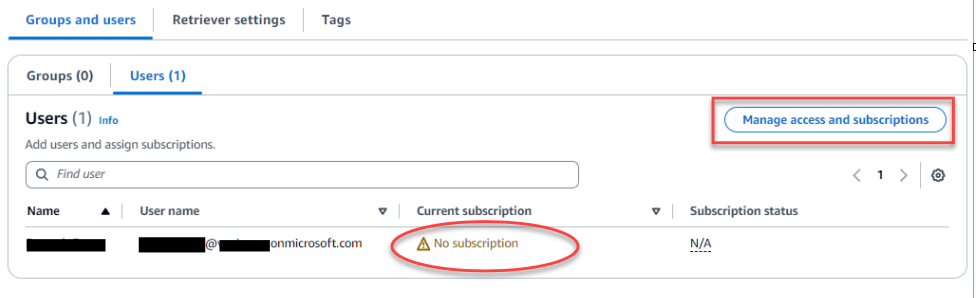
Error message that the application is not set up correctly
Verify that the user or group has subscriptions to Amazon Q Business. Check the corresponding user group and then choose Manage access and subscriptions and select the corresponding subscription.
Error message when uploading a file
In some cases, users might get the following message when they upload a file through their user experience: “Your Amazon Q Business subscription doesn’t include file uploads. Please contact your administrator for assistance.”
Troubleshooting
For troubleshooting guidance, refer to Troubleshooting your SharePoint (Online) connector.
Clean up
Complete the following steps to clean up your resources:
- Open the Office 365 Admin Center using the account of a user member of the Tenant Global Admins group.
- Navigate to the Microsoft Azure Portal.
- Search for and choose App registrations.
- Select the app you created earlier, then choose Delete.
- On the Amazon Q Business console, choose Applications in the navigation pane.
- Select the application you created, and on the Actions menu, choose Delete.
Additional capabilities of Amazon Q Business
Amazon Q Business offers much more than just a powerful AI assistant. Explore its other capabilities that allow you to customize the user experience, empower your workforce, and increase productivity:
- Admin controls and guardrails – Customize your application environment to your organizational needs. Amazon Q Business offers application environment guardrails or chat controls that you can configure to control the end-user chat experience. For example, admins can define specific topics that should be blocked or controlled in the application. You can customize how Amazon Q Business responds when these topics are mentioned by end-users.
- Amazon Q Apps – Empower your teams to build lightweight, purpose-built applications that streamline tasks and workflows without coding experience. For example, you could build an app that drafts personalized sales emails to customers informing them of new product launches or generates social media content for specified social media networks based on your data.
- Plugins for Amazon Q Business – Seamlessly integrate with supported third-party services that allow you to perform specific tasks like creating an incident ticket in ServiceNow or raising an issue in Jira—all without leaving the Amazon Q interface.
Conclusion
In this post, we explored how to integrate Amazon Q Business with SharePoint Online using the OAuth 2.0 ROPC flow authentication method. We provided both manual and automated approaches using PowerShell scripts for configuring the required Azure AD settings. Additionally, we demonstrated how to enter those details along with your SharePoint authentication credentials into the Amazon Q console to finalize the secure connection.
The ROPC flow offers an alternative to certificate-based authentication for connecting Amazon Q Business to SharePoint Online. This can be useful when you want Amazon Q Business to crawl through OneNote or if you don’t want to deal with certificates or in scenarios that require regular password rotation.
By following this post, enterprises can take advantage of the powerful knowledge mining capabilities of Amazon Q to unlock insights from their SharePoint data repositories and knowledge bases.
About the Author
 Ramesh Eega is a Global Accounts Solutions Architect based out of Atlanta, GA. He is passionate about helping customers throughout their cloud journey.