Amazon Q Business IAM Federation requires federating the user identities provisioned in your enterprise IdP (such as Okta or Ping Identity) account using federation with IAM. This involves a setup described in the following steps:
The following diagram shows a high-level architecture and authentication workflow. The enterprise IdP, such as Okta or Ping Identity, is used as the access manager for an authenticated user to interact with an Amazon Q Business application using an Amazon Q web experience or a custom application using an API.
It is not possible to get the groups defined in the enterprise IdP in the IAM federation workflow. If you’re using ACLs in your data sources with groups federated from the enterprise IdP, you can use the Amazon Q PutGroup API to define the federated groups in the Amazon Q Business user store. This way, the Amazon Q Business application can validate a user’s membership to the federated group and enforce the ACLs accordingly. This limitation doesn’t apply to configurations where groups used in ACLs are defined locally within the data sources. For more information, refer to Group mapping.
This is illustrated here using a group core-team, defined in Okta as shown in the following screenshot.
If document ACLs in the data sources are defined for the group core-team, based on the group defined in IdP, and the group core-team isn’t defined locally in the data sources, then you will first need to define the group in the Amazon Q Business user store using the PutGroup API. The AWS Command Line Interface (AWS CLI) command put-group (see the following code) demonstrates the use of this API. This API needs to be invoked by an AWS administrator or Amazon Q Business administrator persona. The Amazon Q Business user store must be updated to reflect group membership changes in your IdP. You might want to build an automation that updates the group membership in Amazon Q Business as group membership changes in your IdP directory.
aws qbusiness put-group
--application-id XXXXXXXX-XXXX-XXXX-XXXX-XXXXXXXXXXXX
--index-id XXXXXXXX-XXXX-XXXX-XXXX-XXXXXXXXXXXX
--group-name core-team —type INDEX
--group-members "memberUsers=[{[email protected],type=INDEX},{[email protected],type=INDEX},{[email protected],type=INDEX}]"
Prerequisites
To implement the sample use case described in this post, you need an Okta account. This post covers workflows for both OIDC and SAML 2.0, so you can follow either one or both workflows based on your business needs. You need to create application integrations for OIDC or SAML mode, and then configure the respective IAM identity providers in your AWS account, which will be required to create and configure your Amazon Q Business applications.
You will need a command line environment installed with the AWS CLI and the AWS SDK for Python (Boto3).
Command line environment for AWS administrator persona
Open a command line window installed with the AWS CLI and SDK for Python and have AWS credentials for the AWS administrator persona. Clone the GitHub repo with the sample scripts in a new working directory and change directory to iam-federation-samples. It will look like the following screenshot.
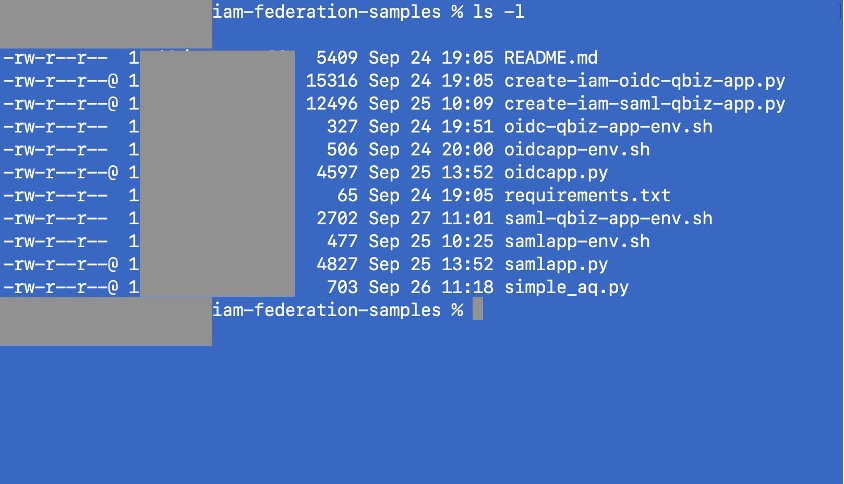
The files contained in this directory are:
- README.md – The description of each file in the directory.
- requirements.txt – The file containing a list of Python modules that are required to be installed.
- create-iam-oidc-qbiz-app.py – You will assume the persona of an AWS administrator, and use this script to set up Amazon Q Business applications by federating user identities provisioned in your enterprise IdP (Okta for the example in this post), using OIDC application integration.
- oidc-qbiz-app-env.sh – The shell script to set environment variables required by
create-iam-oidc-qbiz-app.py.
- create-iam-saml-qbiz-app.py – You will assume the persona of an AWS administrator, and use this script to set up Amazon Q Business applications by federating user identities provisioned in your enterprise IdP (Okta), using SAML application integration.
- saml-qbiz-app-env.sh – The shell script to set environment variables required by
create-iam-saml-qbiz-app.py.
- oidcapp.py – You will assume the persona of a custom application developer and deploy this script to integrate with your IdP’s OIDC application integration. The end-users will use the deployment to authenticate with the IdP, and the deployed script will provide AWS Sig V4 credentials using the user’s identity information for the authenticated user.
- oidcapp-env.py – The shell script to set environment variables required by
oidcapp.py.
- samlapp.py – You will assume the persona of a custom application developer and deploy this script to integrate with your IdP’s SAML application integration. The end-users will use the deployment to authenticate with the IdP, and the deployed script will provide AWS Sig V4 credentials using the user’s identity information for the authenticated user. In many use cases, the application could acquire the credentials and communicate with the Amazon Q Business application by invoking conversation APIs. The sample code has split this functionality into two Python scripts, because it can be useful during a proof of concept or testing to get the credentials, and then uses them to run a number of scripts using the same credentials.
- samlapp-env.sh – The shell script to set environment variables required by
samlapp.py.
- simple_aq.py – You will assume the persona of the end-user who has acquired AWS Sig V4 credentials using identity information, set up a command line window with those credentials, and run this script in that window, to make queries to the Amazon Q Business application using the ChatSync API.
A typical custom application will combine the functionality in oidcapp.py with the functionality in simple_aq.py or combine the functionality in samlapp.py with the functionality in simple_aq.py. In subsequent sections, you will use the command line environment for the AWS administrator persona to run create-iam-oidc-qbiz-app.py and create-iam-saml-qbiz-app.py.
Command line environment for Amazon Q Business developer persona
An Amazon Q Business developer persona who develops and deploys a custom application that accesses Amazon Q Business applications using APIs will also require the use of a command line environment with the SDK for Python. There is no need for the command line environment to start with AWS Sig V4 credentials. These will be obtained by the custom application using IAM federation on behalf of a user who authenticates with the IdP (Okta).
You can use the following steps to prepare the command line environment for the Amazon Q Business developer persona:
- Clone the GitHub repo with the sample scripts in a new working directory, and change directory to
iam-federation-samples. The list of files is described in the previous section.
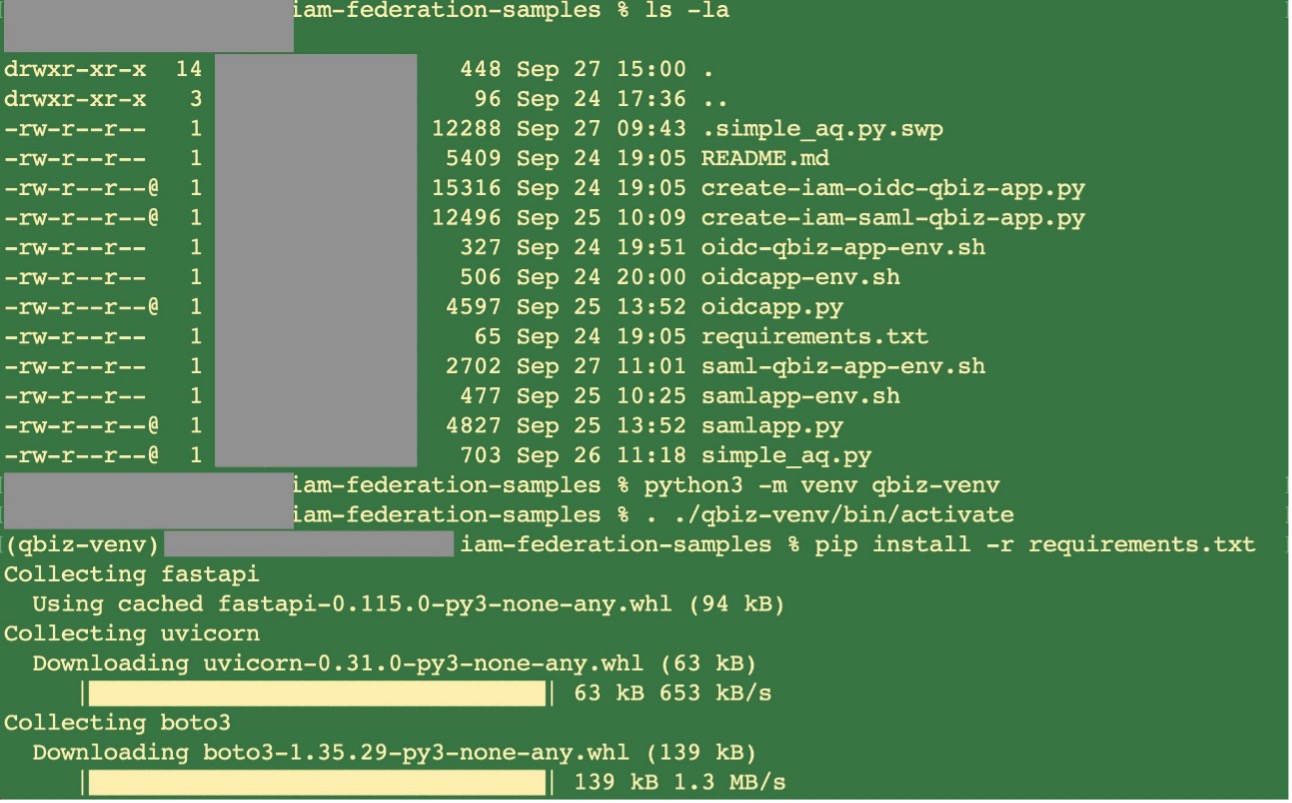
- As a best practice, using a Python virtual environment is recommended. Use the command
python -m venv qbiz-env to create a new Python virtual environment.
- Run the command
. ./qbiz-env/bin/activate to activate the virtual environment you just created.
- Run the command
pip install -r requirements.txt to install the required libraries.
In subsequent sections, you will use the command line environment for the Amazon Q Business developer persona to deploy the custom application illustrated by oidcapp.py and samlapp.py.
Create an Amazon Q Business application with an OIDC IAM identity provider
To set up an Amazon Q Business application with an OIDC IAM identity identifier, you first configure the Okta application integration with OIDC. Then you use create-iam-oidc-qbiz-app.py, which automates the following:
- Creating an IAM identity provider for that OIDC app integration for the Amazon Q Business application.
- Creating IAM policies and roles needed to deploy the web experience of the Amazon Q Business application.
- Deploying the web experience for the Amazon Q Business application.
After that, you will update the Okta application integration with the web experience URIs of the newly created Amazon Q Business application.
Create an Okta application integration with OIDC
Complete the following steps to create your Okta application integration with OIDC. These steps are usually performed by the IdP administrator in your organization.
- On the administration console of your Okta account, choose Applications, then choose Applications in the navigation pane.
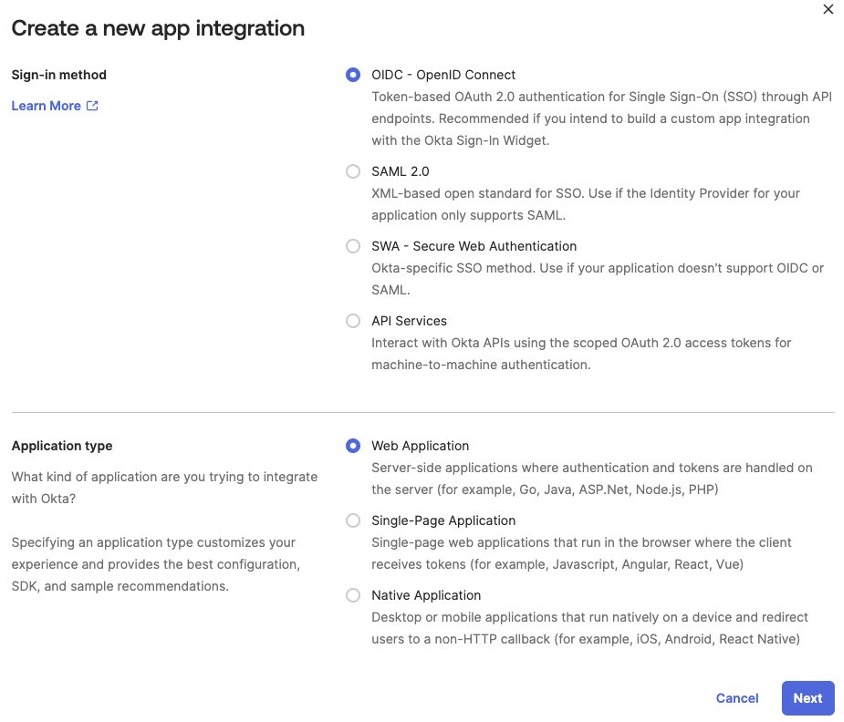
- Choose Create App Integration.
- For Sign-in method, select OIDC.
- For Application type, select Web Application.
- Choose Next.
- Give your app integration a name.
- Select Authorization Code and Refresh Token for Grant Type.
- For Sign-in redirect URIs, provide a placeholder value, such as
https://example.com/authorization-code/callback.
You update this later with the web experience URI of the Amazon Q Business application you create.
- On the Assignments tab, assign access to the appropriate users within your organization to your Amazon Q Business application.
- Choose Save to save the application integration.
Your integration will look similar to the following screenshots.
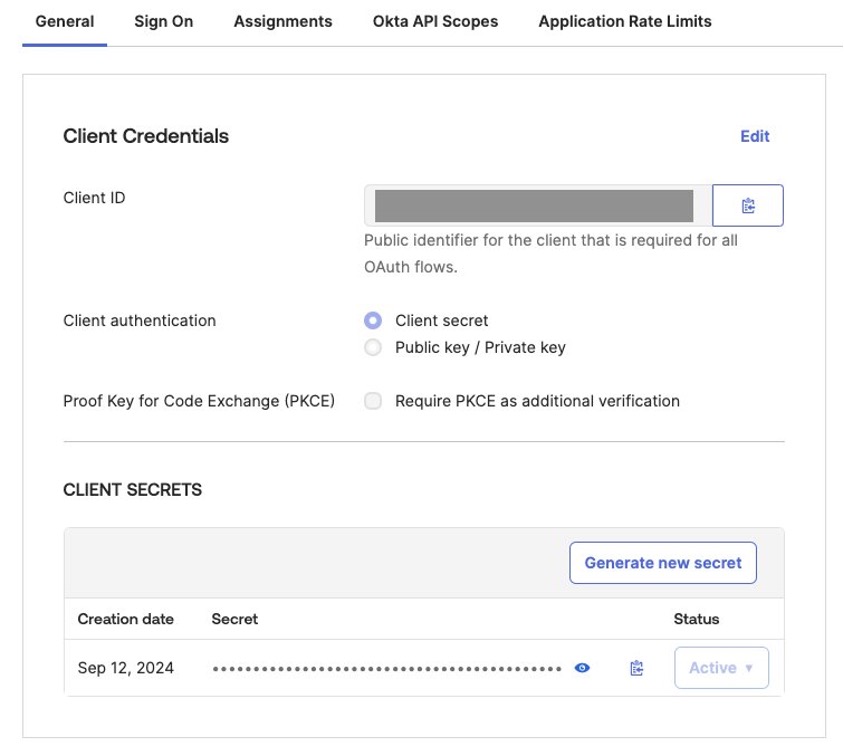
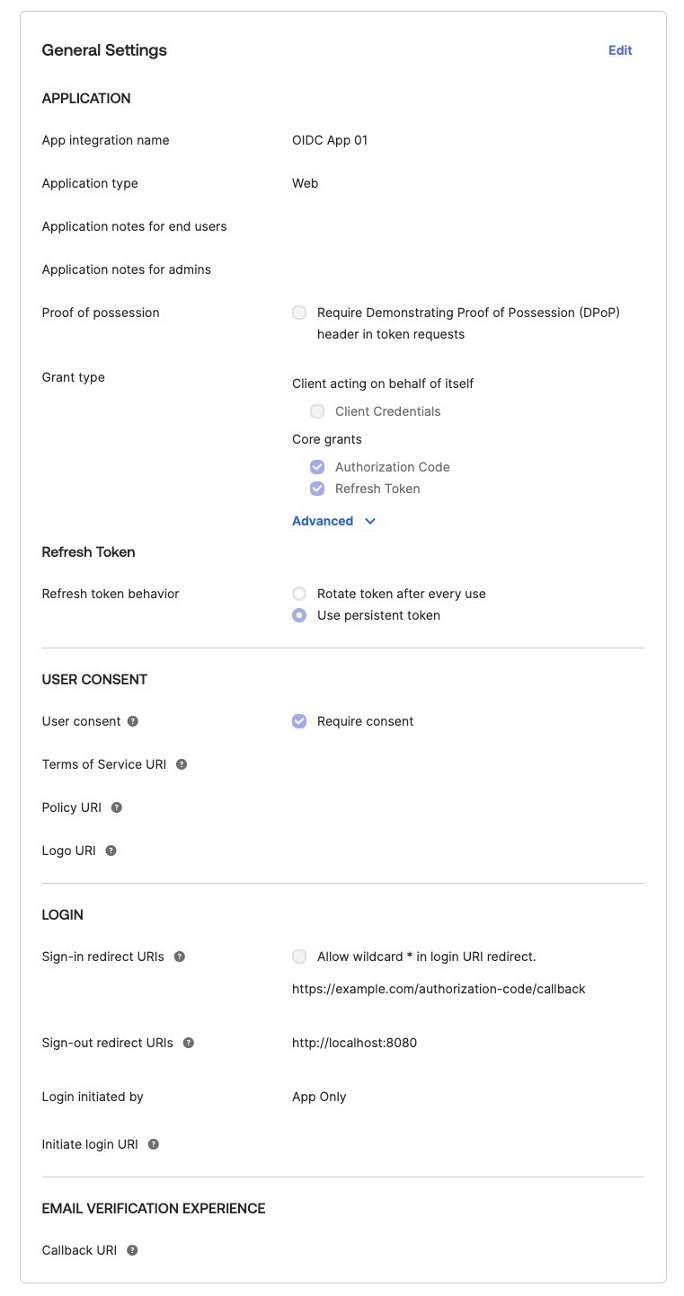
- Note the values for Client ID and Client secret to use in subsequent steps, because the illustrative scripts use the client secret to authenticate back to the IdP. When implementing your scripts, you can choose the authentication method suitable for your use case.
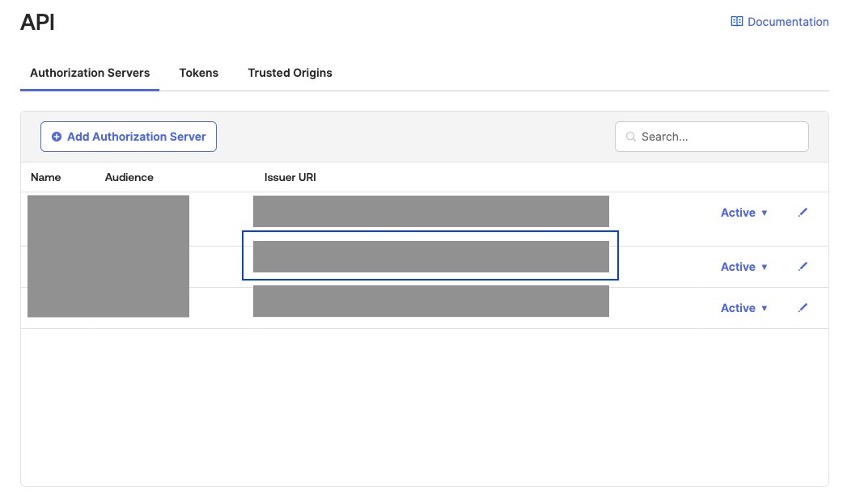
- In the navigation pane, choose Security and then API.
- Under API, on the Authorization Servers tab, note the Issuer URI for your authorization server, then choose your authorization server.
It’s best practice to avoid using the default authorization server.
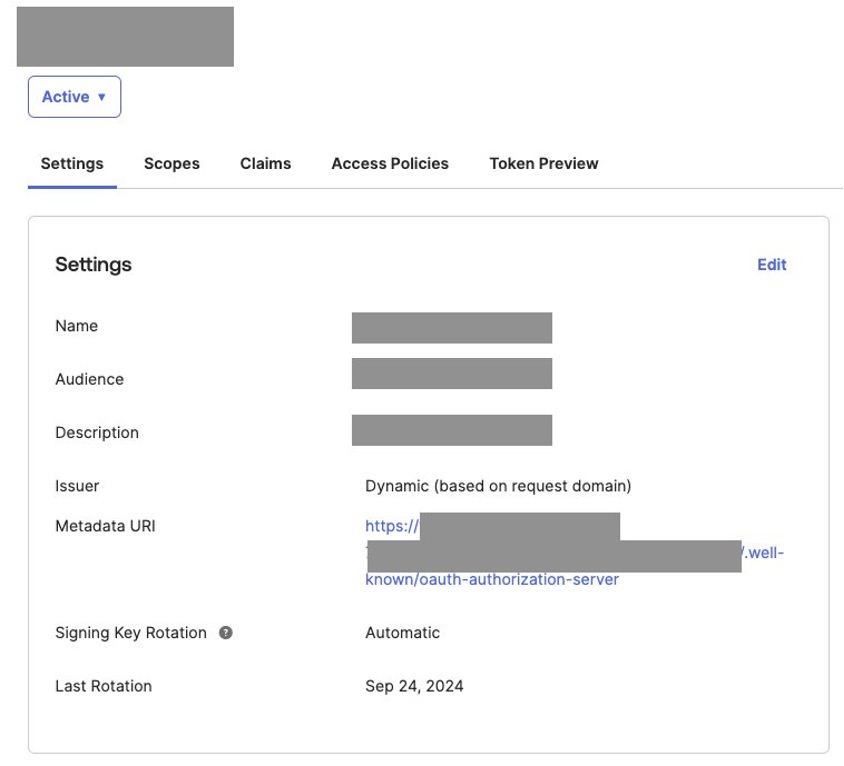
- On the Settings tab, note the Metadata URI. You will need to use it in subsequent steps.
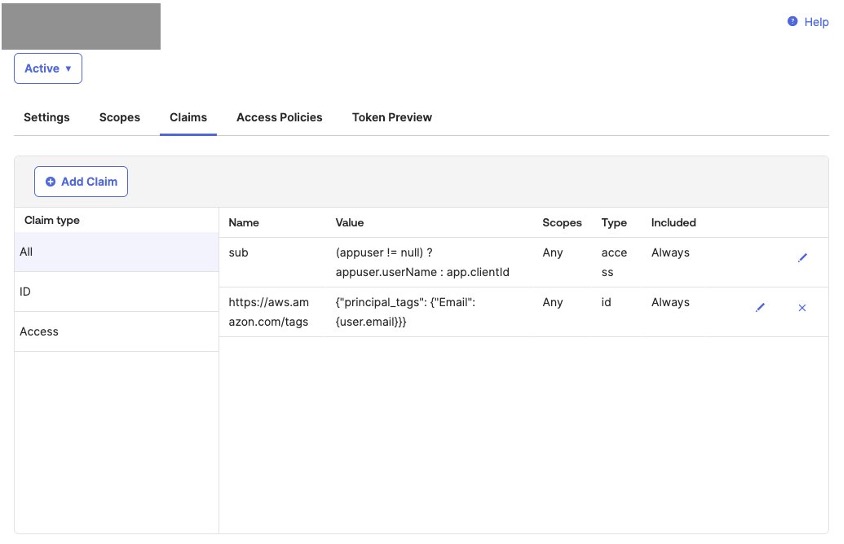
- On the Claims tab, choose Add Claim.
- For Name, enter
https://aws.amazon.com/tags.
- On the Claims tab, choose Add Claim.
- For Name, enter
https://aws.amazon.com/tags.
- For Include in token type, select ID Token.
- For Value, enter
{"principal_tags": {"Email": {user.email}}}.
- Choose Create.
You can add more attributes to enable Amazon Q Business response personalization. For more information, refer to Create and configure an Okta application.
The claim will look similar to the following screenshot.
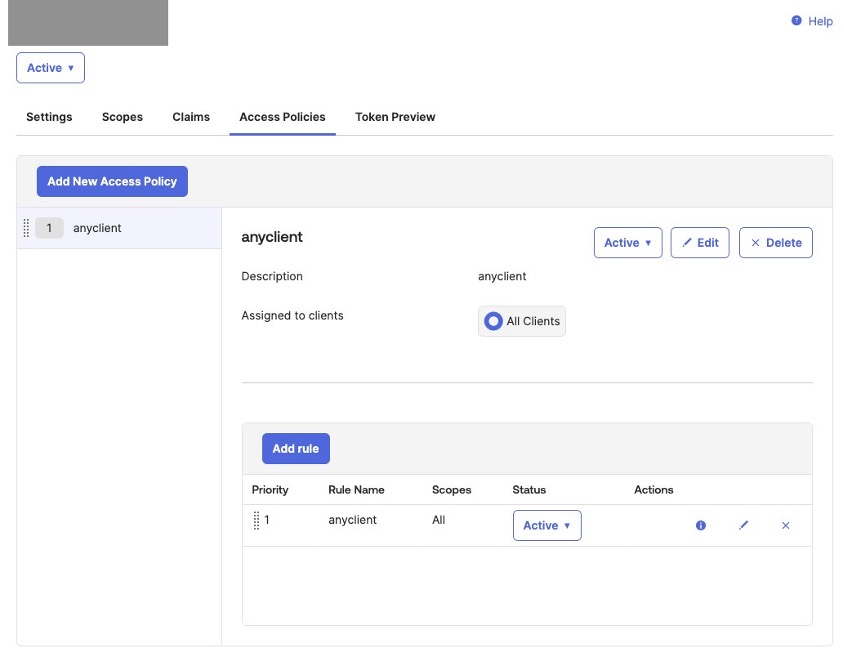
- On the Access Policies tab, verify that there is at least one policy that enables access to the application integration you created. If required, create a new policy to enable access to your application integration.
Store the OIDC client secret in AWS Secrets Manager
For this post, we store the OIDC client secret in AWS Secrets Manager. Complete the following steps:
- In a new tab of your web browser, open the Secrets Manager console. Make sure that you are in the AWS Region where you want to create your Amazon Q Business application.
- Choose Store a new secret.
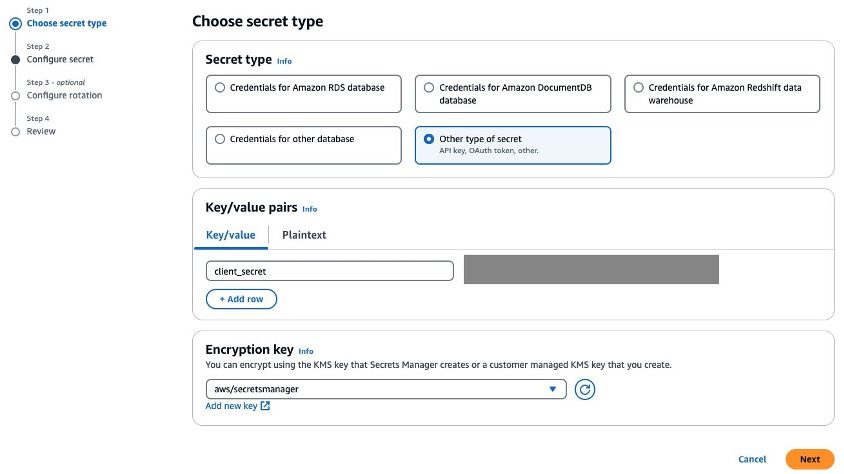
- For Choose secret type, select Other type of secret.
- For Key/value pairs, enter
client_secret as the key and enter the client secret you copied from the Okta application integration as the value.
- Choose Next.
- For Configure secret, enter a secret name starting with the prefix
QBusiness-
- For Configure rotation, unless you want to make changes, accept the defaults, and choose Next.
- For Review, review the secret you just stored, and choose Store.
- On the Secrets page of the Secrets Manager console, choose the secret you just created.
- Note the values for Secret name and Secret ARN.
Create the OIDC IAM identity provider, required IAM roles, and Amazon Q Business application
These steps are usually performed by an AWS administrator or an Amazon Q Business administrator with permissions to create IAM identity providers and IAM roles.
- In the command line window for the AWS administrator persona, edit
oidc-qbiz-app-env.sh and replace the placeholders with the information from your AWS account and IdP application integration from the previous steps (as seen in the following code). Then run the shell script in your command line window to set the environment variables using the command source ./oidc-qbiz-app-env.sh.
Take this opportunity to read the code in create-iam-oidc-qbiz-app.py and understand how it makes API calls to create the OIDC IAM identity provider and the Amazon Q Business application, creates the retriever and index for the Amazon Q Business application and the IAM roles required for the Amazon Q Business web experience, creates the Amazon Q Business web experience, and enables auto subscription to the Amazon Q Business application.
export AWS_ACCOUNT_ID="<REPLACE-WITH-YOUR-AWS-ACCOUNT-ID>"
export AWS_DEFAULT_REGION="<REPLACE-WITH-YOUR-AWS-REGION>"
export AWS_SECRET_ID="<REPLACE-WITH-YOUR-SECRETS-MANAGER-SECRET-STORING-IDP-CLIENT-SECRET>"
export AWS_SECRET_ENCRYPTION_KEY="<REPLACE-WITH-YOUR-SECRET-ENCRYPTION-KEY>"
export IDP_CLIENT_ID="<REPLACE-WITH-YOUR-IDP-APP-INTEGRATION-CLIENT-ID>"
export IDP_ISSUER_URL="<REPLACE-WITH-YOUR-IDP-ISSUER-URL>"
- Run
python ./create-iam-oidc-qbiz-app.py from your command line.
You should see output similar to the following. Capture the output; you will need this information in subsequent steps.
OpenID Connect Provider ARN: arn:aws:iam::XXXXXXXXXXXX:oidc-provider/XXXXXXXXXX.okta.com/XXXXXXXXXXXX
QBusiness Application ID: XXXXXXXX-XXXX-XXXX-XXXX-XXXXXXXXXXXX
QBusiness Index ID: XXXXXXXX-XXXX-XXXX-XXXX-XXXXXXXXXXXX
QBusiness Retriever ID: XXXXXXXX-XXXX-XXXX-XXXX-XXXXXXXXXXXX
Web experience policy: arn:aws:iam::XXXXXXXXXXXX:policy/qbiz-XXXXXXXXXX-XXXX-web-experience-policy
Web experience role: arn:aws:iam::XXXXXXXXXXXX:role/qbiz-XXXXXXXXXX-XXXX-web-experience-role
Attached arn:aws:iam::XXXXXXXXXXXX:policy/qbiz-XXXXXXXXXX-XXXX-web-experience-policy to role qbiz-XXXXXXXXXX-XXXX-web-experience-role
Secrets manager policy: arn:aws:iam::XXXXXXXXXXXX:policy/qbiz-XXXXXXXXXX-XXXX-secrets-manager-policy
Secrets manager role: arn:aws:iam::XXXXXXXXXXXX:role/qbiz-XXXXXXXXXX-XXXX-secrets-manager-role
Attached arn:aws:iam::XXXXXXXXXXXX:policy/qbiz-XXXXXXXXXX-XXXX-secrets-manager-policy to role qbiz-XXXXXXXXXX-XXXX-secrets-manager-role
Created web experience: arn:aws:qbusiness:XXXX:XXXXXXXXXXXX:application/XXXXXXXX-XXXX-XXXX-XXXX-XXXXXXXXXXXX/web-experience/XXXXXXXX-XXXX-XXXX-XXXX-XXXXXXXXXXXX
{
"ResponseMetadata": {
"RequestId": "XXXXXXXX-XXXX-XXXX-XXXX-XXXXXXXXXXXX",
"HTTPStatusCode": 200,
"HTTPHeaders": {
"x-amzn-requestid": "XXXXXXXX-XXXX-XXXX-XXXX-XXXXXXXXXXXX",
"strict-transport-security": "max-age=47304000; includeSubDomains",
"cache-control": "no-store, no-cache, no-cache",
"date": "Sun, 15 Sep 2024 23:32:11 GMT",
"content-type": "application/json",
"content-length": "881",
"connection": "keep-alive"
},
"RetryAttempts": 0
},
"applicationId": "XXXXXXXX-XXXX-XXXX-XXXX-XXXXXXXXXXXX",
"webExperienceId": "XXXXXXXX-XXXX-XXXX-XXXX-XXXXXXXXXXXX",
"webExperienceArn": "arn:aws:qbusiness:XXXX:XXXXXXXXXXXX:application/XXXXXXXX-XXXX-XXXX-XXXX-XXXXXXXXXXXX/web-experience/XXXXXXXX-XXXX-XXXX-XXXX-XXXXXXXXXXXX",
"defaultEndpoint": "https://xxxxxxxx.chat.qbusiness.xxxx.on.aws/",
"status": "ACTIVE",
"createdAt": "2024-09-15 16:32:11.455000-07:00",
"updatedAt": "2024-09-15 16:32:11.455000-07:00",
"title": "qbiz-XXXXXXXX-XXXX-web-experience",
"samplePromptsControlMode": "DISABLED",
"roleArn": "arn:aws:iam::XXXXXXXXXXXX:role/qbiz-XXXXXXXXXXXX-XXXX-web-experience-role",
"identityProviderConfiguration": {
"openIDConnectConfiguration": {
"secretsArn": "arn:aws:secretsmanager:XXXX:XXXXXXXXXXXXX:secret:XXXXXXXXXXXX",
"secretsRole": "arn:aws:iam::XXXXXXXXXXXX:role/qbiz-XXXXXXXXXXXX-XXXX-secrets-manager-role"
}
},
"error": {}
}
QBusiness auto subscription enabled for Q_BUSINESS
- Note the default endpoint for the Amazon Q Business web experience.
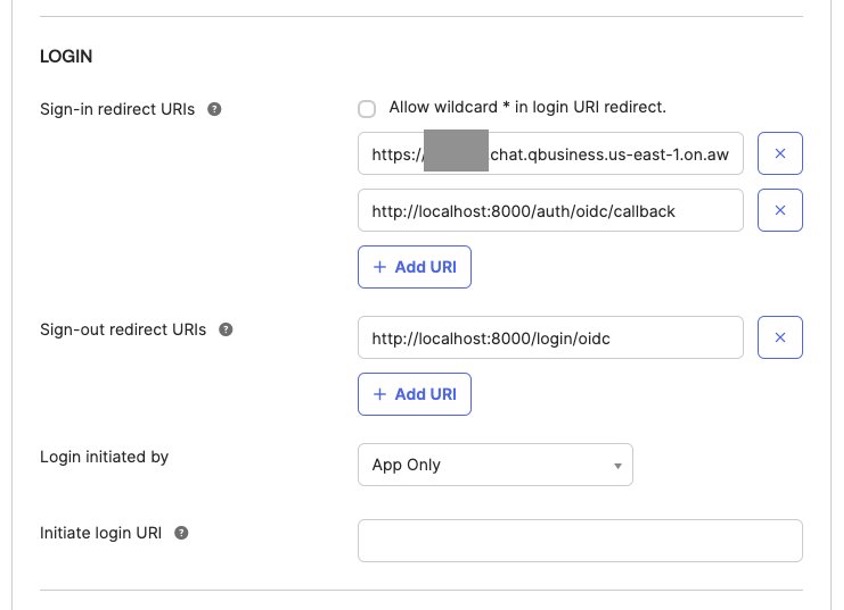
- You need to replace the placeholder of
https://example.com with the default endpoint by editing the General Settings of your IdP application integration, in the LOGIN section, under Sign-in redirect URIs, while verifying that the rest of the URI, such as /authorization-code/callback, stays as is.
- Add one more sign-in redirect URI of
http://localhost:8000/auth/oidc/callback that we will use in subsequent steps.
- Change the value for Sign-out URI to
http://localhost:8000/login/oidc.
- Choose Save.
Typically, the AWS administrator or Amazon Q Business administrator needs to request the IdP administrator to perform this step.
- On the Amazon Q Business console, choose the application you created to review the Application Details
- In the Web experience settings section, you can choose the link for Deployed URL to open the web experience in a new tab of your browser.
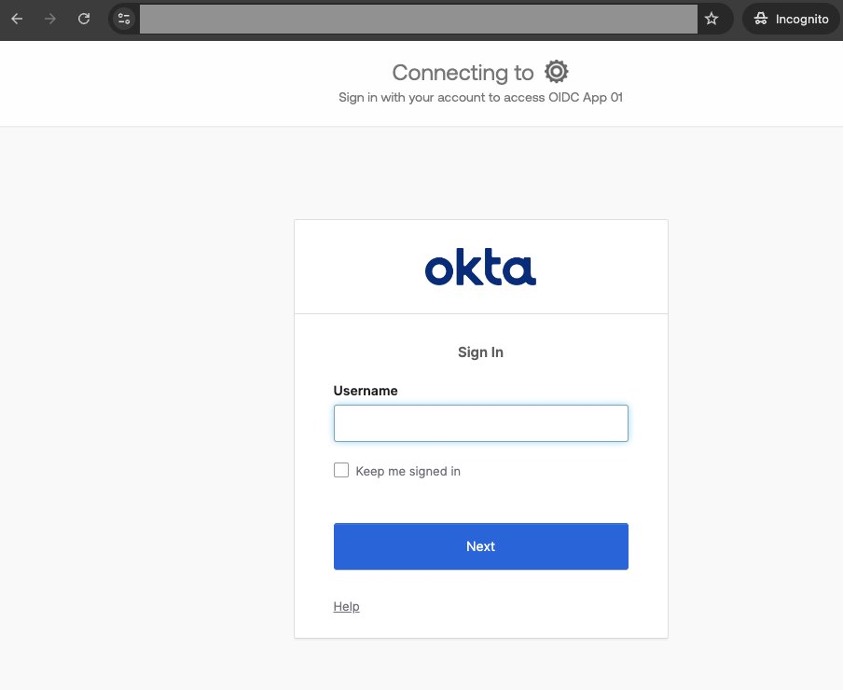
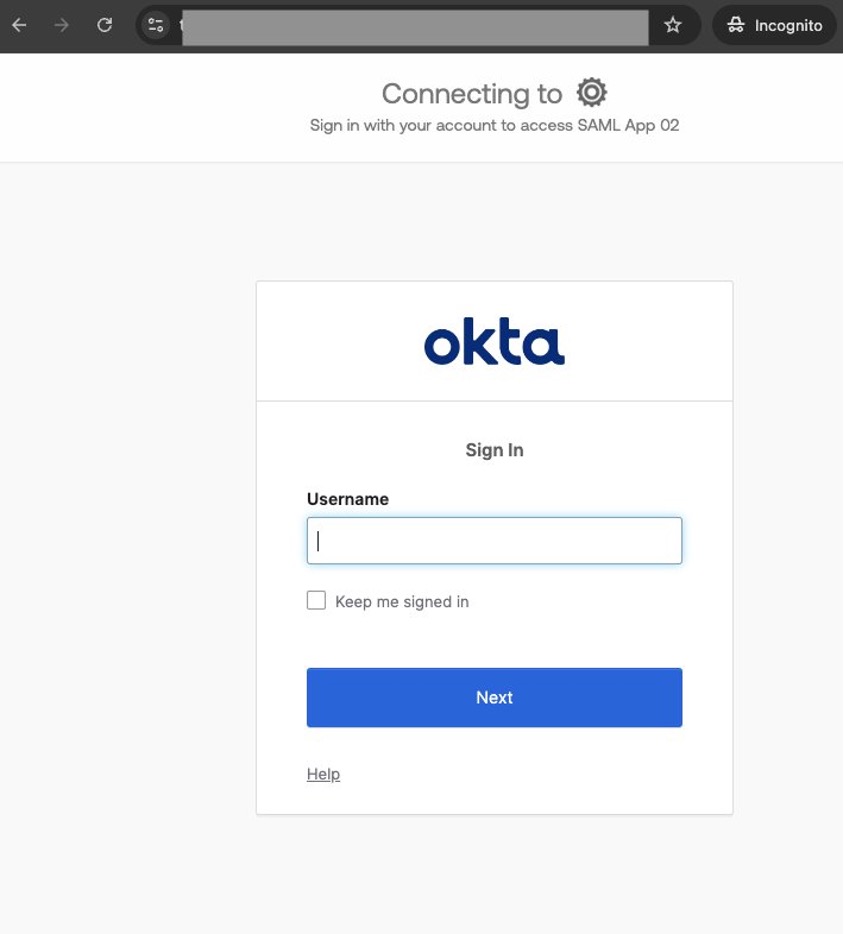
- On the Okta login page, use the credentials of a user assigned to the IdP application integration to log in to the web experience.
Deploy a custom application for authenticated users to obtain credentials to be used to make API calls to an Amazon Q Business application with an OIDC IAM identity provider
These steps are usually performed by a custom application developer:
- In the command line window for the Amazon Q Business developer persona, edit oidcapp-env.sh and replace the placeholders with the information from your AWS account and IdP application integration from the previous steps. Then run the shell script in your command line window to set the environment variables using the command source
./oidcapp-env.sh.
Take this opportunity to read the code in oidcapp.py and understand how it makes API calls to authenticate a user with the IdP, obtain the identity token for the authenticated user, and make the assume_role_with_web_identity API call to get AWS Sig V4 credentials, which include the identity information of the authenticated user.
export OIDC_CLIENT_ID="<REPLACE-WITH-YOUR-IDP-OIDC-CLIENT-ID>"
export OIDC_CLIENT_SECRET="<REPLACE-WITH-YOUR-IDP-OIDC-CLIENT-SECRET>"
export OIDC_DISCOVERY_URL="<REPLACE-WITH-YOUR-IDP-OIDC-DISCOVERY-URL>"

export OIDC_REDIRECT_URI="http://localhost:8000/auth/oidc/callback"
export LOGOUT_REDIRECT_URI="http://localhost:8000/login/oidc"
export OIDC_ROLE_ARN="<REPLACE-WITH-YOUR-WEB-EXPERIENCE-ROLE>"
- Run
python oidcapp.py in the command line window for the Amazon Q Business persona, where you have activated the virtual Python environment you created earlier. It will start a local HTTP server on port 8000.
Now you are assuming the persona of the end-user using the deployed custom application.
- Open a new incognito window on your web browser.
This will make sure that your sessions with the AWS Management Console and Okta continue in the regular windows of your browser.
- Browse to http://localhost:8000/.
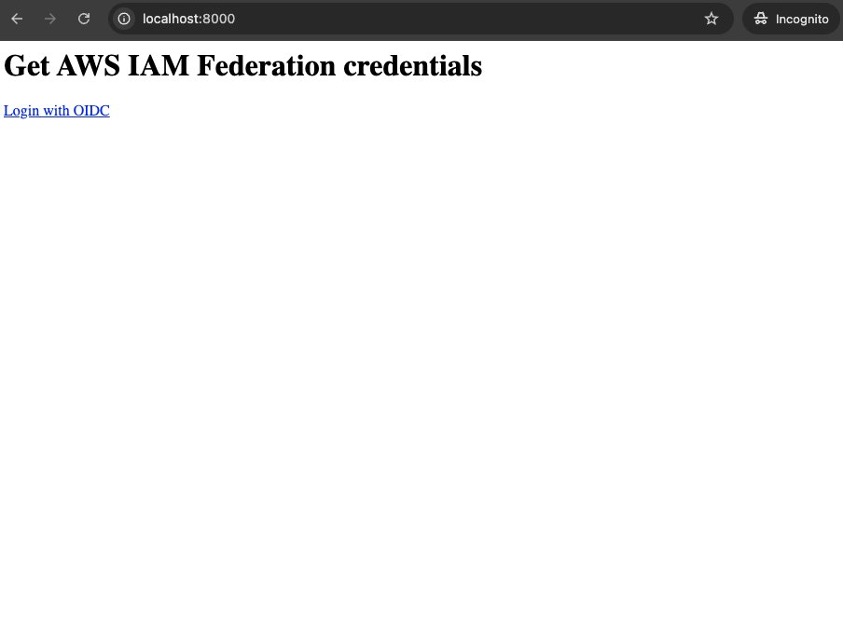
- Choose Login with OIDC.
- Log in using the credentials of a user assigned to the OIDC application integration.
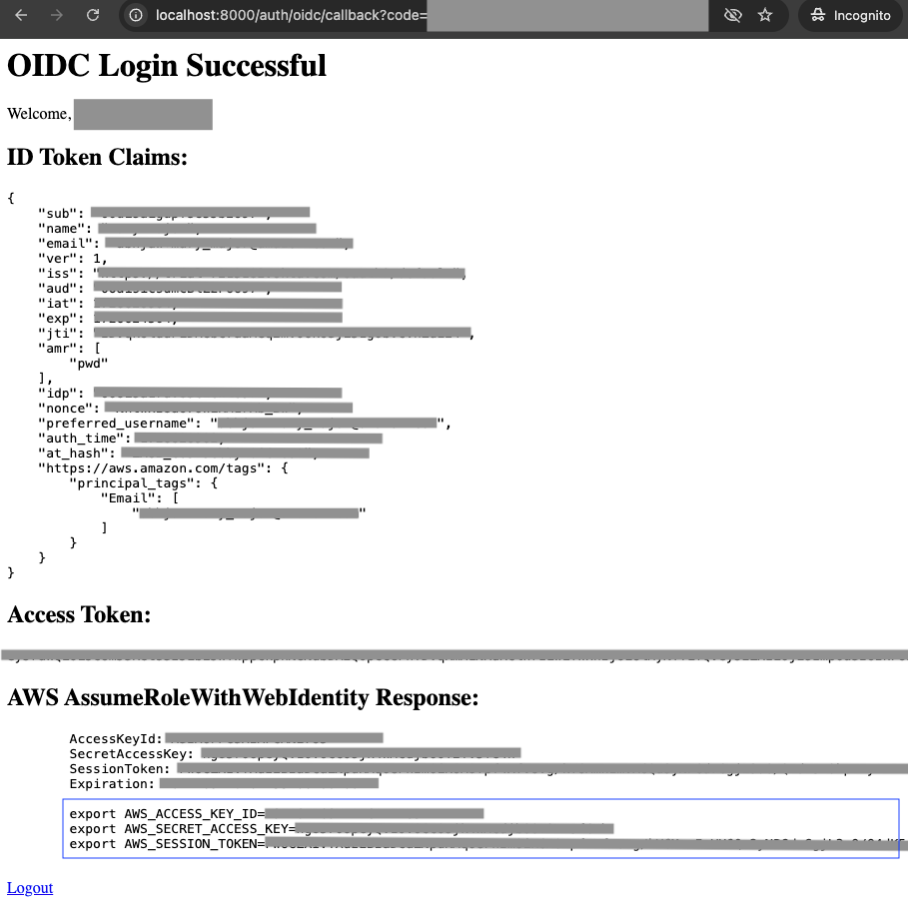
On a successful login, you will see a page similar to the following screenshot. The AWS AssumeRoleWithWebIdentity Response section has the AWS Sig V4 credentials including the identity information of the authenticated user.
- Copy the three lines starting with export.
Later, you will enter these into a command line window with the AWS CLI and SDK for Python installed, and then run the script simple_aq.py from that window, which will use the API to interact with your Amazon Q Business application.
Create an Amazon Q Business application with a SAML IAM identity provider
To set up an Amazon Q Business application with a SAML IAM identity identifier, you first configure the Okta application integration with SAML. Then you use create-iam-saml-qbiz-app.py, which automates the following:
- Creating an IAM identity provider for that SAML app integration for the Amazon Q Business application.
- Creating IAM policies and roles needed to deploy the web experience of the Amazon Q Business application.
- Deploying the web experience for the Amazon Q Business application.
After that, you will update the Okta application integration with the web experience URIs of the newly created Amazon Q Business application.
Create an Okta application integration with SAML 2.0
Complete the following steps to create your Okta application integration with SAML 2.0:
- On the administration console of your Okta account, choose Applications, then Applications in the navigation pane.
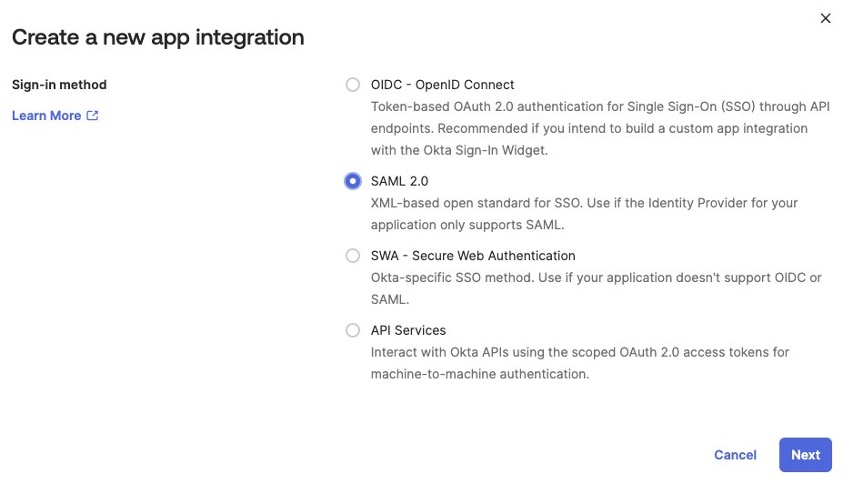
- Choose Create App Integration.
- For Sign-in method, select SAML 2.0.
- Choose Next.
- On the General Settings page, enter an app name and choose Next.
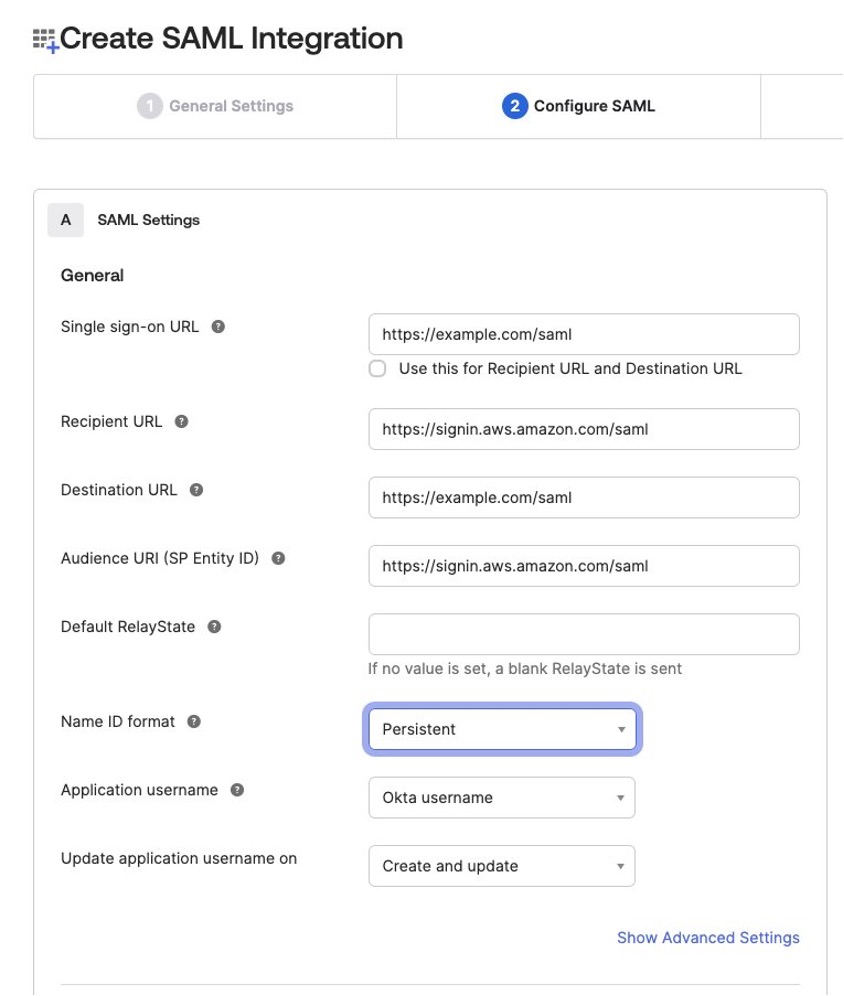
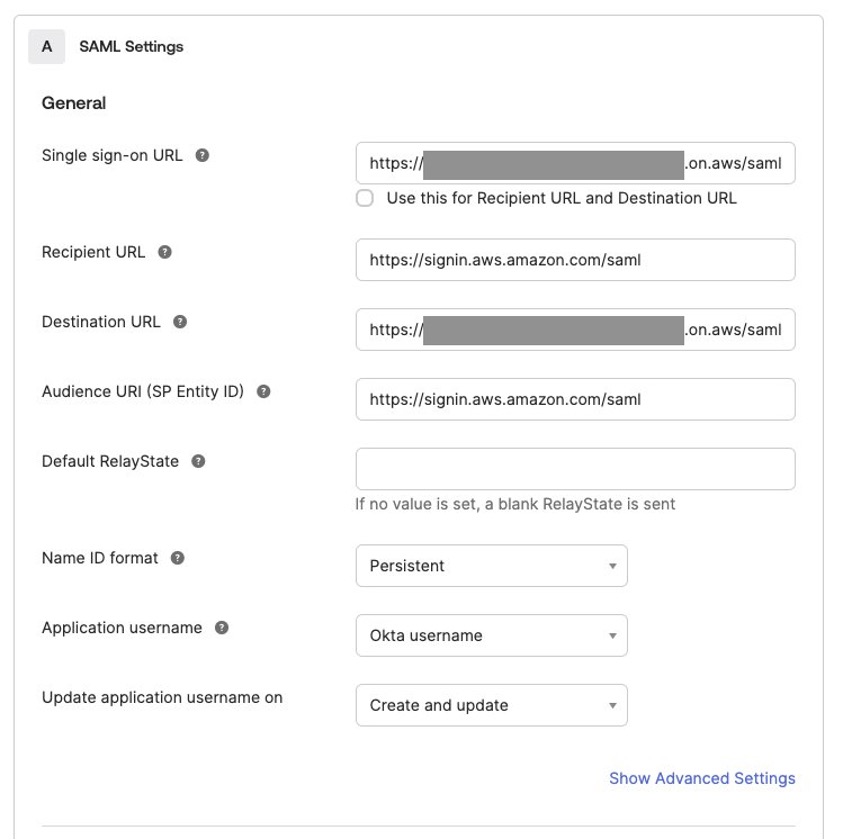
This will open the Create SAML Integration page. In the following steps, the URL https://signin.aws.amazon.com/saml is the AWS sign-in service endpoint based in the us-east-1 Region. AWS recommends using Regional sign-in service endpoints specific to the Region where you will create your Amazon Q business application.
- For Single sign-on URL, enter a placeholder URL, such as
https://example.com/saml, and deselect Use this for Recipient URL and Destination URL.
- For Recipient URL, enter
https://signin.aws.amazon.com/saml.
- For Destination URL, enter the placeholder
https://example.com/saml.
- For Audience URL (SP Entity ID), enter
https://signin.aws.amazon.com/saml.
- For Name ID format, choose Persistent.
- Choose Next and then Finish.
The placeholder values of https://example.com will need to be updated with the deployment URL of the Amazon Q Business web experience, which you create in subsequent steps.
- On the Sign On tab of the app integration you just created, choose View SAML setup instructions.
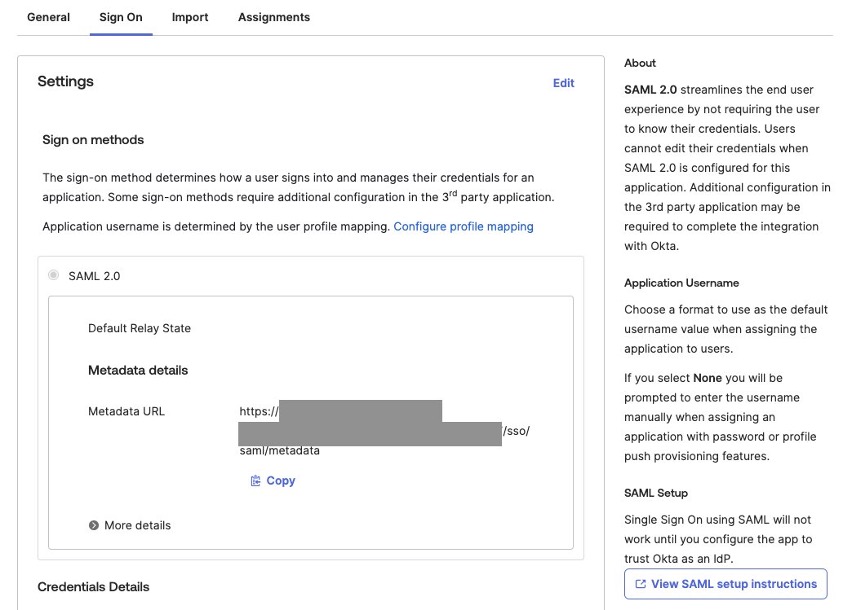
- On the How to Configure SAML 2.0 for <YOUR-APPLICATION-INTEGRATION-NAME> Application page, copy the values of Identity Provider Single Sign-On URL, Identity Provider Issuer, and the IdP metadata and keep them in a temporary text file on your computer. You will need to use them in subsequent steps.

Create the SAML IAM identity provider, required IAM roles, and Amazon Q Business application
Complete the following steps:
- In the command line window for the AWS administrator persona, edit
saml-qbiz-app.sh and replace the placeholders with the information from your AWS account and IdP application integration in the previous steps. Then run the shell script in your command line window to set the environment variables using the command source ./saml-qbiz-app-env.sh.
Take this opportunity to read the code in create-iam-saml-qbiz-app.py and understand how it makes API calls to create the SAML IAM identity provider, Amazon Q Business application, retriever and index for the Amazon Q Business application, IAM roles required for the Amazon Q Business web experience, and Amazon Q Business web experience, and then enable auto subscription to the Amazon Q Business application.
read -r -d '' SAML_METADATA_DOCUMENT <<METADATA_EOF
<REPLACE-WITH-SAML-METADATA-DOCUMENT-FROM-YOUR-IDP>
METADATA_EOF

export SAML_METADATA_DOCUMENT
export IDP_SSO_URL="<REPLACE-WITH-YOUR-IDP-SSO-URL>"
export CUSTOM_ACS_URL="<REPLACE-WITH-YOUR-CUSTOM-APPLICATION-HOSTING-URL e.g. http://localhost:8000/saml>"

export AWS_ACCOUNT_ID="<REPLACE-WITH-YOUR-AWS-ACCOUNT-ID>"
export AWS_DEFAULT_REGION="<REPLACE-WITH-YOUR-AWS-REGION>"
export AWS_SECRET_ENCRYPTION_KEY="<REPLACE-WITH-YOUR-SECRETS-MANAGER-SECRET-STORING-IDP-CLIENT-SECRET>"
- Run
python ./create-iam-saml-qbiz-app.py from your command line.
You should see output similar to the following:
SAML Provider ARN: arn:aws:iam::XXXXXXXXXXXX:saml-provider/qbiz-saml-XXXX-id-provider
QBusiness Application ID: XXXXXXXX-XXXX-XXXX-XXXX-XXXXXXXXXXXX
QBusiness Index ID: XXXXXXXX-XXXX-XXXX-XXXX-XXXXXXXXXXXX
QBusiness Retriever ID: XXXXXXXX-XXXX-XXXX-XXXX-XXXXXXXXXXXX
Web experience policy: arn:aws:iam::XXXXXXXXXXXX:policy/qbiz-saml-XXXX-web-experience-policy
Web experience role: arn:aws:iam::XXXXXXXXXXXX:role/qbiz-saml-XXXX-web-experience-role
Attached arn:aws:iam::XXXXXXXXXXXX:policy/qbiz-saml-XXXX-web-experience-policy to role qbiz-saml-XXXX-web-experience-role
Created web experience: arn:aws:qbusiness:us-east-1:XXXXXXXXXXXX:application/XXXXXXXX-XXXX-XXXX-XXXX-XXXXXXXXXXXX/web-experience/XXXXXXXX-XXXX-XXXX-XXXX-XXXXXXXXXXXX
{
"ResponseMetadata": {
"RequestId": "XXXXXXXX-XXXX-XXXX-XXXX-XXXXXXXXXXXX",
"HTTPStatusCode": 200,
"HTTPHeaders": {
"x-amzn-requestid": "XXXXXXXX-XXXX-XXXX-XXXX-XXXXXXXXXXXX",
"strict-transport-security": "max-age=47304000; includeSubDomains",
"cache-control": "no-store, no-cache, no-cache",
"date": "Tue, 17 Sep 2024 02:48:49 GMT",
"content-type": "application/json",
"content-length": "771",
"connection": "keep-alive"
},
"RetryAttempts": 0
},
"applicationId": "XXXXXXXX-XXXX-XXXX-XXXX-XXXXXXXXXXXX",
"webExperienceId": "XXXXXXXX-XXXX-XXXX-XXXX-XXXXXXXXXXXX",
"webExperienceArn": "arn:aws:qbusiness:us-east-1:XXXXXXXXXXXX:application/XXXXXXXX-XXXX-XXXX-XXXX-XXXXXXXXXXXX/web-experience/XXXXXXXX-XXXX-XXXX-XXXX-XXXXXXXXXXXX",
"defaultEndpoint": "https://XXXXXXXX.chat.qbusiness.XXXXXXXX.on.aws/",
"status": "ACTIVE",
"createdAt": "2024-09-16 19:48:48.903000-07:00",
"updatedAt": "2024-09-16 19:48:48.903000-07:00",
"title": "qbiz-saml-XXXX-web-experience",
"samplePromptsControlMode": "DISABLED",
"roleArn": "arn:aws:iam::XXXXXXXXXXXX:role/qbiz-saml-XXXX-web-experience-role",
"identityProviderConfiguration": {
"samlConfiguration": {
"authenticationUrl": "https://XXXXXXX.okta.com/app/XXXXXXX/XXXXXXX/sso/saml"
}
},
"error": {}
}
QBusiness auto subscription enabled for Q_BUSINESS
Before you can use the web experience to interact with the Amazon Q Business application you just created, you need to update the Okta application integration with the redirect URL of the web experience.
- On the Okta administration console, open the Okta application integration you created earlier.
- On the General tab, choose Edit next to SAML Settings.
- For Single sign-on URL and Destination URL, replace the placeholder
https://example.com/ with the value for the default endpoint URL of your web experience. Make sure the /saml suffix isn’t deleted.
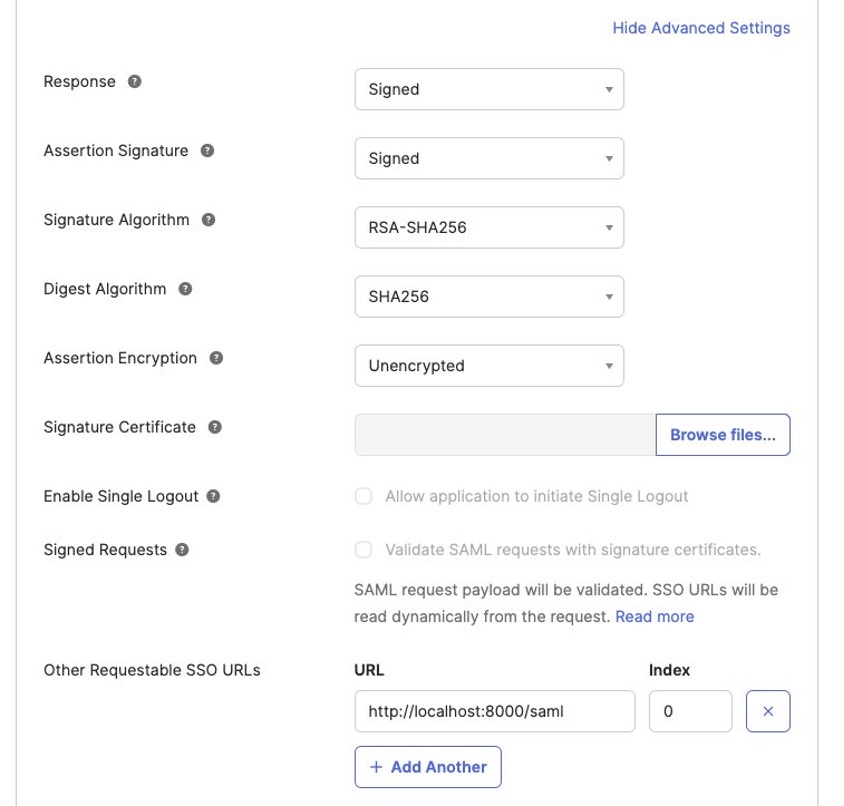
- Choose Show Advanced Settings.
- For Other Requestable SSO URLs, choose Add Another.
- Set URL to
http://localhost:8000/saml and Index to 0.
- On the Edit SAML Integration page, in the Attribute Statements (optional) section, add attribute statements as listed in the following table.
This step is not optional and these attributes are used by the Amazon Q Business application to determine the identity of the user, so be sure to confirm their correctness.
| Name |
Name Format |
Value |
https://aws.amazon.com/SAML/Attributes/PrincipalTag:Email |
Unspecified |
user.email |
https://aws.amazon.com/SAML/Attributes/Role |
Unspecified |
<Web experience IAM role ARN>,<identity-provider-arn> |
https://aws.amazon.com/SAML/Attributes/RoleSessionName |
Unspecified |
user.email |
For the value of the https://aws.amazon.com/SAML/Attributes/Role attribute, you need to concatenate the web experience IAM role ARN and IAM identity provider ARN you copied earlier with a comma between them, without spaces or other characters. You can add more attributes to enable Amazon Q Business response personalization. For more information, refer to Create and configure an Okta application.

- Choose Next and Finish.
- On the Assignments tab, assign users who can access the app integration you just created.
- On the Amazon Q Business console, choose the application you created to review the Application Details
- In the Web experience settings section, you can choose the link for Deployed URL to open the web experience in a new tab of your browser.
- On the Okta login page, use the credentials of a user assigned to the IdP application integration to log in to the web experience.
Deploy a custom application for authenticated users to obtain credentials to be used to make API calls to an Amazon Q Business application having SAML IAM identity provider
These steps are usually performed by a custom application developer.
- In the command line window for the Amazon Q Business developer persona, edit
samlapp-env.sh and replace the placeholders with the information from your AWS account and IdP application integration from the previous steps (as shown in the following code). Then run the shell script in your command line window to set the environment variables using the command source ./samlapp-env.sh.
Take this opportunity to read the code in samlapp.py and understand how it makes API calls to authenticate a user with the IdP, obtain an identity token for the authenticated user, and make the assume_role_with_saml API call to get AWS Sig V4 credentials, which include the identity information of the authenticated user.
export IDP_SSO_URL="<REPLACE-WITH-YOUR-IDP-SSO-URL>"
export IDP_ISSUER="<REPLACE-WITH-YOUR-IDP-ISSUER-URL>"
export CUSTOM_ACS_URL="http://localhost:8000/saml"  # Your AssertionConsumerService URL
export WEB_EXPERIENCE_ROLE_ARN="<REPLACE-WITH-YOUR-WEB-EXPERIENCE-ROLE-ARN>"
export IAM_IDENTITY_PROVIDER_ARN="<REPLACE-WITH-YOUR-IAM-IDENTITY-PROVIDER-ARN>"
- Run
python samlapp.py in the command line window for the Amazon Q Business persona, where you have activated the virtual Python environment you created earlier. It will start a local HTTP server on port 8000.
Now you are assuming the persona of the end-user using the deployed custom application.
- Open a new incognito window on your web browser.
This will make sure that your sessions with the AWS Management Console and Okta continue in the regular windows of your browser.
- Browse to
http://localhost:8000/.
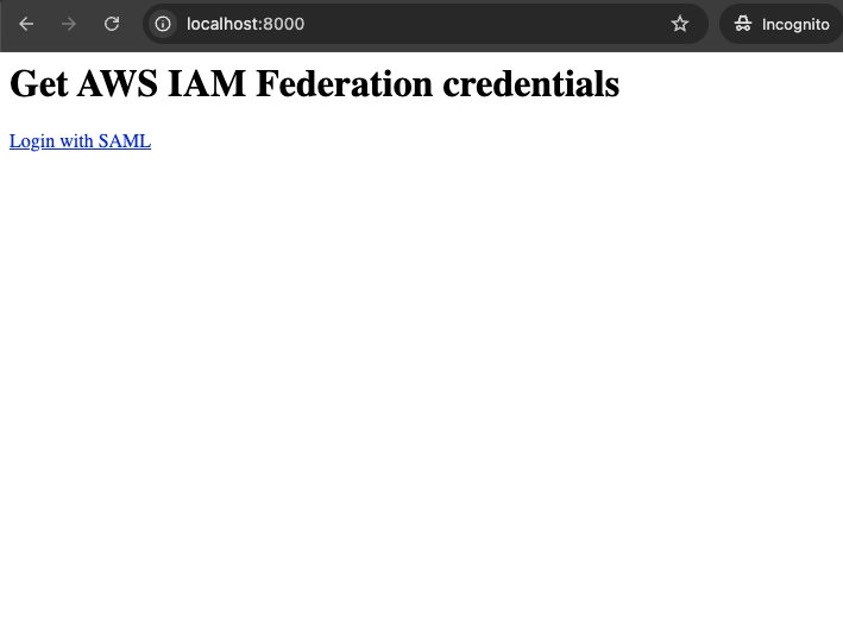
- Choose Login with SAML.
- On the login page for Okta, log in using the credentials of a user assigned to the SAML application integration.
On a successful login, you will see a page similar to the following screenshot. The AWS AssumeRoleWithSAML Response section has the AWS Sig V4 credentials including the identity information of the authenticated user.
- Copy the three lines starting with export.
Later, you will enter these into a command line window with the AWS CLI and SDK for Python installed, and then run the script simple_aq.py from that window, which will use an API to interact with your Amazon Q Business application.

User interaction with the custom application implementing conversational APIs to interface with the Amazon Q Business application
Whether you created the Amazon Q Business application using an OIDC IAM identity provider or SAML 2.0 IAM identity provider, you will first need to index some content. You can use Amazon Q Business data source connectors to connect with your enterprise content repositories and index that content along with the access control information to your Amazon Q Business application. For illustration purposes, we use the Employee AI assistant use case from the earlier post Build private and secure enterprise generative AI applications with Amazon Q Business using IAM Federation. Refer to the Set up the data source section in the post to understand the details of how the Confluence data source is configured to index Confluence spaces to the Amazon Q Business application.
You can use the following steps to interact with the Amazon Q Business application you created earlier using the simple_aq.py script. Here you are assuming the persona of the end-user.
- Use a command line window installed with the AWS CLI and SDK for Python.
- Use
oidcapp.py or samlapp.py deployed by the developer persona to authenticate as a user and obtain AWS Sig V4 credentials containing identity information.
- Edit the script
simple_aq.py and replace the placeholders with the details of your Amazon Q Business application and the queries you want to issue.
Take this opportunity to read and understand how the chat_sync API is used with the underlying Amazon Q Business application. The chat_sync API call doesn’t have an explicit parameter for the user ID. The identity information for the authenticated user is included in the underlying AWS Sig V4 credential and is passed on to the Amazon Q Business application by IAM federation.
AWS_REGION='<REPLACE-WITH-YOUR-AWS-REGION>' #Replace with the AWS region where your Amazon Q Business application is created
QBUSINESS_APPLICATION_ID='<REPLACE-WITH-YOUR-AMAZON-Q-BUSINESS-APPLICATION-ID>' #Replace with the application id of your Amazon Q Business application
queries = [ #Replace with queries appropriate to the content you indexed.
"REPLACE-WITH-QUERY1", #For illustration we will use 'what is the checklist of new team member onboarding activities?'
"REPLACE-WITH-QUERY2"  #For illustration we will use 'who are the project team members?'
]
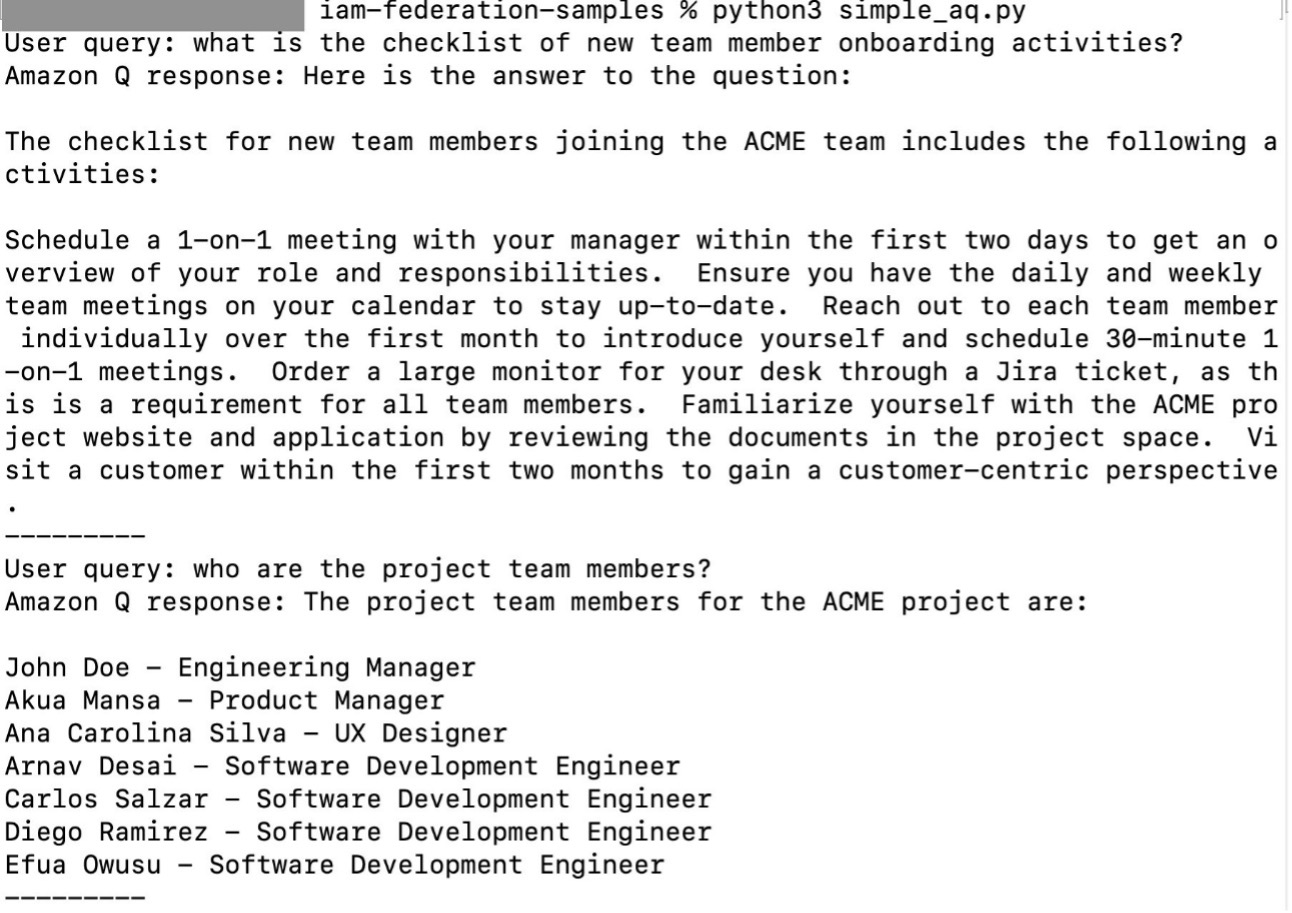
- Run the script using the command
python simple_aq.py.
The following screenshot illustrates running the script using the Sig V4 credentials of user Mary Major. When you run simple_aq.py with a particular user’s credentials for the first time, you will see the error An error occurred (AccessDeniedException) when calling the ChatSync operation: Exception occurred for requestId: 4ad66cea-c3b2-47c6-ac08-f621e0ded2c1 with message: User does not have a subscription for the given application. This is expected, and the user is automatically subscribed to the Amazon Q Business application on this call. Run simple_aq.py again with the same credentials, and you will get the expected response.
The following screenshot illustrates another run using the Sig V4 credentials of user Mateo Jackson with the same queries.
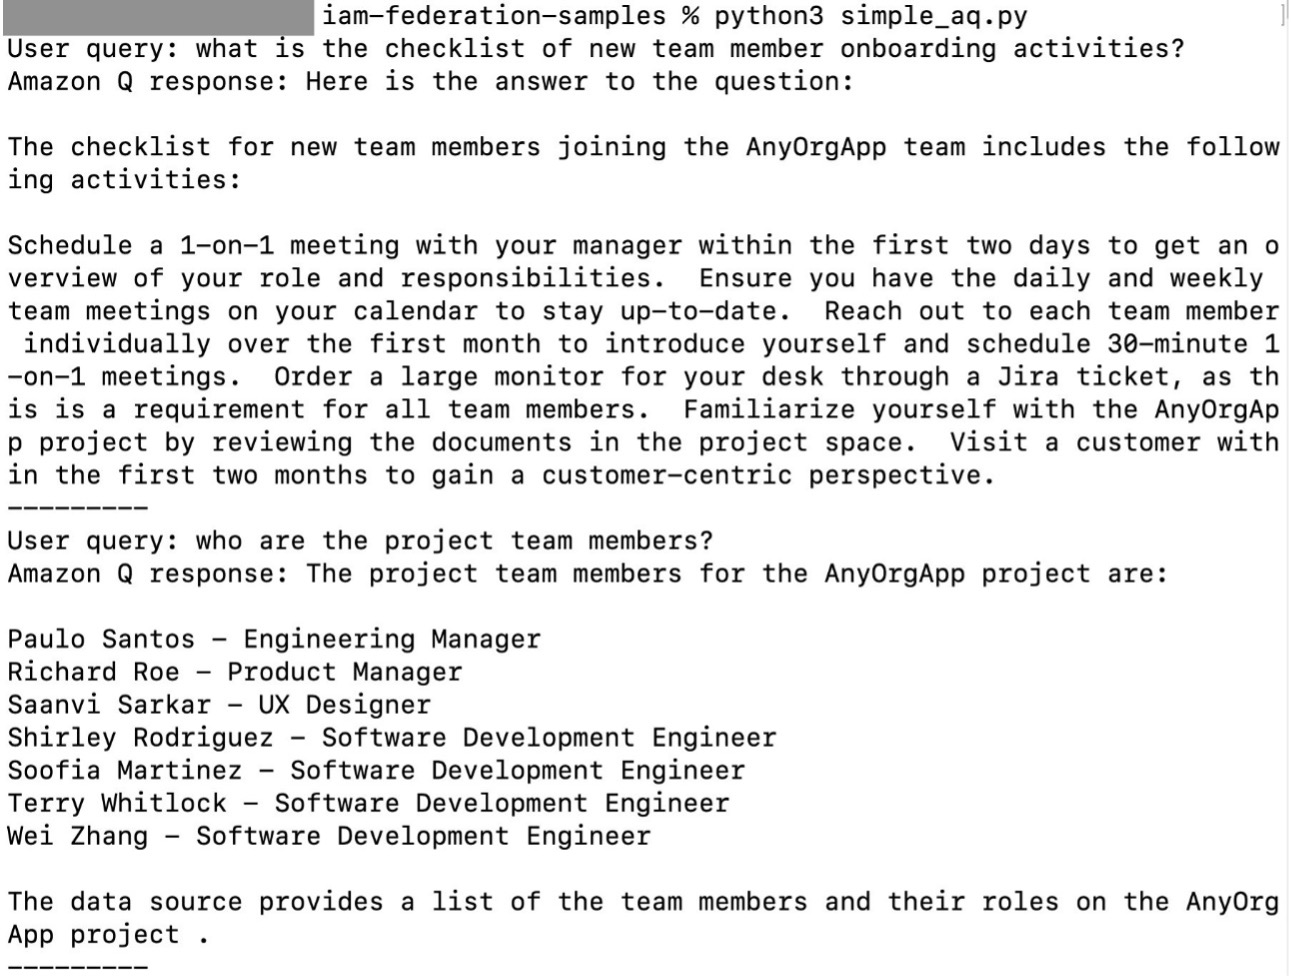
Observe the difference in the outputs when run using the credentials of two different users. When using the credentials of user Mary Major, the query responses are about the ACME project, whereas when using the credentials of user Mateo Jackson, the query responses are about the AnyOrgApp project. This is due to the differences in their authorization to access project information. The user Mary Major has access to the Confluence space for the ACME project, and doesn’t have access to the Confluence space for the AnyOrgApp project, whereas the user Mateo Jackson has access to the Confluence space for the AnyOrgApp project, and doesn’t have access to the Confluence space for the ACME project.
Clean up
If you created a new Amazon Q Business application to try out the integration with IAM federation, and don’t plan to use it further, you can unsubscribe, remove automatically subscribed users from the application, and delete it so that your AWS account doesn’t accumulate costs. Also delete the Secrets Manager secret you created to store the IdP application integration client secret.
Although they don’t accumulate costs, as a best practice remove the IAM identity providers, IAM roles, and policies that were created by create-iam-oidc-qbiz-app.py and create-iam-saml-qbiz-app.py.
Conclusion
For enterprise generative AI assistants such as the one shown in this post to be successful, they must respect access control as well as assure the privacy and confidentiality of every employee. Amazon Q Business helps achieve this by integrating with IAM Identity Center or with IAM federation to provide a solution that authenticates each user and validates the user identity at each step to enforce access control along with privacy and confidentiality.
In this post, we showed how to use APIs to build and deploy custom applications to create and interact with Amazon Q Business applications using IAM federation with OIDC or SAML IAM identity providers. We also saw how different personas, namely IdP administrators, AWS or Amazon Q Business administrators, custom application developers, and end-users use Amazon Q Business APIs through the lifecycle of an Amazon Q Business application and the custom applications to create and build Amazon Q Business applications.
To learn about how to use APIs to work with Amazon Q Business applications using IAM Identity Center for user access management, refer to Configure Amazon Q Business with AWS IAM Identity Center trusted identity propagation.
About the authors
 Abhinav Jawadekar is a Principal Solutions Architect in the Amazon Q Business service team at AWS. Abhinav works with AWS customers and partners to help them build generative AI solutions on AWS.
 Zia Seymour is a Generative AI Specialist Solutions Architect focused on Amazon Q. Zia works with AWS customers to understand their Generative AI needs and help them in their Generative AI journey on AWS.

